We can't find the internet
Attempting to reconnect
Something went wrong!
Attempting to reconnect
Analysis Summary
Worth Noting
Positive elements
- This video provides a comprehensive look at how a highly customized Linux environment can be unified through consistent styling and custom scripts.
Be Aware
Cautionary elements
- The presentation minimizes the inherent fragility and maintenance burden of running a 'micro-forked' and highly customized Arch-based system.
Influence Dimensions
How are these scored?About this analysis
Knowing about these techniques makes them visible, not powerless. The ones that work best on you are the ones that match beliefs you already hold.
This analysis is a tool for your own thinking — what you do with it is up to you.
Related content covering similar topics.

CachyOS 260308 | Zenclora 2.0 | Nyarch 25.04.4 | PelandukOS 2026.03.03
DistroTester
EndeavorOS - An Arch Distro Made Easy #linux #linuxdesktop
Learn Linux TV
Omarchy: The Unified Menu System
David Heinemeier Hansson

I Used Linux for 8 Years: Here's What They Don't Tell You
Chris Titus Tech

Why I Won't Be Using Omarchy
The Linux Cast
Transcript
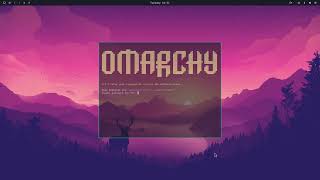
Umi is a modern Linux distribution built on top of Arch Linux and Hyperland, the tiling window manager to create an absolutely gorgeous and fast system primarily for developers or anyone interested in a pro system that takes a little time to learn and to set up, but that will pay dividends in terms of speed of use, in terms of fluidity, in terms of simply enjoying your system like nothing else. I came from the Mac. I've tried to bring over the best of that world, combine it with the best of the Linux world, and come up with just something new that taps into all the exciting stuff that's been going on in Linux subcultures for quite a while now. Um looks like nothing else. Unless you've been browsing the R Unix porn forums on Reddit, this is a truly new and unique system for anyone who's been used to commercial operating systems or mainstream Linux distributions like Ubuntu Fedora. So, let me take you for a ride. Let me show you how Umachi works and I think you're going to like it. So, this is how Umachi greets you when you've just started up your new installation. As you can see, it is quite bare. There are no icons to click on. There are no files on the desktop. There's just a beautiful backdrop to the Tokyo night default theme. The first thing I'm going to do is show you how to start a terminal. So, that is super enter. That simply pops up the terminal for you right here. We can do an ls. Um, it has a nice little starship prompt. So, if I hop in and out of directories, I get the little prompt here going. And if I hop into Omachi for example, you can see it even shows you the GitHub status. But if I open a browser here on Superb B, you'll see that the magic of tiling window managers. It just slides in on the right. And if I hold down super shift and I push the arrow key, I can send them back and forth. If I hold down super J, then I can switch them vertically or horizontally. And of course, I can keep doing this. is if I start another terminal uh on super return, I get it right below. If I close things out, it grows back to full screen. I can open any other program. For example, on Super T, we have the activity monitor from BTOP. Always a favorite. When anyone wants to take a picture of their cool Umachi desktop, it just looks beautiful when you need to see it. What also looks really beautiful in Umachi is web applications. We have baked a bunch of them in in a beautiful frameless way. If you hit super A, you get an AI. I use GPT5. If you hit super W, that's how you close a window. And if I hit uh super shift A, I get Grock. We have a bunch of different web applications. I also have X here on Super X. Always a bit dangerous opening this in the middle of a video. Now that looked all safe, people getting excited about RailsWorld 2025. Excellent. What I really like is when you combine these two things together. When you have the two ees and you have the web applications just living side by side with none of the chrome, none of the ugliness. It's just a beautiful way to do computing because there really aren't a lot of so-called native applications on um by far the majority of things you will do on Amachi will be done through the terminal with the tuis. it'll be done through web applications. But there are all these ways you can start things with the keyboard. I've shown you uh super A to start the AI and super T to start the activity monitor. But if you're starting any other application, you can also hit super space and you will get the launcher. Um there's a bunch of applications built in by default. For example, Base Camp here. We got um Brave, which is the new browser I'm trying out. It's not one of the defaults. Maybe it will be one day. There's a calculator here from Gnome. This is actually one of those native applications. I don't totally love it. I think we're going to use a new calculator in a future version, but that's what's here for right. But what's really neat is that the entire system is controlled through the UMachi menu. You can either get to the imachi menu by clicking up the imachi icon up here and you'll see it or as you'll see if I hover over it on super alt space you hop into the menu and from the menu you can do everything. You can even hop into the launcher as we had on super space or you can start diving into the submen and let me show you a few of them. Learn for example is where we have everything lined up for you to explore the system to learn the system to learn the individual components. If I hit keybindings here you will see a nice way of just getting a way of seeing all your key bindings. For example, if I forgot how to do that terminal, I can just start writing it. Oh, it's on super return. But let's keep going here down through the learning. You also have the omachi manual. It's a great place to learn about how to set up the system, how you install the system, how you configure the system. I make quite the effort to ensure that it's always up to date with the latest versions. And if you're feeling more curious about how everything is set up, you can hop back out on the index here with all the manuals for Amicon and you can read a little bit about the philosophy, the doctrine of how all the Amicon setups and Amachi is um steered from a philos philosophical perspective. But let's hop back in under learn and see. You'll also find the Hyperland wiki which is a great way of learning how to configure your system, what all the variables and key bindings and whatever else is. You have the Arch Linux um wiki as well, which is a treasure trove when you're trying to figure out how to install something, especially on more ancient systems. There's a great guide in there on getting up and going on older MacBooks. And as you can see now, I'm not actually using the arrow keys to go back and forth. I'm just typing. And that is one of these magical things about the umi menu. You just start typing the things you want to learn about. I'm here. I want to check out the neoim key map bindings. Okay, that's where I am. I'm going to hit super W. I close it back out. I can hop back into the menu. It's really fast to do it this way. Now, under capture, you have a few different things for doing screenshots and screen recordings. You can even grab a little color picker here. All of these things are also accessible on key bindings. Super K, you'll see all those key bindings. For example, if we're trying to figure out the different ways we can do screenshots. We can just start typing here and you'll see, oh, control print is how I start the screenshot of a whole display. And print alone is just a region. Actually, let me do this. I'm going to hit the print button. I'm going to do a little screenshot here and you'll see it pops up into this nice little editor where we can uh draw some errors here and point out that the sun is really the most important thing in this picture. You can either escape out if you want to discard it or just hit return and it'll save to your clipboard and to the file system. But let's keep going here and jump into toggles. For example, on toggle you can toggle the screen saver on and off. Whether you want that starting after two and a half minutes of inactivity, you might want to turn that on if you're on a power strain system or if you're running on battery. It is quite the show. I should actually show you the show. Let me show you the show. Let me show you the sizzle here. You can exactly also start it by jumping down to system menu. And now, isn't this pretty cool? These are all these wonderful different effects out of the Python terminal text effects library. We're simply just playing through all of them. I love looking at this kind of setup. It's just running into terminal and you can stop it at any time on any key. But it is a beautiful addition to the Umachi setup. But let's keep going through the menu and I will show you everything else that you can set up. As I said, under toggle, you can toggle on and off the top bar. If you're restrained on vertical space, you can turn on and off the idle log. And there's even a nightlight to get that nice orange glow if you're sitting in front of your computer in the middle of night. But let's hop in here under style and I will show you themes. Themes are super cool because but before I do that, let me actually just open a couple of application. I'm going to open my browser here and I'm going to open uh Btop and then I'm going to hop back into the style menu under themes and we're going to change themes to something else. Let's actually take something one of my favorites here, Osaka Jade. And boom, the whole thing simply changes over. Everything is synced together. If I hop in here, I close this out and I hop into a terminal. I'll show you. Neov is also tied into this setup such that Neoim is styled with the correct theme that matches that. We're styling the browser. We're doing it live. That actually required a whole micro fork of Chrome to get it done. But we got it done. Everything is tied together such that these themes will just update everything. Now if I hop back out and I show you the Vtop you can also jump directly to this menu by pushing super control shift space and you will get that. And we can do a light theme for example here on rose pine. That's kind of neat. You see the backgrounds here a bunch of different backgrounds. If you hit control super space, you can cycle through them. On most of the themes, we have a handful of backgrounds, not on all of them. We will soon have that as well. But uh on some of these themes, look at that omachi on the background. Let me hop over on another theme here. We have two of the white ones we or light ones, I should say. Capuccin Latte. We have some beautiful green ones. Everforest here, for example. Nice moody one. Um what else do we have? We have a a really cool wristto brown theme that I really like. Let me actually show you it with the browser here. It's neat to see that just altering at the same time and really proud of it because it required this micro fork and that wasn't easy to do, but we have it set up. Um, Nord is also a nice uh a nice favorite here. It also has a nice alternate background. Um, so that's the themes, but you can change more than just the themes. If we hop back into the menu, we hop down to style. You can also change the font. I have a few extras installed here. But by default, we also installed the Jet Brains monof for example. It is quite a popular one. As you see, subtle, but it changed. Now you're into the menu. And this is running the Jet Brains font. I actually prefer the Cascadia Mono that I run for everything. So, let's hop back to that. But you can hop back and forth between these fonts super easily. You can also style your own screen saver here. If we hop into this and you want to put in your own ASI art, if you change this file and you save out, by the way, that is Neo Vim, so you're going to use colon WQ. That'll save and then quit, you will have the new logo on your own personal screen saver. Isn't that neat? You can actually do the same thing with the about screen. You can change the omachi icon here. And if you do and you hop down to about, you'll see it displayed right here with your own setup. This is one of those things that's really magic about Omachi. It's really magic about Linux in general that this is your operating system. All of this is just open source. You can hop in at any time if you want to look around and see how things are done. You can hop to the Umachi path. You can start your neovim editor and you can simply just start browsing and look at oh I wonder how the the screen recording is done for example. All of this is done in bash almost all of it. And it is really easy to look. I would not recommend making changes directly in here in dimachi um setup because then you're going to deal with potential conflicts when you upgrade but you can certainly make all the changes inside of the config area. And we have actually hooked that up really neatly. If you hop back into the umachi menu and you hop down to setup, I'm just going to show you some of these other things. But if you hop down to config, for example, you'll see all the main configuration files are hooked up for you to jump into. These are the ones that live in your own home directory underconfig. So if we wanted to change the idle, for example, like how long should it take before the screen saver starts? We could make that 250 seconds instead of 150. I'm not going to do that. So, I'm just going to quit out. But if you do that from this menu, then the changes will be immediately apparent. So, let me actually show you that. I'll hop down to config. I'll hop down to the way bar. That's that top bar that you see up there. And let's say I don't really want the clock. I don't want the clock in here. So, I'm just going to remove that from the module center here. Pull that out. And now as soon as I quit, I can do that on space QQ. Boom. The clock is gone. Let's add it back though. I like the clock. So we hop back into the way bar and I'm just going to hit U here to restore it. And I'm going to quit out again. Now the clock is back. All of these configuration files right there for you to change. But let's keep going through the setup here because there's some curious stuff. We've been trying to lean into the whole TUI aesthetic. So a lot of these things are twies. If you hop in under the audio configuration, for example, and you can use tab to jump between the different segments. You can see here I have a cam link attached. I have my sure microphone and I can change these back and forth um on which are going to be the default. I can hit D here and the little diamond is going to move. I'm not going to do that because that's going to break everything off. I use my wonderful LXX2 speakers and I have those set as the default. So that's where you do that. And if you just hit Q, you will quit out. We can also set up our Wi-Fi. I have it set up here. You jump between the different sections on tab. And if you want to select a different Wi-Fi network, you hit space. If you want to turn it off and on, you hit space. And if you're on your station, you can hit S to start scanning for something new. You can also hit question mark and you can see all the different options that there are. And again, if you hit Q, you quit out. Bluetooth though is one of those exceptions. There is a Bluetooth TUI. I'm not quite sure whether I love it. So, if you hop into this one, you're actually just going to see a regular old guey interface. I think this might be the first one I've showed you. Beside the browser, so those still do exist. It is not like we've ripped out literally everything. You can set up your power profiles. This is not really that relevant on a desktop machine. I'm running my beloved framework desktop here, but if you're on a laptop, you can set it to balance mode or power saver as you please. Monitors, that's a really good one to take a look at because by default, Umachi is set up for retina class displays. So, that means the framework desktop display at 2.8K. That means something like a 5K 27 in or 6K 32 in. If you have something else in that, you're probably going to want to change how the monitor setup is because otherwise it's going to be too big. Here's a recommendation for running 4K monitors. Or here, if you're running a low 1080p or 1440p, you can comment these things out and then comment this in. And you'll see something else and quit out again on space Q. When you are changing these Hyperland configs, they also update immediately. That's very nice. And some of these other configs that you can change here is the key bindings, for example. I have all of these set up to the kind of web applications that I use. But if you want to change something else, you just hop in under key bindings here. But let's hop out of that. We're not going to change those changes either. Hop back into setup and uh input. That's a good one as well. If you want to change, for example, toggling between keyboard layouts. I am just on the US keyboard layout, but if I was using Danish one, I'll comment this out. the repeat delay, the touch pad if you're using that, the scroll factor. All of these things are just stuff you can change and I would very much encourage you check out the Hyperland wiki, see how everything is set up. Let's see what else do we have under setup here. Of course, you can also set up a fingerprint scanner or phto key on the framework desktop, for example, there's a fingerprint scanner and if you set that up, you can unlock after the lock screen and you can unlock on pseudo. It's really nice to do. As I said, all of these different setups of the default config files are in here. On the XCMPOS one, that's a good one as well. When you set up a Machi for the first time, you'll see that it'll ask you for your name and it'll ask you for your email address. And it's mainly using those to configure git so that you can make commits and they show up correctly. But it's also using it to do this. So, for example, if I opened a super N here, I'm gonna get a new lazy vim. And then I hit N again and I'm gonna be in insert mode. and I hit caps lock space N and it's going to insert my name. And if I do caps lock space E, it's going to insert my my email address. Let's do Clock W and then get that. Now, of course, you also have all of the emojis. That's actually the main reason this is set up. We can hop into the learn. We can hop in underachi here. See that? Scroll down a little bit and see hotkeys. I'm going to scroll all the way back to the bottom here. You have your quick emojis. So, I can do caps lock ms and I'm going to get a smile. Isn't that lovely? Speaking of emojis, you also have super control E and I'll bring up an complete emoji picker here. I'm going to pick a Danish flag. I'm going to insert that. So, let me show you something else. Let me show you how to install extra stuff onto your system. You go out to install here and we could just do a package. I just start typing and you get fuzzy find. You can see there's 19,000 packages to choose between and I find the one I want and I just hit return and it's going to ask me for my password here on the sudo and it'll simply just start installing it. It's going to take a little while. Well, not that long. I'm already done. And now if I do superpace and I start typing Visual Studio Code, I can launch that application right away and everything is set up. Isn't that easy? Isn't that just nice compared to going to some website and downloading something? I really like how this setup works. But you don't even have to use the package installer. By the way, here we have the AUR when they're available. You can also install packages from there. Let's see if we're lucky. Oh yeah, 100,000 packages almost on the AUR. That's pretty incredible. So between the AUR and the main Arch repository and the Machu repositories, you really have a lot of packages to install from, but you can install other things too. For example, you can install all these development environments. Set all of it up such that it is a one-click install. You want Ruby and Rails. You hit this one. Boom. Ruby and Rails gets set up with MIS to install Ruby. We use gem to install Rails. We have under PHP here, we have Laravel. We have Symphony. You hit escape, by the way, to go back one level. Under elixir, we even have Phoenix. We have all of these main programming environments. All of them are set up on a on a oneclick to go here. Let's actually install Go, for example. It's going to pull go down using MI. It uses MI for the majority of this. Not for all of it. There's a couple of them that have their own individual installers, but Go isn't one of them. It's just going to download it all down. And then boom, we're done. We have Go available in a terminal here. If I type go, there we go. Go. Hop back in. Look at the other things we can install under development here. As I said, we have all these. Oh, JavaScript, of course, not to forget, we have the three major ones, node and bun and dino. You can install any of the runtimes that you prefer. Docker DB is a fun one, too. So, if you hop into that, you can install some default setups for running these databases locally, having them available for testing right away. Let's do space here on my SQL and let's also do reddus. And then I hit return. I'm going to install those. They're just going to pull it down. We already have Docker on the system. And actually here I'm cheating because I already had these set up. I should have deleted those images. But let's actually see those set up on superd. You're going to jump into lacy Docker. And you can see that even though the images were installed, we have now started the two Docker images that I picked. The one for Reddus, the one for my SQL. You can stop it on S. Yes, I want to stop it. You can then delete it on D, including the volumes. And now it's gone from your system. We're going to stop that one as well. And we can delete that one, too. Great. I quit out again on that. Super W and editor. You see how I just installed VS Code? You can actually also install VS Code right here. You don't even have to know the name of the package and fuzzy find that. Um, actually, let me just show you that. So, if I jump back here and go down to remove, I go down to package. I have all the packages I've installed 200 on the system right now. That's a bit more than we installed by default. I'm just doing a little extra. But if I find Visual Studio Code here and say I don't want it. I just hit return. I enter my password and boom, that is now gone. If I go search for it, no, there's no Visual Code. Let me add it back. Install editor VS Code. Enter my password. And when you install it this way, we have this nice little extra that'll start the editor for you. Isn't that lovely? And again, if you don't want it, you go down to remove down to package Visual Studio. You see, it's just a package that installed for you. We can remove that from the system right away. And away it goes. As you can see in here under editor, we actually have quite a few different ones. We have cursor that's on the AUR. We have Z, Sublime Text, and Helix. Let's actually try Zed here. I've heard a lot of good things about that as well. I am a new Vim stand. That is the default in Umachi. But if you installed that right here, it is. And again, if that is not something that you want, you just remove it. It makes it super easy to try new packages out and be able to cleanly remove them from your system. We have more though. We also have a bunch of AI tooling. We could install LM Studio for example. I've tagged the ones that are on the AUR since the AUR sometimes have a little bit of problems with some ddozing. But if we install um LM Studio here Oh, my fat fingers on the password weren't quite right. Um it's going to pull it down. And you can see this is um actually an app image that's set up and inside of another package. And now I can hit LM Studio. It takes a second to start up. Just note that. But not that much of a second. And I am here on a system. I actually already had a setup on the system. So it found the config files that I already have. Let's see if it knows about Amachi. I don't think it will because Oh, we're just going to use the last year's model. We're going to I was testing GPT OSS 20 billion model or 20 billion parameter model here. Um, let's see if that works. What is Umachi? Does Does it know? It's going to boot it up. It's going to process the prompt and we hopefully will get an answer. It's a political theory. Oh my gosh, I've never seen this before. This is actually wonderful. That is kind of fun. Yeah, of course this is not searching on the internet like um like AI would do if we asked a live model here. What is Omachi? Let's see where Chat GBT has to say. Oh, it is up to date. It is your own largebased Linux distribution core identity opinionated Linux. Yes. Yes. Very nice. Here, let me show you what else you can install under AI. You can install um Gemini and Claude for example. Let's do Gemini here. Do I have that on the system already? I might already have it on the system. U or maybe I didn't. And we hop in here and we start Gemini in a browser. And boom, we're ready to go. As you can see here, the whole experience of installing something new on the system is incredibly quick because everything is just running off these packages. We've tied everything into one unified menu. That menu, by the way, even has gaming. You can game on Linux, you can game with Steam, you can game with Retro, and you can game with Minecraft by default. And of course, again, you can install any package. So you you want. So if there's something you don't find set up here in the defaults, you just install that. If you go under uh style, you can even install new themes. We can hop in here and see um if I start a browser here, all the extra themes. Let's move this window out of the way. By the way, we can do that in two ways. I can hold down super and then click and just drag. Or I can hold down super and hit W. That'll take it in and out of this um floating mode. That's quite nice. Let's scroll down and find one of the extra themes that someone has made. Um this Mars one looks interesting. Let's have a look at that. And we're going to copy the uh URL setup here. Going to paste that in. Remember when you paste into a terminal that is on control shiftV, not just controlV because Linux terminals use that as control key. So if you're coming over from the Mac, that is going to frustrate you for some time. But it's going to clone this down and voila, right away everything is simply set up and tied to that theme. And if I remove that, we have a nice picture of Mars. Let's go to Mars. Now, if I didn't want that, I can hop back into the Amachi menu. I can do go down to remove. I can go down to theme, and you see all the extra themes. Not the default themes, but the extra themes. If I remove that, boom, it removes. And then just jumps to the next theme. I think this is the matte theme we have. Let's hop back into style theme and pick something else. Let's just jump back to Tokyo Night. That's the default. It looks wonderful. Um, what else can you install under style? You can install your own backgrounds. So if I open this for example, I will see all the default background images. And if I open a another file manager here, I can go find my own image, throw that right in there next to the other backgrounds. And once it's in there, I can hit control superpace and I will simply be cycling through all the backgrounds that are in that folder. Under style two, you can install different fonts. I have actually hooked up some of the common fonts that require a package to install the fire code font. If we install that, it's going to pull down the package and it's also then going to set the font. We already had it. Boom. It has set it. And you see it changes it up here in the way bar. It changes it in the terminal. It changes anytime you use a mono font. But again, as I said, I really like looking at my Cascadia mono font. So, we're going to hop back to that. I think that was everything under style, wasn't it? Yep. One back out. Now, one that's really neat here is that all of these web apps that you have, you can just add your own. We built the entire system in here. And if you start it like this, and we do gh blog here to add a new one. And we're going to add my personal blog here on Hey World. And then we need an icon. Now, I'm suggesting dashboard icons here. That's perhaps not the one you want to use for my blog. I don't have a dashboard icon here for us to um look at. But if you were finding uh Blogger, for example, let's say I was hosting it on that, you could probably find that. Yep, you could. This is some vintage stuff right here. You go down and copy the PNG URL. And again, you need to use control shiftV to paste it in. Now, it has set up the blog. And you can find it on superpace. So, let's try to do that. Superspace dhh. Voila. There's my blog. And again, this is your own application. You can make that whatever you want. You can put in whatever icon you want. It lives right next to the system web apps that we have set up. Isn't that just lovely? There's no discrimination here. Your web application is going to look as good as any other. Hop back in under this. And you could do the same thing with tuis. You can set up any tuy that you would like to use here. We could do another one for lazy docker. Let's just imagine that we didn't have that. Um lazy dog. We can pick whether we want it to float or to tile. You see this window right here is floating. But if you just want it to tile to the side, you pick that. And again, we're going to pick a dashboard icon. And I'm going to make this one um tile for a second. We're going to find one for Docker here. I'm going to pick the Docker one and paste it in. And now I can find LCD that I had set up on my unique Docker icon. And there we go. Now if you hop into update here, this is where you will be updating Machi when there's a new release coming out. When there is a new release coming out, there will also be a little icon up here next to the clock and you can just hit that. It'll jump straight into the update process. But let's just run with scissors. Let's just live update Omachi right here. You can see Omachi is already up to date. But when we do this, it also wants to update the system packages. This is how you keep Arch up to date. There were actually a couple of new ones. There's even a new kernel. Do I want to reboot right now? Do you know what? I'm going to save that for just one second here. So, I'm not going to reboot this second, but that's the invitation if you want to do that. Under update, if you've messed with any of the configs and you want to restore them to the default, you can go in here and do that. Finally, you have the system menu. You can hop in here. You can start that beautiful screen saver we already looked at. You can lock your system. You can uh suspended relaunch hyperland restart shutdown. You also have a quick access to that just on super escape. I usually hit super escape return and then I've locked my system. Now, as I said, we also install a bunch of other default packages. You can learn about those if you hop in under the omachi menu in under learn in under um and you can go down here and check out what is there. We have obsidian for example. I use that to keep all my notes. You have Pinta and if you find an app like oh I want to check out what Pinta is you can just launch it here. Quick drawing app. We have local send. That's a replacement for AirDrop. It is really neat. Um start local send here. And if I have any devices I can quickly send to them. I can pick a file a folder text or paste or whatever. You can install clients on Android or on iOS. You have Libra Office for those times when you need to open a Word document or Excel spreadsheet or you want to just do some spreadsheeting or writing in that style. We have Signal, we have MPV for playing videos. You have Op Studio, that's what I record this on. And Caden Live, that's what I edit these kind of videos on. And as I said, you also have some um commercial guies installed by default. You have one password, that's what I use for all my passwords. Topora, which is a really neat writing tool that I use for all of my essays. Let me actually just show you that real quick. Topora here. What I really love is you see it like this. It looks nice. Then you hit F11. And now it's just writing bliss. There's literally nothing else on the screen here. Do I hit F11 again? I could jump out of that. So that's the basics of Omachi. It is a beautifully fully setup system ready for anyone to do production development work with everything you need from your editor to your AI to your development environment with all the configurations set up and done for you while leaving you free to change whatever you want to change. This is your system. This is not Mac OS. You don't have to beg Apple for something. This is not Windows. You don't have to beg Microsoft for anything. This is Linux. You get to change whatever you want to change. Now, let me show you how to actually install Omachi. Um now comes on an ISO. I'm going to show you here in a BM how to set that up. You download the ISO from the website. You get it onto a USB key and you plug it into your computer, make sure that secure boot is turned off, and then you simply boot from it. And it'll automatically hop into the Umachi installer. That'll first detect your network, and you'll ask answer a few questions. It'll enter your username here. Mine is DHH. It'll ask for a password. If you enter that password wrong, of course, you'll be let know that those don't match and that they have to match. And then you can enter your full name here if you want the GitHub um setup. I like to have that set up. And then of course you also get those autocomplete keys. I enter my email address and then a host name for the machine if you want to use that. I can just hit return and it's going to be called Umachi. Now you can filter down your time zone and enter your keyboard. And if everything looks correct, you can say yes, I want to proceed. Now you get to pick where you install this. And it's really important that you pick a drive that it's free. Um takes over an entire drive. There's no dual booting on a single drive. You can of course dual boot if you have two NVME slots in your machine. But otherwise, um make sure you pick the right one. Make sure you have a backup because as soon as I hit return here, it's going to override it. It's going to encrypt everything. It asks you one more time to confirm it. And by the time you're done with that, you're going to get the countdown to the big formatting. You could still quit out at this point, but now we're off to the formatting effort. It takes about a minute to format this on my one terabyte drive and lock things down with the default disk encryption, which will be unlocked by the password that you entered. We also use that password by default for setting up your user and uh going to root. So, make sure that you pick something you'll remember. And this is the thing about Amachi 2. Everything is set up to unlock with disk encryption and you hop straight into the system. And after that is going, we will have the Arch install under the covers. Install everything that you need for the latest version of Arch. That means you get the latest version of the Linux kernel by default. This is an online installer. So, you do need to be online. And of course, it helps if you are on a fast connection. I have a pretty fast connection here. And I can do a complete installation of Omachi in about um five minutes. That includes the one minute spent formatting the drive, another minute or so installing all of the Arch defaults, all of the Linux kernel and a lot of that stuff, and about two and a half minutes installing all of the packages that we need for Umachi. Now, you can see Arch is done installing. Um takes over and starts installing its own package list. There's about a hund and some packages and a bunch of dependencies. So depending on your connection that can take a while as well. But we will simply just power through this. It is all based on top of the Umachi package repository that we've set up for the default packages that we absolutely need and can't get through the arch core or extra repositories. It also leans on those as well. It does not depend at runtime on the AUR. So if that's having problems, you won't have an issue installing Umachi. And there you go. We are all done installing. You get this nice little animation. Remember to move your remove your USB installer and it'll reboot right away. It'll reboot straight into the disc encryption here. So you enter your password and it'll finish booting up. So this is a bit of Omachi inception. I'm now running Umachi inside of Umachi. That is all it takes to install it with the new online ISO installer. So that is Umachi. I hope you enjoyed checking it out. I hope you give it a go. I hope you experiment with it. I hope you realize that this is going to be an adventure. I hope you realize that this is not just autopilot. This is not a commercial operating system. This is a brand new Linux distribution that's only at this point been around for a few months. It already has thousands of people using it. Tons of excitement for it. I'd love to have you on board. I'd love to have you check it out regardless of whether you're getting a new machine to install it on and using something old. Linux is super efficient, so you can run it on almost anything and it'll run wonderfully. You don't need the latest and greatest to get it done. But, uh, if you do check out Framework, they have the Framework Laptop 13. That's my personal computer and they have the framework desktop that I love as well. If either of those two things don't work, then Beink is a great choice, too. They make really affordable mini PCs. Come join us. Come have fun in the Umachi world and join us on the Discord.
Video description
The full tour of Omarchy 2.0. See https://omarchy.org/ for more.