We can't find the internet
Attempting to reconnect
Something went wrong!
Attempting to reconnect
Daniel Amber · 12.9K views · 307 likes
Analysis Summary
Worth Noting
Positive elements
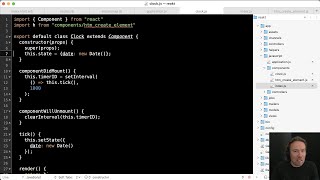
- This video provides a practical, step-by-step configuration guide for modern ClojureScript development, specifically solving common hurdles like React 18 'createRoot' integration.
Influence Dimensions
How are these scored?About this analysis
Knowing about these techniques makes them visible, not powerless. The ones that work best on you are the ones that match beliefs you already hold.
This analysis is a tool for your own thinking — what you do with it is up to you.
Related content covering similar topics.

ClojureScript Google Authentication using Firebase (with Re-Frame)
Daniel Amber

Firebase storage with ClojureScript (+ Re-Frame)
Daniel Amber
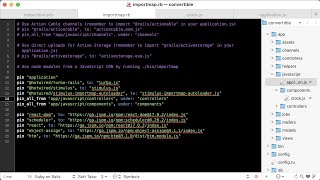
Alpha preview: Using React with importmaps on Rails 7
David Heinemeier Hansson
Alpha preview: Converting a import-mapped React app to use esbuild with JSX in Rails 7
David Heinemeier Hansson

Alpha preview: Rails 7 w/ esbuild + Tailwind CSS
David Heinemeier Hansson
Transcript
hey what's up guys in this video we're going to be turning our back enclosure application into a full stack app so let's get started [Music] cool so first off i'm going to be working off an api i made in the previous video and that's available in this github repo if you want to see how i made this you can watch the previous tutorial but we're going to be setting it up in this video so i'm just going to copy the link here and get clone this i'm going to clone it into short url app and essentially what this repo does is it's an api where we can post a url to it we get back a short code and natural code will allow us to redirect to the longer url so let's cd into short url app and open it in vs code so once we have that open we got some db credentials in our env.edn and i'm just going to create some new credentials to make sure it works so i used planet scale to make my database and i have this table inside of it the syntax to create this table will be in the description along with all the links and everything in the video so i'm just going to go back here and connect this database generate a new password cool copy these credentials go back to our project and use this for our env that should be all we need to do to run this project so i'm just going to start a project repo connect to devs.edn because it's a dev.edn project and let's go to db.clj and load and evaluate this current file and then we should be able to query so called geturl with our slug and it should return a url if you don't have this url you can insert it with this form here but now if we go to core.clj and load and evaluate this file and then run the server here we should be able to so it's running on port 3001 we should be able to go to localhost port 3001 forward slash abc and it should redirect us and it doesn't the server's not found because it's not thirty thousand at one three thousand and one and it's not localhost it's localhost cool it took a while to get there but we got there so now we have our project running let's add a front end for this so the libraries i'm going to be using are shadow cljs and shadows cljs will allow us to compile our closure script into javascript helix helix is a library which allows us to write basically react enclosure script if you're familiar with react then helix will look familiar to you and then we're going to be using tailwind css to style the application so i'm just going to close this github repo here because we don't need it anymore we don't need plan scale anymore we can get started by setting up shadow cls let's do that so what i'm going to do well the first thing i want to do is just separate our closure from our closure script i'm also actually well i served i'm going to stop this rep all so i'm going to stop the server and then i'm going to kill this ripple and then what i want to do is create a new folder in source called clj and this is going to house all our closure move that there then inside clj well inside source i'm going to make a new folder i'm going to call it cljs and inside of that i'm going to make a new folder called app and inside of that i'm going to make a new file called core.cljs and then i'm going to change the namespace to app.cool save this and i want to make an entry point well an entry function to our application so i want to define a function here called init and all this is going to do is console.log console.log houses and we are going to export this by creating some metadata and cool that's the same as like doing like a modules.export if you're confused about the syntax i've got a video for that which i'll links up this is just how we run console.log js has all the window functions attached to it so let's start by creating a shadow cljs eden file which will hold our config for shadow cljs new file shadow cljs.eden [Music] and this takes a map and obviously some keys and values so the first key i want to add is builds and this will define the builds for shadow cljs and i'm going to name the first build app and app text this takes in a map and the first thing i'm going to add is the target and the target is going to be browser because this javascript is going to run in the browser then we need an output directory and this is going to be where our javascript gets compiled to and that's going to be inside resources forward slash public forward slash assets for js and you'll see why just now then i'm going to define that entry point for our application so i want to say start at this point here so to do that all we do is we add a modules key then we need another key here i'm going to call it main this will be the name of the file that our closure script gets compiled to so we'll have a main.js sitting inside of resources public assets js after this is done and then we just need to tell it to have the initial function of app.core well in it inside the app.code namespace and that is that let's save that now let's define a development server so when we when we start the cljs we want a front-end server to start on let's say port 5003 so div http it's our development server and we wanted to start on port 5003 and then we wanted to serve this folder this resources public folder cool but now we want shadow cljs to actually start the ripple for our closure and our closure script which means we wanted to use the dependencies in our devs.edn file so there is configuration for that and i'm going to go to the shadow cls documentation to see how to do that so go back to shadows cljs the user's guide and then search for depths yep so build tool integration devs.edn um example with shadowcljs.edn with a cljs alias so this is exactly what i'm looking for i'm going to copy this out paste it here so this is saying use our devs.edn file and use the cljs alias in that file so we're going to create that alias and it's going to have the shadow clds dependency so let's go to depths.edn and add that alias and let's make sure our curly braces are right and i just noticed that this should be pause now we need to put the maven version in here so let's go back and see what the current version number is and it is 2.19.9 so 2.19.9 save that and i think we have enough to now start our ripple using shadow cljs so technically everything should work so if we go start a project ripple and instead of selecting devs.dbn we select shadow cljs we select the app build cool we get this warning but we'll solve that just now looks like everything is working just takes a bit of time cool the required namespace app.core is not available so let's sort that out and i think to sort that out we can add source clj here and source cljs and now we'll add the two paws and now if we start a project ripple connect to shadow cljs cool okay it's compiling we select the app bold then our http server is available at localhost 5003 so let's go here we're missing our index.html file but i think we should still see our message no we won't see our message because we're not learning any javascript so let's go back here i want to just show you that inside resources we'll have public assets js and inside.js we have a main.js and that's going to be our compile javascript so let's create our index.html file inside of public so inside of here we'll say index.html and here we'll say html5 then this will be our short close this short url app and let's include that javascript so script and the source will be usb assets forward slash js for main.js and it's deferred loading this file save this and now if we refresh this we should see hauseit console.logged awesome we've just set up shadowcljs and if i'm not mistaken we can go back to let's go back to db.clj to show that we can we can evaluate some closure let's just evaluate the sol file load anyway her current file now we should be able to get url abc cool and if we go to core.cljs we should be able to just execute javascript so js alert hello execute this and here we have an alert of hello and you can see at the bottom if you're using vs code and cover you can see this is a cljs repo and if we switch to a clj file it changes over to the clj ripple cool cool so now let's just look at fixing this warning here shadow zljs is not installed in the project and that's because we need to include it as a dependency inside of package.json so i'm going to stop this repo open up a terminal then i'm going to initialize an npm project so npm init dash y to say yes to everything then i'm going to install shadow clgs so npm i d for dev dependency shadow cljs and this will include shadow class into our project so that the next time we start that ripple we won't see that warning and we can just test that out and start a project ripple shadow crjs connect the app and yeah no more warnings cool cool no more warnings so the next thing i want to do is include helix into this project so to do that let's go to the helix github repo and let's just copy all of this code in the start of the repo go to our project and add that here say this then um instead of this console.log in our init function we'll use this rdom render function here and i can see that we need an element with the id of app in our index.html so let's add that also inside of body i'm just going to create a div and the div will have an id of app cool but now we also need to install if we go here we need to require helix as a dependency so i'm just going to click here and copy this then let's go back to our depth.edn close this here and let's add the dependency here cool so now we have helix in our dev.edn file but i think we also need react i think it says so here you need react and react dom react and react refresh should be installed automatically and store the current funding version of your renderer example react on so let's install react on so to do that we open up our terminal again and go mpmi react done cool so now if we go back to quarter cljs i think this will work let's start a project repel shadow cljs connect to app uh connect our app build go to localhost 5003 cool and it's working and if we type in here that works nice now i know if we let's just make this bigger i know if we go inspect and check out console we're going to get this warning react on the render is no longer supported in react 18. we need to use create root so let's see how to do that i'm just going to copy this and here's the solution so we need to import create the create roof function from reactdom client so let's do that let's make this so we can see stuff so instead of using from react dom let's get from reactdom client then to that function we need to pass through our element so let's do that so here what i'm going to do is create a let binding and i'll init and i'm going to define a root variable and with r dom create let's just evaluate this i don't know how this came here evaluate this save we'll have a create root function then we need to pass through our element then i think we call render on root let's just see yeah root has a render function and that takes in our app so here's our app and here we're going to call dot render on root and just move this into here tell that binding get rid of this save and i think that should be it let's go back to our application okay and it's not working because create root is not a function let's go back and add an e here spell it properly refresh awesome now we don't get any console errors cool so now helix is working and we're getting no console errors let's look at making the front end for our application so essentially i want the front end to be like an input box with a button you click the button and then you get back the url that you're supposed to be redirected to so we can get rid of this greeting component and state set state you state so the initial state of this is this map and it doesn't make sense to have name let's have url and we can default that to an empty string welcome we don't need that we don't have our greeting component anymore the input on change when we change the value of this input it should change the url value and the value should be the url from our state so save this refresh cool this should be updating the state now i want a button so let's add a button here d button and the button should say um short shortened url save this make sure we have a button cool so this is basically what our ui is going to look like so before we add the functionality what i want to do is make our back end actually serve the index.html file and the javascript along with it so let's set that up so i'm going to go back to our project and just close all of this then i'm going to go to our core.clj file and essentially what i want to do is right now if we start the server so i'm going to start the server load and evaluate the current file start the server and if we go to port it's going to open a new tab here go to localhost 2001. if we go to a blank path we get create redirect screen and that's this response here so instead of returning that i want to return our index file so let's create a function at the top here called the fin index and we essentially just want to read our index file from our server and serve it so to do that i want to use um from closure dot java dot io i want to use this namespace so i'm just going to import this as io and here io we can read from our resources directory link resources or resource and we want to read our index.html file so that's at public forward slash index.html and we want to slurp that and that will just read that file so if we evaluate this function and run index here [Applause] and i think this isn't happy because we need to add um our resources directory to our pause in our devs.edn file so the defs idn let's add resources here save this oops let's restart our apple close this close our output close our dips then let's connect to our app build and then we can load and evaluate the current file and if we execute index cool we get our index returned that's awesome so now instead of returning this string we can return the contents of index save go back to firefox run this okay we need to start our server again so let's start server create redirect screen why let's re-evaluate app hmm let's stop the server and start the server inspect what's going on response okay cool so this we're not getting okay so we're not getting our our main.js serve because right now we're just serving the html file so if we go to our index.html file and we add some random stuff here save this and refresh this we'll get that but our app isn't loading because i mean.js isn't found so let's serve that what we can do is we can create a resources handler which ring provides us with so we can just go assets this is the path that we want to serve anything on this assets past will be handled by ring forward slash create resource handler and this takes in options and the options are going to be the root path and the root path is going to be public forward slash assets so everything in public for such assets will be available at forza's assets so i think we can evaluate this go here again refresh and we should see our app now this is a problem because we don't have a fav icon i'm not going to add like that's a yeah i'm not going to add a fake icon sorry but now we can do is we can now post to the api and get the short code back so let's do that it's going to go open our project again close this close this go to our core.cljs and let's handle the unclick event for this button so unclick we want to run a function and for this on click event handler we're going to have a function called let's say this fetch slug and let's make that function at the top here fetch slug that's going to be a function which is going to post the url from state to our api so before we continue with this there's a library that i want to use called promiser or promisa so let's go here promise uh promise a closure and this will basically allow us to handle promises really nicely so i'm just going to click here to include this in our dev's ddn file copy this here go to depths.edn paste that here then let's restart our apple go back to quarter cljs and let's just look at how to use this so i'm just going to copy this fetch response so copy this whole pillet save we just also need to include promiser so let's just go to require and copy this here go here and copy that there and then evaluate this now re-evaluate our app now it should be able to go to our application check our network click shorten url just refresh this okay cool we have to start our server again because we restarted our apple so go to core.clj load this file then start our server go back here refresh click shorten url and we see we're getting a uuid back okay so what's happening here is we're running a fetch on this endpoint and we're awaiting the result the result is going to response then we're calling dot json on the response and we're seeing well we're not actually seeing the response because we're not doing anything with it but i think we can do something like this it's going to print line save this and now if we run this we should see a console log yeah okay now we still have a promise so what we can do is we can name this underscore response and then if we grab the response from here we can name this response and now if we print line response so we're going to await the result of this then await the result of this then we're going to print the result that's because we need to pull jason on this response so just to make clear what's happening here so we basically awaiting fetch here of this and that's going to be if you're writing this as javascript this is what this would look like response and then we're going to get response is equal to the weight of underscore response.json and then this would be our result from the api reevaluate this click shorten url cool and there we get our result red but now instead of fetching http bin we want to fetch our server so the the route is actually forward slash api forward slash redirect if we go to core.clj that's the route here and we need to post it if we check this function out a url in the body param so let's add a training slash we need to pass through some options here so the method is going to be post then we're going to need to add the body params so we can go to body and then we need to call um jason dot stringify on a map which will have a url and we're going to fetch that url from our state so we can get our url from our state we also are going to need to add some headers here so i'm going to add headers because we're posting content.json we need to have those headers and the headers for this post are going to be our content type and that's going to be jason so application forward slash jason think this should work let's save this and evaluate it go to our browser reva like refresh this click well let's add a url here i'm going to just add the stackoverflow article shorten url okay so now we're getting a few issues i don't even know if we posted anything okay we're calling get so right now this isn't working and the issue is that we're using closures well closure maps and we need to actually be using javascript objects for our options so let's go back here and we can wrap this whole map in a function called clj to js and then we also need to make this map javascript so we can go hashtag js and i think that'll solve our problem let's try this again let's just refresh this page shorten url now it's posting and now we're waiting a long time and cool we get a response back which is not great because we're getting like a whole string back maybe we want to return an object and if we check console json to pass unexpected character okay so we're not actually returning json we're just returning a string so this is a problem on the api side and that's what this error is about we can't pass json because we're just returning strings so let's go to call.clj and for the response here for creating a redirect instead of returning a string let's return a map and let's say slug is the slug that we generated and i think we need to reevaluate our app let's just start and stop the server again i'll stop and start the server go here copy our url again put it in here click shorten url see the response cool okay now we're getting jason back and we have a key of slug and a value of nzkr go to console and we see we're getting our javascript object back with slug and nzkr so we need this to be closure now so let's go back to chord.cljs and let's convert this response to closure so what we can do here is do the opposite of clj to js we want to do um let's call this data and we'll say we want js to clj and that's going to need our response and we can also say keyword eyes keys to true and that will keywordize our keys so now if we print line data js2 js 2 clj sorry and then this needs to be this response that's fine okay let's refresh shorten url cool and we get our close script object back so now we can do instead of printing that out we can call set state and we can associ slug on our state with the value of slug from data and let's set the initial slug to be a blank string slug is a blank string and here we can do is we can say let's say if if there's a slug in our state then let's just for now i have a div well let's just yeah let's just render out let's just show the slug otherwise it's render out a div with this the button and the input so if we refresh this we get nothing back so let's default this not to named string but to mill cool and now let's copy this url now we should just see that's our slug that we get returned so now we can easily convert this into a url that we want to show the user so let's go back here and let's let's just show the whole url so we can go string so now what we want to show is i want to show the full path so localhost port 3001 forward slash whatever this like is so to do that well to get the the host on window we can go window.local and that will return us the the no return that's the host i actually think window.location.host is what we're looking for well that doesn't return us to http so window.location and see what all these things are origin window.location.org let's use that let's go back to our project and we want to get from js location dot window we want to get the property so using dot we'll call a function using dot hyphen will get us a property and the property is origin slug and let's actually wrap this in a a tags a div a and let's give that an href attribute of basically the same thing um so instead of repeating this what we can do is we can create another variable here and we can call it redirect link and and we can then use this link on both these places save this refresh location.windows undefined i think it's just just location save this refresh and let's try this again let's add whatever url div is not defined and that's d refresh just copy we can copy anything in here it doesn't matter cool and i just want to add a trailing slasher because it's important cool so that's basically what i want from helix this is looking good but it can look better and that's why we need tailwind css so let's do that let's add it so to add it we're going to go let's go to our browser about this one this one and let's see how do we install tailwind so we can install tailwind css as a dev dependency so i'm just going to copy this here and let's run this in our terminal clear our terminal execute this go back to tail end then we can run mpx tailwind css init and that's just going to create this config file for us so let's run this and now we should have a tailwind config file right so then let's go back and see what we need to do there now we need to add where our content is so i'm going to just copy this content out and paste it here so this is interesting this is basically checking all html and javascript files but we actually are using cljs files so that's where it needs to look for the classes as it runs and let's go back here and we need input.css so what i'm going to do is let's just create a new file here i'm just going to call it global.css and then we can just add these tailwind components go back here then we need to run this command so this will scan the files and then output to a to a css file so let's go here and let's run this so paste it but we need to change the source the input is not input let's just change this to uh global dot css and the output will be in resources forward slash css forward slash output.css and if we run this now i think every time we add css it'll be added to this output.css let's actually add this to our index.html file so let's close this and at the top here let's add a style sheet so we need a link a relationship is stylesheet and then the href would be assets forward slash css forward slash output dot css and we can so if i'm correct tailwind should have like no base styling so let's go back to our app and refresh this it should look worse and it doesn't look any different oh and that's because i'm confiding to the wrong directory so i'm just going to go to our terminal close this delete this css folder it needs to go into resources public forward slash css now if we go back to our app and refresh we're gonna get there it's public assets css output.css and now we can just delete this old css file now in assets we should have two folders yeah cool it's working finally so now we can close all of this and we can start adding some css styling now it's not going to be a styling course by any means it's just going to be let's make this look probably worse than it looked originally [Laughter] so so let's start off by adding some styling to our button let's add class names here last names and we can let's convert this text to uppercase and it's not and i think because we need a hyphen here save this and this needs to be class name cool so our styling is working let's add a border size two and let's make this rounded and let's add some padding y two and padding x four right now let's style the input so i think let's go here it's class name and let's make this form control form control and let's give it a border and say the border is solid and border gray let's say 600 let's go back and let's create a placeholder and it's going to be into url let's get this padding y let's get rid of this and you know let's just center this whole thing so on this main div let's add class name i think we can say grid and place item center save this go back and i think we need to set the height the whole screen this is beautiful this is beautiful let's make the background pink so bg pink say 50. that's beautiful maybe even 100. this is a pretty nice looking ui let's copy this url paste it in here click shorten url and now we have our shortened url we can click on it and we get redirected amazing cool cool so that's basically um the basics of a full stack project in my next video i want to go about deploying this because it's a sin that i'm the only one who can use this project locally and i just want everyone out there shortening their url so cool catch you in the next one guys bye
Video description
Adding a front-end to a deps.edn API using ClojureScript with Shadow-Cljs, Helix and Tailwind. Links to Repos: Start project: https://github.com/danownsthisspace/shorturl End project: https://github.com/danownsthisspace/shorturl-app Calva: https://calva.io/ Shadow-cljs: https://github.com/thheller/shadow-cljs#quick-start Helix: https://github.com/lilactown/helix Tailwind: https://tailwindcss.com/docs/installation Planet Scale: https://app.planetscale.com/ 00:00:00,00 Intro 00:00:14,11 Project Setup 00:02:38,11 Libraries needed for front-end ClojureScript 00:03:07,26 Setup Shadow-Cljs 00:11:35,01 Add Helix to ClojureScript project 00:15:46,07 Create a simple layout using Helix and ClojureScript 00:16:55,24 Serve assets from Clojure Server 00:20:54,19 Post to API and store response 00:32:33,28 Add Tailwind CSS to clojurescript Shadow-Cljs project