We can't find the internet
Attempting to reconnect
Something went wrong!
Attempting to reconnect
Analysis Summary
Worth Noting
Positive elements
- This video provides a comprehensive, hands-on look at the specific new defaults in Rails 8, including Kamal deployment and the removal of heavy build dependencies.
Be Aware
Cautionary elements
- The 'demo effect'—where complex operations like database migrations and production deployments are shown working perfectly in seconds—can mask the actual troubleshooting skills required in real-world environments.
Influence Dimensions
How are these scored?About this analysis
Knowing about these techniques makes them visible, not powerless. The ones that work best on you are the ones that match beliefs you already hold.
This analysis is a tool for your own thinking — what you do with it is up to you.
Related content covering similar topics.
Alpha preview: Action Text for Rails 6
David Heinemeier Hansson
Alpha preview: Using React with importmaps on Rails 7
David Heinemeier Hansson
Alpha preview: Converting a import-mapped React app to use esbuild with JSX in Rails 7
David Heinemeier Hansson

Alpha preview: Rails 7 w/ esbuild + Tailwind CSS
David Heinemeier Hansson
Rails 7: The Demo
David Heinemeier Hansson
Transcript
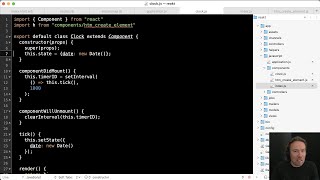
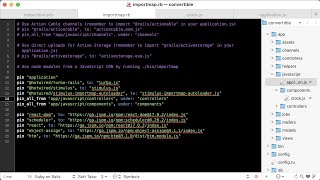
welcome to Ruby and rails if you are looking to go from Hello World to IPO you've come to just the right place I'm going to build a simple application that shows you the basics of Ruby un rails and how you put it into production let's go we're going to start by running rail's new blog to get the basic rail skeleton let's hop into that skeleton and then we're going to generate a scaffold for a post that post is just going to have a title that's a string and a body that's a text and as you can see here from what's being gener ated we have everything that we need to set up a basic interface for that post scaffold there is a migration that will set things up in the database there is a controller there are views there's a model there's even testing stops and adjacent API on top so let's run that migration and as you can see here we created the posts in the main schema file and now we're ready to have a look at the application that was generated here with the post scaffold so let's jump into the post controller first the controller is really what guides all the inbound actions you get into a rails application you'll have the user hitting SL posts or slost new and it gets routed into the post controller all post controllers follow the same convention there are seven actions you have index show new edit create and update and Destroy so these form a basic set set up for configuring everything that's needed for a resource to be exposed to the to the web and if you scroll down here you can see we have everything served in two flavors we have both the HTML setup that'll render views directly and then you have Json that'll render for an API and as you can see here we're also setting up a new post for some of those actions that require that we're going to find it straight off an ID passed in through the URL and the post parameters are the ones we're using when we're creating and updating the application if we jump into the post model you'll see there's actually nothing here everything in the post model is made available through introspection so a new post model will look at the schema for that table and it will know that there there is a title and there is a body and we can access that title and that body directly through this post object and as it descends from application record we can run everything from updates and Destro and what have you this is also where we're going to put our specific logic that's particular to this application Beyond just the uh management of attributes and then finally we have the views that are being generated um if we hop in here and have a look at the index view you can see this is where we will list all the posts that are in the system and rails uses Erb which is essentially embedded Ruby so you mix HTML with Ruby in line and you can split out more complicated functions into helper methods but otherwise this is the uh clearest cut setup in rails that is the default for integrating HTML and Ruby now if we hop over and start up our development server you do that with is bin /dev if we were running a rails application that also had auxiliary Watcher processes such as one for ES build or for tail and binev would start those as well but this version of our rails blog is just going to be built with all vanilla no build setup so we only need to start the Puma Ruby web server and we can hop over into the browser and see here this is the thing you're going to see when you start up a new rails application it'll tell you which version you're on both for the Ruby version The Rails version and the rack version that's running on local horse host 3000s by default but if we do SL po posts here you'll see the scaffold interface that we generated now this is the index action the one we just looked at in the view and from the controller but if we click the new you see here we have a form for creating the new post with its title and its body it's uh quite basic to put it mildly right now uh but all the actions are mapped out this scaffold interface is not meant for shipping into production it is meant to showing you how to build a rails application with the basics and then you make it look pretty you look make it look nice but um oh yeah let me show you real quick here if you dopost dojason you're going to get that automatic API as well as I showed you in the controller there are two different paths you have HTML and you have Json you could also have added XML in there or another path but by default you just get these two different variants the HTML and the Json variant now if we hop back into um our editor here I can add a little bit of styling to make this look slightly nicer than the very basic layout that you get with um the scaffold by default I like to use Simple CSS it is simply a um individual file that's being included I don't have to compile anything here I'm just referencing it straight off their CDN and if we save that and reload you can see it just looks a little nicer now rails has a bunch of different ways you can do the CSS there's also a path where you can use Tailwind uh lots of people like that for good reason and there are a bunch of different uh options all the major CSS Frameworks are available but by default we ship with a no build as I said uh intention and simple CSS just makes things look uh prettier without having to Adorn anything with classes or what have you now let me show you one of the first features here if we do um raise exception inside the index action you will see that rails provide some really nice nice um interface for dealing with that exception seeing exactly where it happened if I'm reloading here you can see the line it was raised on the source code that's around it you can see a full trace and down here we even have a console so you can interact with the instance variables that have been set for this index action here is just at posts that's been made available and you can help diagnose whatever issue that it is that you have but let's remove that again and then let's look at the console from another Angle now you can get the console as I just showed you when an exception is raised but you can also get the console if you just run rails console now you have access to your entire domain model so if we find the first post that we created we can update that post straight here from the console if we hop back you see title is now changed from CLI this is exceptionally helpful for interacting with your domain model uh updating things on the Fly and as you'll see later updating things even once you've deploy this to production now let's install something else here let's install action text that is one of the Frameworks that's part of rails but is not set up by default but you can set it up by running rails action text install that's going to give you a wizzy wig editor that's currently powered by tricks the open-source what you see is what you get editor made in JavaScript and it also sets up active storage active storage is a way to deal with attachments and other files in your real application when you run it through action text install it'll automatically set up those active uh storage tables that we need there is um one for the blob and then we have one for for text here we run migrations to set that up again and now that we've run action text installed it also added a couple of gems so we need to restart our development server I do that just by exiting out and then just running the server again if we then hop into our um post model we can declare that that post model has Rich Text body we're going to convert the plain text body that we had just a second ago to a rich text body that is accessible through the wizzywig editor and that accepts those active storage attachments and uploads um but before we can do that let's change the text area we had in the form here for our new post to be a rich text area that's basically all you have to change and let's save that and hop back into creating a new post as you can see here um there is now a full wizzywig interface for creating the body it comes with a default set of styles for the toolbar you can change those those styles are generated straight into your application so you can make it look nice for yourself let's give some bold and italic Tex here you see that was all that was needed but I think what's even nicer to look at here is if we do an upload and we add a file you will see that that file gets added with a preview directly to the Wiz wig editor and if we save that we update the post it is added to the post itself and that then went through the whole process of doing a direct upload of the file When we dropped it into the editor that uploads straight Tractive text um or Tractive storage excuse me and then um we have access to that and rendering it directly from whatever storage backend active storage is using in this example we're just storing on disk but you could be storing your active storage in S3 or another object storage now let's add a bit of custom JavaScript rails by default ships with Hotwire Hotwire gives you turbo which is a way of accelerating page changes and updates just that your application will feel as fast and as smooth as a single page application without you basically having to write any JavaScript at all and then there's the stimulus um framework for creating that additional functionality that you might need in a really simple way you can have have a look at hot wire. to see more about that but what we're going to add here is a little piece of JavaScript to just add some additional functionality pulling something in from npn so we can do that using the import map pin command and as you can see now that I hopped back into our config import map we've added the local text pin at the bottom version 302 it pulled that straight off npm it downloaded that as a vendor dependency that we can check into our version control system and now we don't have any runtime dependency whatsoever on npn or anything else like that you don't need anything beyond what rail ship you with already because rails 8 is all no build by default that means there is not a transpiler that means there's not a bundler these files are shipped directly to the browser over http2 so it's nice and fast um and the import map is what allows us to refer to these files by their logical names while still doing far future digesting such that they load really quick and such that they're easily compatible with CDN and all that good stuff but now that we've added that let's have a look at our application JS file that's a default setup that you have that the scaffold is going to use and as you can see we're using turbo rails we're including all the stimulus controllers if we have any we're including tricks and action text to give the wizzywig and now we're going to add that local text um package as well and we're going to start local time here and in the local time we're going to use it and we're going to use it for um adding the updated at timestamp here and as you can see here we're just adding a Time tag that's just a vanilla HTML tag that has a data local uh time that's what activates the local time JavaScript setup and we will give it a format for what it should do with that UTC timestamp and turning it into a local time that we can have a look at so if I reload here you see it is November 13th by the time of my recording at 3:28 p.m. in my local time zone but actually underneath the time tag is going to be in UTC that means we can cash this and anyone around the world will still get the time displayed in their local time just a nice feature but really um what's unique here for rails is the fact that we're using no build by Def def fault so if I go over here in the inspector and look at the JavaScript files that are included you can see we have the application JS file with a little uh digest stamp on there if we change anything that application JS file the digest is going to change and the browser will redownload just that part but everything else turbo and stimulus if they're not changing we're not redownloading that that is why no build is such an efficient way of dealing with caching but we can also have a look at a specific file you'll see it matches exactly what we have back there that's not a development setup that is what we're shipping in production there is no minification there's no transpilation there's none of that nonsense because you just don't need it we're g sipping or broadly this stuff so to it transports really quickly but we're allowing you to view Source on entire application if you look at something like hey.com you'll see this technique in use on a major application and you can view all of the JavaScript that we Ed to build that application and that's the default for rails now again if you don't want any of this stuff there is a way using JS bundler um- rails to set things up in a more traditional way using ES build and what have you but this is a wonderful way of developing modern web applications all right now let's add some comments to our blogging system and I'm going to use a different generator here I'm going to use a resource generator that is a little lighter than the one we were using for scaffold doesn't generate a bunch of views and doesn't generate all sorts of actions in the controller by default but it does generate the new model that we need the comment model it generates a uh migration for that create comments and it generates just some empty placeholders for the comment controller and for the view uh action so let's run the migration for that that sets up the comment table you can see here the schema that we've now built up we've added um a number of tables for Action text and action storage and then we have added a comments table that's as you see here um as we had it in the migration where we were just referencing the post as a foreign key and then we had the content as text and then it rails by default also adds two timestamps that it keeps track of by itself created at and updated at um and below that you had the post that we added originally all right if we hop into that um common controller it was empty as you can see there I'm going to paste something in that actually makes this stuff work you'll see one principle of the controller setup we have is that we have these call backs before action we're going to set post so before all the actions we're going to reflect the fact that this is a nested resource the comments is something that belongs to a post and we will pull out the post ID from the pams that's what's being parsed in as part of the URL and we will fetch that post and now we will create the comments uh associated with that post based on the parameters that are expected as comment content and then after it's created we will redirect back to the post so um let's um actually also create the other direction of this Association you saw comment belongs to a post but then we're also going to make the PO post uh has many comments now we have a bidirectional Association that we can work with in in both ways now we're also going to add a number of partials here this is the templating system basically a sub routine that you can refer to there's going to be three of them there's going to be the comments that includes the entire comment section we're going to reference that in our post show in just a second and within that we're going to refer to another partial for an individual comment and another partial again for the new setup so let's paste some of that in here you can see this is for the entire collection it just has an H2 for the comments and we render the post comments this again uses rail's convention over configuration approach it'll automatically know that the comment model should map to view/ comment comment so it can look up the right partial file to use and then below that we have the form that we're referencing with the comments new so let's hop in and paste in the individual comment as you can see here we um we just give it a div that has a Dom ID so we can reference it uh we're pasting in the comment and we're using that same time tag as we were using with the post but this time we're are going to use time ago so we get that nice 2 minutes ago on when something was posted rather than a local time spelled out with Am Pm set up and then finally let's um paste in the form that we're going to use that form is going off a model the new comment but it's nested underneath the post is that we automatically can deduce which URL that we should post this new form to and your comment is just going to be a text area for Content we could have made this a rich text field as well but let's keep things simple and just keep it in plain text now that we have um that set up we can hop in and hook it all up into the show action for the posts that's going to reference that comments SL comments that includes both the comments and the new form all right let's save that and hop back into our browser oh I made a mistake here uh when we generated the resource it added a route for the new comments but that route was not nested by default we actually need to go into our routes.rb and then see here that resource we added needs to be nested when it is nested um we get the fact that it's going to be slash poost slash1 slash comments and we have the association is set up nicely now let's reload now it works we have our comments filled underneath we can add the first comment and as you can see here um this is my first comment a second ago that was the local time doing its time ago conversion now let's set things up um to be dynamic such that when we add a new comment to um one of these it's going to update the other as well this is how we use web sockets in rails using um action Cable One of the Frameworks that we have to create updates that are distributed automatically without folks having to reload their browser so if we scroll down to the bottom here um we're ready the first thing we're going to do is we're going to add a turbo stream from post to the show file to the show template um that's going to set up the websocket connection and subscribe us to a channel named after that particular post that's pasted in and if we hop into our comment we can set up a broadcast 2 for that post the broadcast 2 will broadcast all updates made to that comment whether a new comment is updated or an existing comment is changed in some way or even one deleted and send it back out to a channel on action cable named after the post Association that this comment belongs to and that is basically it now if I go over here and I add a comment to one of these you see the comment was added on the left immediately at the same time that's all websockets automatically happening through action cable um we can do it of course the other way as well all right that is very neat now let's go to production because of course you're not just here to create a Hello World app that runs in your own machine you want to get this out into the world and rails 8 and Ford ships with Cal a simple tool for deploying your web application anywhere and there's a default configuration file in config deoy doyl that we can use it's um pre-filled a little bit it has the service name of the name of your action but we need to rename for example your user the name of the image to go to my name of where I store this on dockerhub um you can see we changed that down in the registry as well and the name of the container image now I'm going to deploy this on my own little hoppy server and that hoppy server is current wiped it is completely clean and Ubuntu um 244 setup that has nothing on it already this is part of the magic of Kamal you can spin up a new VM anywhere in the cloud or use your own hardware and point Kamal straight to it and you'll be going in no time so This Server exists on this uh address demo exit software. and I will then fill out the host as a c name to that machine but using Alpha here if I had deployed another application called Bravo to the same server Kamal would set it up such that can host two applications or any number of applications on that same server now we will also need to have a look at the secrets here that is incal secet because the register that I'm using that is dockerhub um needs of course a password it is using my username but also needs a password and you can pull that password from a bunch of different places you can pull it from a credential store like password you can pull it straight out of a GitHub command as you can see here with the GitHub token above or you can pull things out of En I'm pulling it out of EnV with my Cal registry password that I've already set up on my personal bash and then the rails master key that does the decoding of any credentials we've set for rails is just using a cat straight out of confect master key you'll need to change that if you're working with other people of course because you don't want to check that master key into your git Repository you're going to want to pull that out of one password when you go for real but this is all we basically need we are now ready to check in the entire project into git uh Kamal uses git for keeping track of versions and we can now run Kamal setup and I'll connect to that remote server and it'll install Docker if it's missing it'll build the docker file or the docker container off the docker file that rails ship with by default there's nothing you need to set up there and it will deploy it push it out do it in a um red green deployment or blue green deployment such that there is no Gap in that deployment as you set things up and as you can see here I sped things up a little bit but it was about 80 Seconds on my Linux machine from a cold boot to do that now we can hop back in here and go to Alpha exit software. and see whoops there was a 404 here um that's because if we go back to our routes file I have not defined route and in production you're not going to get that screen we saw with the rails version and the Ruby version that is only for development so in production you actually need to manually specify the route so we can go down here and uncomment this that sets what the rout route is going to be we're just going to point it to posts. index um we can save that check in that save change and then we can run Cal deploy again and that's basically the Rhythm you will be in when you're working on a rails application and you're deploying to production if we go back here and reload now in production boom We Are live in production with our whole setup everything is working we can upload the um active storage files directly to it by default um Cal will use a Docker volume to start these things up but of course you can configure that and as I said you can use S3 if you like as well common system is is of course there as well let's add one of those Commons and now we have the entire application running in production wasn't that easy now let's add authentication to things as well uh authentication is one of the newer features in rails it basically gives you a default setup for tracking sessions um tracking passwords and even doing password resets what it does not give you is a um signup flow because that's usually quite specific to a given application so we leave that as an exercise for the reader but as you can see here it adds a handful of migrations one for uh users and one for sessions so we're going to run realp migrate again and then we are going to hop in here and have a look at what was actually uh generated um we have the sessions controller that's probably the most important you can see here it allows unauthenticated access to just new and create everything else by default will be behind the authentication lock there's also a rate limit to make sure that people don't um bombard you with attempts to to log into users they don't have access to and then we do the authentication using the email address and passwords and start a new session from there if we hop to the session you can see it just is very basic rails uh active record um now what's we're going to set up is we're going to set up a default user that the system should have as we're working with it to allow us to log in since we don't have that signup flow so that's just going to be my email address and a one two three password we can hop back into our CLI and run rails DBC that's going to run that uh file I just showed you and set things up now if we hop back onto Local Host and we try to log in with first the wrong password we're actually going to see something here when I added the authentication it added another gem it added BC Crypt that's what we're using to keep password secure so we have to hop back in here and restart our development server uh as we added a new dependency we can hop back in reload and now we're we're good to go here as you can see I first tried to put in a wrong password we're going to get this screen try another email address or password but if I log in with 123 boom I'm in now let's add a way to sign out to um the main um layout here we can add that with a button to sign out it's going to hit the session path and it's going to use a method of delete to delete that session if we're authenticated as you can see there so it's not going to show that button if we're not already authenticated which is good because this layout is also used for login all right let's save that and hop back and see a Reload here now we have a sign out button and we can sign out and um that's all I just should be let's deploy this to production we're going to um just check this thing into G deploy it straight to production go back to our Alpha software boom uh dhh1 2 3 oops that didn't work why did that not work because we had not run our dbcs now I could run dbcs in production but let me show you another way of doing it Kamal also gives you a way to start a console on the server side that is just like the console I showed you earlier that ran in development you can see here it reminds you that you are in production so be careful when you create things they're going to be created on the server side in your real database the database by the way we haven't talked much about that and that is because we're using SQL light so there is nothing to configure there's nothing to set up SQL light is now a suitable database for production with rails we have tuned it with all the right pragmas and everything that you need to run SQL light well in production you of course still need to set up a way to back that up but everything uh else is preconfigured for you so now we created that user in production using our uh Cal console I can log in with that user one two three and boom we are in with production authentication for the entire system all right one last thing let me show you how to turn this web application into a pwa as well we're going to create a link reference here to a manifest that manifest um just exists here as a comment that you can reference we're going to turn the Manifest on in our routes file as well there are basically two lines here as you can see there's a manifest and there's a service worker that you can use for your pwa we'll turn those on and I'll show you the Manifest first the Manifest is just really basic it's going to show the name of the pwa you're going to use it and it's going to refer to an icon by default we just have a nice Red Dot but you should obviously replace that with your application icon and if I hop in and have a look at the service worker it is sort of already set up for doing web push um just as an example here having some listeners you can tweak that as you see fit we're not going to change that for this little example but um now let's check in that pwa files and then let's deploy to production one more time and as you can see look in the top right corner when I reloaded we now have that little install icon in Chrome and if I click that little install icon I'm going to get this prompt and boom I have a pwa running in production for my rails application so that is a very quick tour of rails this is a wonderful way of getting started just to use those scaffold um generators and the Authentication generators to get something going get a Hello world out there start working on your application and before you know it you might just be taking your application all the way from Hello World to IPO
Video description
Get started with Rails 8 by building a basic blog, adding a WYSIWYG editor, putting it behind authentication, making it available as PWA, and deploying to production. Read all about Rails 8's features at: https://rubyonrails.org/2024/11/7/rails-8-no-paas-required #rails #rubyonrails #rails8