We can't find the internet
Attempting to reconnect
Something went wrong!
Attempting to reconnect
ProgrammingPercy · 5.6K views · 108 likes
Analysis Summary
Worth Noting
Positive elements
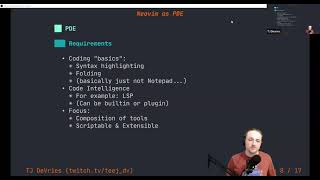
- This video provides a rare, granular look at the logic behind NeoVim's Lua-based configuration system rather than just providing a copy-paste script.
Influence Dimensions
How are these scored?About this analysis
Knowing about these techniques makes them visible, not powerless. The ones that work best on you are the ones that match beliefs you already hold.
This analysis is a tool for your own thinking — what you do with it is up to you.
Related content covering similar topics.

Debugging Clojure with Conjure and Neovim
Olical

ast-grep
DevOnDuty
The Most Used Tool In Programming...
nycrat
Neovim as a Personal Development Environment - SGVLUG Feb 2022
San Gabriel Valley Linux Users Group (SGVLUG)

Turn VIM into a full featured IDE with only one command
Dreams of Code
Transcript
[Music] hi and welcome to programming Percy today we'll be having a look at learning new Vim many years ago I tried new Vim for the first time and I ran I ran quickly it was hard to configure and I really didn't understand what I was doing so I kind of gave up now some time ago I decided to give it a new try and I'm super thrilled that I did because it's just so amazing to work with when you know what you're doing sadly I see a lot of developer asking why spend a few hours setting up an editor uh when you can just use Visual Studio code and I I agree somewhat but if we're going to work with a tool every day in our job is it really such a bad thing to invest a small amount of time making it really good the reason why I do recommend neovim for people to use is because it's super customizable you can really modify the editor to become whatever you want to behave the way you want when you press this and that button do this and there's really no limits to what you can do the con of neovim is the same argument there's stuff that you need to configure it takes some time to configure but once you get the hang of it and once you learn how you'll notice that it isn't actually time consuming and it's actually really easy it's just in the beginning it might seem a little overwhelming and that's why we're here this tutorial tries to provide you with the tools needed to get started with nein I won't give you the perfect IDE configuration to use which makes your editor look amazing that's not what we're doing here if you're only after that you should search for people's dot files which is the way we reference the dot files because they're hidden files that you use to configure neovim and you should search for them if you're only after a full complete configuration this tutorial aims to teach you how to create those configurations by yourself and I don't expect any previous knowledge of neovim or VI we will cover everything as we go and you know what they say hand a developer an IDE and he or she will code but hand a developer the ability to configure and customize his ID and they will become developer Gods at least I'm pretty sure that's what they say let's get going the first thing that you need to do to get started with neovim is installing it I recommend going to the neim uh GitHub by searching on Google for neim GitHub going to Vicki and at this location you have uh information about how to use this you also have installation instr instructions which are great so go ahead and at this place you can find how to install it you should select the most stable release so it's a lot easier to work with there's installation instructions for you here as you can see here for Linux as example which I use I need to download the newm tar file extract it and then simply run the binary you can find the files uh below here so you could go ahead copy the link and switch to a terminal and do a vget for that file and it will download that file and once you have that file untar it using tar xwf and the name of the newm file so once you downloaded it and onard it you can execute neim by using the binary found inside the folder which was UN and then slash bin as you can see here I have the new neim binary we need to add that to your path I have my I have mine inside of a file called bash aliases but you can you can use bash RC or whatever you use to add your aliases and as you can see here I have an alias called neovim or envm and it's pointed to that binary you can also just add the neovim binary into your bin path it's all up to you how you add it let's go ahead and close that so once we've added neovim as a binary we can start configuring it configurations by default goes to your home folder sl. config SL envm so this is the default path that it will read from so I'm just going to go ahead and create that folder and move there because this is the place where we will be working once you start neim without any configurations by executing the binary it looks like this nothing special but not so shabby beginning to configure is what I hear people are scared of many times it's confusing but it's actually not so confusing once you get started you've open up neovim like me you're going to shut this down you can see the prompt here saying type colon Q enter so that's actually how you enter commands so if you press shift and hold them and then colon you'll see here at the bottom you get a colon prompt this is the command prompt where we can enter commands and what I'm going to do is go ahead and type Q and enter and that will close neovin Q is short for um quit shift plus colon is how you trigger the command prompt and that's important to if you're not familiar with uh VI that's really important to remember so before we configure it we actually need a plug-in manager who can help us configure and download plugins for Neo everything you do in neum is usually changing the configurations or downloading plugins to help you so it's really good to have a plug-in manager we're going to use a plug-in manager called Packer and Packer can be found on GitHub as well what I recommend you to do enter their GitHub and scroll down to the quick start and it will show you how to download it I'm using uh Linux and you can see that they clone the repository and they actually move it into lo/ share envm and/ sites don't change this unless you know what you're doing just simply use the command because this is the default location where neovim will look for stuff so just copy the command run it in the terminal and it will install P Packer for you so copy the command from their GitHub paste it into your terminal execute that and you will have Packer installed to begin configuring neovim we need need to create a new folder and that folder should be placed inside your home path at config and a folder called envm so go ahead and create that then we will go there so one there at this location we will store a few files so let's go ahead and create the file which actually starts up Packer the plug-in manager and initializes it so I'm going to go ahead and create a new folder in here called Lua configurations in neovim is done using Lua scripts and if you name a folder Lua that folder will be automatically shaked whenever we import the scripts in na so inside Lua I'm going to go ahead and open up and create a new file called plugins. Lua this file will be responsible for handling all the plugins inside of our configurations so the first thing that we will need to do is press I to go into insert mode and then we're going to require Packer which is the plug-in manager once we've required that we're going to execute the startup function and pass in a Anonymous function like this so we require hacker we call the startup and we insert a function and our function you can see that we have use here and use is a way to import other plugins let's add a comment here configuration is going here in our case we want to manage Packer itself as a plug-in this allows us to update Packer whenever there's a update that needs to be done what we can do is after we've added Packer we can press escape to leave insert mode and go back to normal mode press shift colon to open the command command Tab and type in w to save the file if we restart neovim nothing is going to happen we have only created a script that loads in Packer but we haven't told Nim to use this script so we need to do that neovim has a special file called init.lua and init.lua will be automatically loaded once new started and executed we'll go ahead and use the inbuilt Explorer to go there press shift colon to open the command Tab and type explore with a capital E which will bring up net read writer and as you can see we have the plugins Lua which we just created and we can go up one step to the parent folder and we can see our Lua folder which holds our Lu configurations and at this place we will be wanting to create the init.lua so I'm going to go ahead and press shift percentage sign and it will open up a command tab saying enter file name because we creating a new file and I'm creating a new file called init.lua and this file I will go into insert mode by pressing I and this is the file that is executed by newm once it's started and what we will do here is that we will require plugins which is the plugins. Lua file that we created note you don't have to write luas plugins. Lua you don't have to do that it's enough to Simply say plugins and it will know it's a Lua file inside the Lua folder so once again press shift T shift colon to open the command tab press right now I'm going to go ahead and restart neim and nothing has changed as you can see but we have added the ability to run Packer so we can go ahead colon Packer status and we can see we have no plugins uh available so far and it brings up this little tab where it shows us uh the output from Packer which is nothing so press Q to go back going into the command tab shift colon type Packer sync Packer sync will download and install plugins for you it will remove any plugins that are not available in your configurations so it's a great way to keep track and keep your plugins updated Packer sync so in short what we have done so far is that we have learned how we can use Packer to import plugins we have learned that neovim has a init.lua file which we can use to load our configurations we can run commands by pressing shift colon such as the Packer sync or Packer status and we can navigate using the explore command so let's press Q to bring that tab down and let us add a few more plugins that we will need now since we're going to learn how to use neovim as an editor I think it's good that we would install some language server support and to do that I'm actually going to use a plugin from William Bowman and you can find links in the descriptions to these plugins later so you can see more about them but Mason is a plugin used to help you install code related stuff such as dap servers or LSPs and stuff like that we're also going to use his LSP config newm plugin because that's used to configure it and then we will also download a plugin called neim envm LSP config now LSP config is used to run different language servers and it's needed for these plugins to run properly so once we have added these plugins Mason to download and help us set up LSPs and neovim and LSP config to configure them once this is done let's exit the insert mode by pressing escape uh shift colon and write the file if we do Packer sync now it won't actually so I'm going to go ahead and do it Packer sync it won't actually do anything it won't detect the changes I'm going to go ahead and close that we need to reload the file either by exiting them or reloading it in line we can do that so let's do shift colon to open up the command tab type Lua file and a percentage sign what this will do is that we it will reload the current buffer now the buffer is the file so it will reload the buffer into memory again so that's the same thing as closing it and opening it up it's just a little bit more easy to do that so let's go ahead and do shift colon and type Packer install you might as well type Packer sync Packer install will download and install the plugins for you it won't remove old ones so it installed three plugins that's great so let's press Q to exit now one thing that we need to I need to clarify is that Packer down loads the plugins for you it doesn't configure and enable them automatically for you that is up to us so let's go ahead and do that now in this example we're going to set up go PLS which is the go language server to help us code in a go related file but you can really use this approach for any language that is supported which is most of them and we're going to enable our first language server and we're going to use Mason to do this so actually I'm going to go ahead and and create a new file so shift colon type explore and you can see right now in our Lua directory we only have one script which is the plugins I'm going to go ahead and add a new file here so you can do that shift percentage sign and then enter the file name and I'm going to call it Mason config.lua this file will hold all our Mason configurations uh remember to not name the file the same way as the plugin because there will be conflicts if you do it for instance if you name it Mason it will be a conflict press I to go into insert mode and we're going to require Mason and call the setup function so we used Packer to download Mason but now we also need to configure Mason to work the way we want and each plug-in has a setup function which will set it up with the default settings which is fine for us right now let's use the default settings now we're also going to use the Mason LSP configuration plugin and again we're going to call the setup function to set the default up press escape to leave insert mode shift colon and W to write the file and once that is done we're not exactly done yet we need to do the same thing in the init Lu that we did with the Packer so go ahead shift column explore we go up one level and we go into the init.lua file so the same thing that we did here we told newm to load in the plugins script we need to tell it to also load in the Mason config script I'm going to go ahead and save this file shift colon W and then shift colum Q to quit I'm going to open up new them again and there shouldn't be any difference so we can check our plugins but and this is really useful when you're trying to set something up and it's not working because that will probably happen sometime so go ahead and open the command tab shift colum type in check health and it will show you the health of all the plugins that are currently installed now one thing you need to know about Mesa is that it helps you install tools for development such as go PLS however it does require you to have the binaries or the programming languages installed so you can see here it tells me I do have go installed which is great I don't have cargo for instance and I don't have node and if you don't have go installed it won't be able to download go PLS for you so you can still use Mason even though I don't have cargo but I won't be able to do cargo related stuff using Mason we need to install that first in this tutorial we will be using go if you don't have go installed now is the time to pause this video and go and find the go and go into Go download and follow the instructions to download and install go if you want to follow along um the things that we will learn here will actually work for most of the programming languages so you could use another language uh if you're more familiar with it but if you want to follow along and do exactly the same download go from this link I will put it in the description once you have it installed and put it in your uh binary path you should be able to see go here okay so Sheck Health user super useful to check the health of the current plugins so I'm going to go ahead and type Q to s simply quit and close that tab down we did install and configure Mason so let's go ahead and do shift colon to open the command tab type in Mason and you should see this really nice looking pink screen now in here you can see we have LSPs dap for debugging linters for linting and formatters which Mason can help us install this is our long list and you probably won't know the name of the language server by default but if you're interested for instance uh I know go PS is related to go and we can see up here there's a language filter by pressing Capital C and capital c when you see that in newm configurations that is actually control so capital c means control and then F so if you go ahead and press hold control press F and it will open up a new tab and that will have all the programming languages that we can apply as filters so as we see here go is number 47 I'm going to go ahead and press space until I get to the bottom and I'm going to type in 47 and this will apply go as a filter now I'm only seeing go related stuff and if I go down here I can see go PLS and we can press enter to see a little bit more information about it now we want go PLS so I'm going to go ahead and do shift colon to open up the command tab I'm going to write Mason install go PLS and you will see that it starts downloading go if you have don't have go installed it will complain here telling you that you don't have it okay so it installed go PLS for us which is nice uh we can go ahead and press Q to leave Mason that was really simple but there's one thing that we need to know we installed go PLS we still need to configure it the same thing we did with Mason and others we need to apply it's really simple it's really the same thing as we did before so I'm going to go ahead shift colon type explore and inside here we can see we have two we have the two configurations as before I'm going to go ahead and shift percentage sign and I'm actually going to create a go pls. Lua and go PLS will hold the configurations related to gols for me and I'm going to go ahead and configure it so that neovim knows how to use go PLS so the first thing that we want to do going into insert mode and I'm going to require the LSP configuration from the plug-in so we can attach go PLS to it and the way we do that is we create a new variable and we assign it the value of require LSP config this will import the LSP config Library allow us to use it and configure it we're also going to use the util package so require LSP config SL util now we have imported the plugin we can start configuring it now each you can use this plugin to configure many language servers the way you configure a language server is LSP config dot the name of the language server you can find a full list in their documentation I'm going to put links in the description I know it's go PLS so let's go ahead and call go PLS and we will call the setup function and the setup function we will close it with brackets and inside here we can start configuring it to run go PLS it's a command line tool so it will use gopls from the command line and it will use Serve this is how to start gos we're basically telling neim how to run this plugin and we want to configure the file types to run it on and I want it to run whenever I have a CO file or a go Modi for instance you can add more files you can really control this to work the way you want and the root directory to use will be util root pattern go work we will use go. and dogit this is basically the path to the root folder where the plug-in will run so you're telling it that start running from this path so whenever we see a goor file go mod file or a dogit that will be the root path now we can also configure settings and this is how the plug-in will work now this is if you have go PLS running by default you have to tell it what analyzer to use for instance and you can do that here in the settings tab so we can do settings and we can say gos and gos is going to run we're going to have the analyzis to tell us what to analyze and basically we will call we will check for unused params for instance we want that and we will also enable static checking so this is how you would configure a LSP for go PLS now to do the same thing for example rust we would simply go ahead we would do LSP config so we would have uh code lob for instance but let's not do that now but hopefully you understand how we can customize that plug-in and if you want to know what settings are available all of this exists inside the plug-in documentation on GitHub so it's really easy uh when you see me writing this you might think oh how will I ever know what's going on but actually it's pretty easy if you check it in the documentation you will see they will have examples of everything and it's not that hard I'm just going to go ahead and add those colons there because they're needed so let's go ahead let's leave the insert mode shift colon right now we have one thing left to do and hopefully you have an idea of what it is we will need to update the init Lua to use the configuration that we just wrote so let's go ahead explore mode Let's go back one step up let's go inside init Lua and of course let's add it so require go PLS and Let's Escape shift colon write the file and let's exits now to test this out I'm going to create a super super small go l program and I'm just going to go ahead and do neovim main.go which is and you can see it's actually complaining we cannot have end of five so our language server is actually working I'm just going to go ahead press I to for insert mode I'm going to do package main to just see a few things that I that they are actually working so I'm going to create the main function and I'm going to go ahead and do v test string and I'm going to do pumped print line hello world and press escape and once I do that actually we can see the language server is working it is complaining and it's telling me that I have errors in my code I'm going to go ahead and just save this file anyways because we will be using this later so we are one step in the right direction we can see errors but I don't know if you noticed but there's no code completion or suggestions which is really important when we have an editor so let's go ahead and add that and to add that we need to drum roll wait for it add a plugin same as always so we will be leveraging a plugin from HS 7th I think you pronounce it he 7 sorry if I pronounce it wrong he has a whole Suite of plugins in GitHub and I will put links in the description to all of them and I won't cover them all in details because there's quite a few of them but uh while I write let's try explaining a little bit what they are so let's go ahead let's go inside oh sorry wrong let's go inside Lua let's go inside the plugins again and we're going to add plugins for code completion for instance I like having a few comments sometimes just to make it a little bit easier to understand what's what so the first one we're going to use is H 7th SL envm CMP now this is the completion plug-in and it allows us to add completion engines to new them and the great thing about the plugin is that it supports many languages uh sometimes I see plugins which are related to one language you install it and it does one thing but this is really useful because you can use it for many languages and um he has a complete list of supported stuff on his website and it's just I mean it's just great so we're going to be adding a few plugins so um at this point of time I think it's probably good if you learn that if you exit insert mode and go into normal mode you can press YY double tap YY and then p and you will copy paste the current line that you're in so I'm going to go ahead and do that that's y y followed by P so the first thing that we installed was the envm LSP which is the engine now there's something called sources which the engine then uses to add functionality to it and we're going to add a few of the sources and all of them begin with CMP envm so we want LSP Source we want a Lua Source I'm just going to go ahead add a bunch of them so we have envm LSP signature help which is used for displaying function signatures with the parameters and we're going to do envm envm LSP is used to add the language server as a source to the envin CMP which is used for code completion so that's what we're doing we're adding code completion sources here uh it's going to be more apparent soon so let's go ahead and do CMP V snip and that's used for adding and enabling and adding the ability to create Visual Studio code Snippets this the same way if you're familiar with them I'm going to add CMP path which and I'm going to add CMP buffer now path is used for enabling the file system as a source and the buffer is used for adding buffer words right I'm also going to add one final which is oh sorry let's copy that one which is the Vim V snip so there's going to be links to all of these in the description don't worry um basically code completion with this one and then these are sources which basically adds functionality to that completion so once we've done this let's go ahead escape to exit insert mode shift colon write the file shift colon do a Reload remember Lua file percentage time to reload it and then I'll run Packer sync it will download all the plugins for us and as we can see it all downloaded perfectly so that's great now again let's press Q to exit and as always we need more than just downloading the plugins we need to configure them and initialize them so I'm going to go shift colon and explore command and at this place I'm going to do shift percentage to create a new file I'm going to call it codec completion. Lua because all our code completion related stuff will go in here one of the things that we will begin doing is adding a small popup frame with the code suggest you know when we're typing we want the code suggest to pop up at the cursor now one way of doing this is adding it to the Vim opt option and there's a few options by default in new which you can use I'm going to go ahead here I'm going to paste in I'm going to go to the documentation so whenever you're configuring neim it's great to know the neim documentation is really good I think so you can visit here to see what options we have and we want a we want a completion option and we want to display it as a menu so we can go to the documentation search for complete opt and you will see a bunch of options that we can add to that and I'm just going to go ahead in my editor and type and type complete op is used to manage manage code suggestion format and we're going to say whim. opt which is the option for wiim and complete option is equals to now I want us to have suggestions pop up even when there's only one suggestion because by default you won't have that so I'm going to go ahead and do menu one and you can find that by reading the documentation so we can see menu one use the popup menu when there's only one match and I want that so I'm going to add that I also want to add no select which the options which is an option that allows or forces the user to select one from the menu and I'm also going to add no insert which which is an option to tell us to not insert the suggestion before we have selected it otherwise it will print it uh depending on what you select but we want only it to be entered into the file when we select it I'm also going want to add the preview to show some extra information again you can find what these options mean on in the documentation on newm I'll put a link in the description so you know when you're building your own editor how to find these options I'm going to go ahead and close the browser now because we don't need it so we added a few options that will modify how the completion will behave but this is not part of the configuration this is part of the neim configuration I'm going to do I'm going to add one final thing which is short message so Vim up short mes plus Cals true and this will make this will prevent the messages from being uh excessive or very very long we want to use the CMP plug-in for our code completions so we're going to require in a variable the CMP and then the same thing thing that we did with the language servers we can now use the plugin and we can call the setup function and we can pass in a object with configurations so this object will hold our configurations so this object will hold our configurations and the first thing we need to add is the sources that we added as plugins as well so sources are installed that can be used for code suggestions so it's the source for the code suggestions so let's go ahead add a sources option it's going to be a object and at this and it will hold object and we will basically just add the name to the source and that will enable that source to be used and we can also configure them here uh we will be doing that for some of them so I'm going to go ahead once we've added this I'm going to go ahead press Escape I'm going to press I'm going to double tap Y and Then followed by P to copy it a few times because we have a few sources like that and I'm going to go ahead and change the name to match the other sources so we have M uh LSP and we're going to add a keyword length you don't really have to worry about that you can find if you visit the CMP GitHub you can find all the available configurations that you can use and let's add all of the other sources we have the signature help we have EnV muua we have p i now we have buffer and we have the V snip and again for some of them I'm going to configure the keyword length and let's add it to the buffer as well and also let's have a comma and for the envl I will also configure the keyword length what we have done so far we have configured how we will show the code suggestions we have configured the sources for envm CMP so that it can find suggestions now we also need to control the plug-in so for instance whenever we have a suggestion we need to navigate or switch amongst the suggestions and we can do that by using mappings mappings is where all the fun in neovim begins mappings allows us to create keyboard shortcuts for executing commands so in in the case of the code suggestion dialogue we want to select uh suggestion we want to move to the next selection for instance without grabbing the mouse adding mappings is pretty easy it can look a little bit scary the first time you do it um but let's go ahead and uh see how we can add them keyboard shortcuts to execute commands inside the plug-in here we're going to add a a mapping object which will apply the mappings that we create to the code suggestion tab to show you guys what this is I'm only going to create one first and then we will add a few after we've tried it so to specify mapping we add the brackets and inside the brackets we put the keys that we will press to trigger a command so inside here we will put our keys so we want want to bring the code suggestions up for instance when I press control space I want the popup to appear so I'm going to go ahead and do Capital C remember Capital C is short for control and Then followed by space you can just print space like that and it will understand and when we do that I want to trigger CMP mapping complete and do doing this will trigger the popup to appear I'm just going to go ahead and add a small comment to bring up the code completion at current cursor so once we've added this control. space shortcut we can go ahead and type shift colon explore because before our code completion will work we need to go into in. Lua and we will have to require the code completion script so let's go ahead and add that uh press Escape shift right and then shift colon Q to exit now I'm going to go ahead and open the main go file again so it actually complained a little bit inside my file so let's go ahead and see if I can track that down right my bad we need to add a colon here so add a colon after the configuration or otherwise it's not proper properly configured so go ahead add that I'm going to go ahead and save the file I'm going to quit and then I'm going to open main again and this time whenever I press insert I'm going to write F Dot and as you can see we're now getting code suggestions we are getting these suggestions like and I'm if I'm here I do f.p I can press press control space and it opens up this menu but I can't navigate inside of the plugin yet I can probably use my mouse but it doesn't really work as we want it and this is because we haven't configured the navigation inside the plug-in yet so let's go ahead and add a few mappings we need more mappings so let's exit this file let's open up code completion again and inside mappings I will add a few mappings that I find necessary and nice to have so for instance whenever we press shift. tab we want to go to the previous suggested item maybe and at this time I'm just going to go down to the configuration that we already have press YY up two steps and then P to in insert it and I'm going to change here and do cap capital S for shift and then tab so shift tab goes to the next item and we're going to change we don't we don't want to call the complete we want to do select previous item so that's how we add more mappings so I'm going to go ahead and add a few of them so tab to go to the next next item for instance again I'm just going to go ahead and copy the ones we have so instead of shift tab I want Tab and not the previous item but the next item let's have control e to exit the suggestion if we don't want to have any suggestions we can press control e to exit yyp to copy and I'm going to go ahead and do at this location control e but instead of complete I will do close so let's add a comment explaining Control Plus e closes the suggestion tab now this next part is really uh interesting because we want to select the suggested item and when we do we want to have the plugin add the code that we have selected so if I select a function as suggested I want it to insert that into the file and I want to do that whenever I press enter so pressing enter or return will confirm and apply so we need to add the setting and the key for that is CR CR is something that you will probably find in a lot of mappings and CR stands for enter or return and we're going to call the confirm function and we're going to pass in a function and inside of this we will do a there's something called a behavior you can find out more about this by going to the documentation but I've read it so I know that we have something called a confirmed Behavior behavior and we can call it insert with which will make it insert the selected item into the file and select equals true to make it happen uh if we only selected it so let's go ahead and save the file now we have added a bunch of uh stuff so shift tab tab control space control e so let's go ahead save the file shift colon quit to exit let's open up the main file again so we have an error at code completion Lua line 30 so I'm just going to go ahead open code completion type shift colon as the command and we're going to insert 30 which will take the cursor to line 30 this line is acting up so why is this line acting up see do we have any errors ah my bad so whenever we're doing this we don't want to seam the mapping we want to do CMP mapping that's really important so let's go ahead change that to CMP let's write the file let's go quit let's open up main.go again and this time see font dot print and this time I can press tab to navigate inside and I can press shift tab to go back and control E I can exit and whenever I select something so let's go ahead and do the print line it also Imports for for us now because that's one of the features that is added so let's go ahead said fixed code suggestions which is amazing so enter test is still not declared and it's going to complain but our code suggestion is actually working and we can select and it inserts the selection that we have which is really nice it does look a little bit bad to be honest so far uh as you can see it's the description is kind of printed at the same location it doesn't look really good but we can configure this we can we can make this look a little bit better we can for instance go explore and I'm going to go inside the Lua file I'm going to go inside the configuration I'm going to add a new configuration window for styling for instance so the window command takes in a few suggestion a few options which we can use to make it look well at least a little bit better for now we will fix more sooner so let's do window and we can do completion CMP config window bordered because we want to add a border to the completion window the documentation window we also want to have a border so let's add the same function to that and this will make our code completion Windows have borders which really is uh probably something that will make it a little bit nicer so let's take a look let's save this file and let's explore now we actually have to quit and let's quit let's quit that let's open up the main file again and let's see how it looks now when we added some borders so f. print and as you can see it looks a lot better already using those borders now we can style this even more to sometimes if you have multiple sources and you want to know which source everything comes from for instance you can add icons which makes it a lot more easier to see which uh Source has suggested what so let's go ahead and do formatting and we're going to add the fields that we want to format it's going to be we're going to want to format menu something called abber and also the kind so these are the items that we will apply to and we're going to have a function which accepts the entry and the item and and we're going to do we're going to add some icons so menu icons you can find out how to do this in the documentation again uh they have examples of this I'm not I wouldn't be able to do this without having to read the documentation first so you know kind of always a good idea to read the documentation to see what you can change and what you can modify in each plugin and I'm just going to add some icons whenever we see if we have V snip for instance we want one icon but if it's from Neo LSP I want another icon we're just going to add that and the idea is just to show um so let's see let's just whenever it's the buffer let's add a b when it's the path let's add a p just make it really easy then the item the format function accepts an item and the item is what's being printed so let's do item. menu let's apply the menu icon and entry Source name we have a map with the names of the sources these ones have to match the name of the source so as you can see here I actually made a typo it should be V snip and whenever we get an entry we will check the name of the source which will be then grabbing the icon from this list and we will return the item and let's print a end to this function and let's also end that we have ended a few menu icons so let's go ahead let's write the file let's close it let's open main. go again and let's see we should see that it now prints you can see the icon that is being printed uh in the suggestion which makes it look look I mean a little bit better so you can see the this one comes from the buffer so it shows us that it's B from the buffer and the other suggestions are from the LSP so it can help you understand what the suggestion comes from which can be nice it is it a current file or is it from LSP so up until now we have been using the explore command to move around inside of the files and I'm going to be honest I don't like it now there's a lot of popular plugins to handle this and I will show you one called envm tree and I will put a link in the description and installing it should be really a breeze for you now so let's go inside Lua let's open up the plugins folder when we execute use we can actually add more stuff uh to this place than simply the name so let's go ahead let's add the name of the plugin which is envm tree. Lua now sometimes you will see sub requirements so what we're saying is that to run this plugin we will require another plugin and the plugin we will require is envm tree SL envm web deons now this plugin is actually optional so you can go ahead and skip it if you don't want it it will add small cute icons to the bar that we will be adding and installing it will require you to have a patched font so if you don't know what that is I suggest that you you open up your browser you go to ww nerd fonts.com and nerd fonts.com is uh actually icons that are used for development and they have examples they have for example down here you have a font Patcher which allows you to easily install and Patch fonts uh and you need fonts to have this plugin show you icons um it's really easy to install you can press the download and you have a lot of fonts to decide on and they look a little bit different depending on which package you choose but I recommend using the font Patcher which makes it really easy to have patched fonts I won't cover exactly how you install that in this tutorial if you have that installed you can use the dev icons plugin otherwise you can skip it if we have added that we can go ahead and write the file and reload it using the Lua file command and then of course we need to run Packer sync which will download and install the plugin as and this is cool because during while record while recording this tutorial we can see that the Mason has been updated and we can see uh what has been updated also so let's go ahead we have installed the plugin for the file explorer I'm going to go ahead I'm going to use the Explorer one final time inside it I'm going to create a new configuration file I'm going to call it file explorer. Lua and the first thing that we will need to do is disable the regular net rewriter directory Explorer and this is actually something that they do recommend in the in the envm tree GitHub they say that this is the first thing that you should be doing if you're using the plugin disable the regular plug-in so we're just going to go ahead and do that using uh vimg loaded net read writer uh I'm going to enable something called term goey colors because that makes it look a little bit better and we're going to require the plugin so this this is the same as the other plugins that we have been adding we require the plugin and we execute the setup function now this time I'm actually not going to use the defaults I'm going to add a few options I want the uh explore tree to open on Startup so whenever we start new I want it to open up also I want to add a option called buffer ignore on setup and set that to true for now so once we add this we can go ahead press Escape save the file go inside of the init Lura because we need to add or require the configuration file that we just created and we called it file explorer so I'm going to go ahead and add it I'm going to go ahead and add it at the top because I want it to load the new Wim tree in the beginning so it can disable net net R so it can disable the regular Explorer right from the start I'm going to go ahead and press Escape I'm going to save this file and I'm going to quit new and now the next time I open new Vim we will see a navigation tree so you can see an icon for showing you that this is a Lua file and you can see a small X this is because I'm inside a GitHub repository right now and it detects that and shows you the icon it's showing me that we have modified or removed some of the files um so the new tree is actually really really really nice and you can navigate between the files by clicking in the uh tree file here to navigate between the tree and the text file you can either use the mouse by clicking but you can also use control W and then press the arrow key to the towards the window which you want to move which is useful if you have many of these tabs open which can happen or you can press contrl and double tap W and it will move to the next current open tab as you can see my cursor jumps between there's a few things you can do inside the MVM tree for instance we can press a which will open up a prompt to create a new file and I'm going to call it new file. go and once that's created I can press capital I and I will see the file here the reason why I have to press capital I is because by default EnV tree will hide files that are not inside of your git repository so unless these files are added to the EnV tree they won't show up you can disable that if you don't want it I kind of like it to have all my giit ignored files not show unless I specifically specifically tell it to so shift I to remove or show hidden git files now in my case I don't want want the new file. go so I'm just going to go ahead and press D to open up the prompt to remove the file now this makes uh handling files inside of neim a lot easier and I really like that so we can either press Q to remove the tree or we can use the command provided by mvim tree called envm tree toggle which will open up or close the neovim tree but running a command like that uh it's not really nice is it that's a lot of work to open up a simple tree so I'm just going to go ahead open up the mm Tree by calling the Tuggle command inside the Lua folder I'm going to press a to open the prompt to create a file and I'm going to call it costume keys. Lua and inside this file I'm going to open it inside this file I'm going to fetch the key map function which is used to create new key mappings so I'm going to do vm. API to find the NVM API set key map which is a function I press tab to select it with map I can create new key mappings and with key mappings we can execute commands the same as we did inside the mapping for the plugin but we can create them globally also and I want a global command and let's see map the key n to run the command NVM tree because that's what I want to do whenever I press N I want to toggle the navigation tree so the First Command here the first input to map is going to be n but this is not the key n this is uh referencing normal mode and normal mode is when we're not insert inside the insert mode so if I press Escape I'm inside normal mode if I press I I'm see inside insert mode there's also visual mode we haven't covered yet now we want the command to only execute when we're in normal mode and I want it to trigger whenever I press the N key and I want the command to trigger to be n Vim tree toggle but I will also add the key CR and the reason to add CR is because otherwise we will only open up the command tab with the command prefill but we will have to press enter to execute it and I kind of want it to execute by default so adding CR will make the command also execute and I'm going to pass in the final argument which we can skip for now and once I've done this I'm going to go ahead and save the file now regarding the envm API you can find in the documentation what's available there's a lot available which you can do but setting the key map is really important to know so that's why we're covering it before we can use this uh of course I'm going to switch to the tree again I'm going to navigate upwards I'm going to go inside init Lua and I'm going to add the custom keys because we need to import the plugin so custume Keys script I want to add so let's go ahead and save that file and let's do a final command which is QA now QA stands for quit a stands for all because if you simply press Q it will only close one of the tabs but pressing QA will close all of the tabs which is useful so go ahead and open NB again now the tab opens and the the navigation tree opens as expect if I press n now it's going to close and I can press n to bring it up great this is really nice this is a lot nicer to work with and will speed up navigating between the files a lot now you can resize it if you want to by simply dragging on the border and dragging it into the site that you want great we can now have a navigation tree and we know how to create custom key mappings which is really useful so I don't know about you but constantly pressing or writing the command W to save the file is kind of annoying so I'm going to add a second mapping which is control+ s to save the file and it's going to execute while in normal mode and we're going to do n to say normal mode when in normal mode we want to press c c capital c for control and Then followed by an S to save the file then we want to execute the command which is right and then we want to also press enter to actually have it automatically trigger and then we want to pass in the final parameter we're going to save this file we're going to quit all and then I'm going to open new them again open any random file I'm going to remove the space here and then I'm going to press contrl s and as you can see the buffer was written that's a lot easier than having to run the command now hopefully you understand adding these key mappings is really what's going to make neovim super useful because using this we can add whatever command we want and it's really really helpful and you're going to probably be adding a lot of these ones we have a file tree we have code completion we have a language server which tells us what is wrong we know how to bind keys to special mappings I think it's time that we add a debug adapter and and adding a debug adapter can be done using Mason uh as before so since in this example I'm using delve I'm just going to go ahead and install delve and it's as easy as typing Mason installed delve I'm not going to show you how to find that delve is available because you should by now be able to use the language filter so once delve is installed we need to attach delve and to attach delve we're going to use a plugin called envin dap so again let's go ahead and open up plugins that Lu down here in the bottom I'm going to go insert a new row and we're going to use a plugin by m fuser something I can't pronounce that mfus Ander mfus anager and he has a plugin called envm dap for supporting debug adapters and using these plugins will allow us to kind of support debuggers for multiple languages so let's go ahead do Command right or contrl S now so we're going to reload the Lu file so again shift colon L file present that sign to reload and then on Packer sync to install so we installed the envm appap now the same thing as always we need to create a configuration for the plugin so I'm going to jump to the file tree I'm going to press a and I'm going to add a file called debugging DOL and I'm going to open debugging Lua and we need to specify which adapter to use so I'm going to begin by fetching the plugin fetch the DAP plugin and to do that we will create a variable called dap and we will require dap so this allows us to use the DAP and configure it and we will add delve to debug so dap. adapters. delve and whichever adapter you use it will be the same it will be dap do adapter do the name of the adapter and you can find more information on their GitHub uh and each adapter has their own specific configuration which you will need to apply but it's all documented on the GitHub so if you want to install another adapter uh I'll put a link in the description just go there and check out the adapter so delve is going to be ran as a server and we're going to need to bind a port to that so we we can connect to that port and we're going to use a parameter we will see soon how we can fix that let's go ahead and do a executable and executable is going to be command equals Del oop my bad Del and we're going to pass in some arguments these are pretty much always the same depending on where you want to connect so we're going to connect the DAP to the to the URL of my local IP cuz I'm developing on my local machine and you could change this to a remote machine if if needed oh I made a big typo supposed to be like that I'm not used to this computer that's why I'm misspelling a lot so we say here that we passing the arguments dap we passing the L flag and the local host and the port parameter as arguments we have configured the DAP we can add even more so we can add if you're familiar with Visual Studio code you can have different uh debug programs basically which you can add parameters or environment variables to basically to modify the debugger or the way you run the go program and we're going to add those and they are called configurations in this case and these configurations are going to apply to go so configurations. go so each each time we're inside a go program and run the debugger we are going to have these options available and here we can specify different types that we want to run when we debug so we can specify the type which is Del we can say the name of the execution is called debug for instance and I mean this could be basically anything the name it could be debug with no environment variables for instance and the request type is in our case going to be launch and basically what you put here depends on the program that you're going through on the debugger and you will have to look at the documentations to understand and know what you need to add for a go goang program this just kind of works um unless you want to add or change anything so I'm going to go ahead this is going to run the current file so we pass in file as an example so this configuration will run delve it will run on the current file and we can add stuff for debugging test files for instance if we need to debug tests in go we can also add a configuration for that and and we can do the same thing here we run delve we name it debug tests for instance and we say it's a launch request and the mode is test and the program will again be the current file once we have these configurations we can attach the adapter and we have a few a few launch configurations I hope that makes sense uh let's add a comment launch configurations so let's go ahead we need to save this file contrl oh sorry exit insert mode crl s and then as always we need to also update init.lua because we need to require the file require debugging and we will go ahead and Save and we will exit and we will open up main.go and see so uh an error again at line four I'm just going to go ahead and open debugging and see why debugging line for oh found it at this location we also need to close the arguments I'm going to go ahead and write quit all open main.go again now envm dap doesn't come with any preset mappings or anything so it's a pain to use in the beginning but we will fix this soon so to set a break point we need to run a command so I'm going to run a command called it's a Lua command and we will require Dap You can do this to run Lua inside and we're going to toggle break point and once we do that you can see a b up here this is a icon for a breakpoint so we do have a breakpoint set now I'm going to run a command again and this time I'm going to run Lua require the plugin D and then continue which will execute the and start up the debugger now you can see our configurations here we have debug and debug tests in our case we want to run number one debug regular and you can see that it failed to launch we actually have a s error here so I'm going to go ahead and remove that remove the variable I'm going to go ahead and save the file and I'm going to rerun the debugger so open command Tab and press Arrow up to rerun the old command I'm running it again this time I'm running number one and as you you can see the B is now replaced with an arrow indicating that we are currently here the debugger is at this location at this point we want to see information about what we're doing we can do la require we can require the daap and then we can go ahead and open a ripple and call open on it and we will get the debug tab opening up so if you go down using control W and then you go to insert mode it will add a new tab it will add a new row here and wait for your commands and you can do do Scopes and it will say locals and we have no local Scopes in this code I guess we could go ahead and add some variable again and it would show debugging like this is not going to cut it of course so I'm going to go ahead and exit and I'm going to exit this program and I'm going to exit everything I'm going to open new them again and I'm going to add a few commands so let's go into custom keys I'm going to create a new mapping and enm key enm dap key mappings so for instance we don't want to execute a command to start a debugger I'm going to make it so whenever I press F5 We Run The debugger when I press F5 I want to run the same command that we just did so Lua require dap do continue oh sorry dot continue and then press enter and then the command is done and let's finish that I also want to make sure that control plus b sets a break point so I'm going to add in inside normal mode I want control and B to execute the command require dap. toggle breakpoint and then we also again want to do CR to execute it and then the final param and let's go ahead and save this file now starting and starting the debugger and setting break points should be a lot easier we will need some more mappings because when we debug we will need to step through we will need to step over step into for instance I'm just going to speed up and uh write them down here and add the comments as I go and I'm going to show you some nice things that we will cover so we can do press control+ I to set log point if you're unfamiliar with log points they're basically break points but instead they simply print something to the console to standard out so I'm just going to go go ahead and do whenever we press control and L I'm going to make it trigger a Lua require dap Lua require dap and we also need to make sure to have that command exit and I'm going to go set breakpoint and we're going to pass in nil nil and then the third parameter is going to be Vim function input which will allow us to insert a message and we want to have a small prompt so message logo message and we will exit the set breakpoint function and then we'll want to execute it and let's break that and the finals so we can press contrl L to set log points which is amazing and we're going to add pressing F10 press F10 to step over a function for instance and I'm just going going to go ahead and add them F10 and whenever we call that we're going to do L require dab step over is a function so let's call that and let's close the command like that and we will do the same thing for step into and step out to so I'm just going to go ahead and press YY PP and I'm going to go ahead and change this to f11 and F12 I'm going to change the function that is called so f11 will be step into instead and F12 will be step out and I see I made a typo so it's going to be step not set so step in step into and step over now that looks a lot better and let's see we need to open repple uh we don't want to type uh repple open each time we want to see the debug in inform so let's go ahead oh I'm going to exit insert mode YP and I'm going to have that on F6 whenever I press F6 I want to call the function repple do openen and I want it to execute and basically that's it so I'm going to add one final uh mapping so copy again go ahead and change this and I'm going to change it to DL this is something that I do uh you can set your mappings to however you want well DL for me is going to rerun the last debugger so if I ran a debug and I made change this and I save the file and I want to run the same debugger again I can press DL to re-trigger it and you can do that using run last so I'm just going to go ahead save this file with these mappings once we've done that we can close all I'm going to open up the main file that I have again and this time I'm going to show you that if we do VAR value in let's do value equals 10 and I'm going to say fmt print line value then I'm going to go ahead and let's fix that I'm going to go ahead and press contrl B to add a breakpoint which we just set I'm going to press F5 and I'm going to run the first configuration and we can see the debugger stopped at the line indicated by the arrow and we can press F6 to open up the repple and I'm going to go there and I'm going to enter insert mode and I'm going to do dot scopes and we will see the value being printed so the value is 10 at the current location and we can go ahead and debug stuff from here there's a bunch of stuff you can do I'm not going to cover the reppel but you can do Del help if you want more information about what you can do but let's exit we don't want to debug this way anyways we're going to improve this more so I'm going to go ahead and close all and we have a debugger and debugging this way kind of works we have the functionality to set the debugger we can step in step over and do those regular stuff but I like having a UI I like having a u Yi debug so I can see what's going on easily now this is actually really really uh easy to add so again open up Newen open up the plugins going to add another plugin and we're going to add a plugin called dap UI and we're going to import it this time using a object again and we're going to name the plug-in which is arara and Vim dap UI and that plugin has a dependency and it depends on the plugin that we used to debug because without the debugger we cannot have a UI so add that and I'm going to six string ending like that so and I'm just going to correct this as well I don't know why I did double doubles so let's add that let's save the file let's do a Lua reload and let's do a packer sync to download the UI okay we're done and then we're going to go into the debugging file again I'm going to open it and at this location at the top I'm going to add a new import so set up dap UI we're going to require it same as with the others so require D UI and we're going to uh basically we're going to use the default so D ui. setup which will trigger the default configurations so I'm going to go ahead and save that by default D UI has a toggle function that brings up the UI while we debug but this will break our current layout with envm tree if we bring up that UI our newm tree will still be there and I feel that we don't need the navigation while we debug so I'm going to go ahead and change the key mapping and this is one of the fun Parts about neovim we can do I can make it do what I want now I'm going to say that whenever I press contrl plus d I will toggle debug mode and remove envm tree because it's in the way when we debug so make a new map and again I want this to be in the normal mode and I want it to trigger when I press contrl D and when I do I want to do envm tree toggle I want to execute that function but I want to continue call another function which is require D ui. toggle and then execute that function and then go ahead and close this and like that so before we save this I need to correct that we need to add the closing so it's controll D I'm going to save this file I'm going to go ahead and close it open up the main.go again I'm going to place a breakpoint by contrl B now I'm going to run it pressing F5 enter which configuration and I see by the arrow that it's running and now I'm pressing contrl D and as you can see it brings up the debugger information the dep UI and it's a lot nicer we can see the scoped values and we can see the information uh we can see the stack trace and the g routin is running and we have the reppel window down here and it removed the envm tree which is is uh nice because we don't need it while debugging so this is nice but one other nice thing about neovim is that you can make it reactive so as you Traverse the bottomless pit that neovim is and you will find many things that you might want to do and one thing that is great to know is that there are something called events now about neovim triggers events and plugins also triggers events now just as in JavaScript we can subscribe or listen into these events and apply commands to trigger whenever we see them so as a lesson I want to make it so the DAP UI appears whenever I start a debugger now we could simply make and change the FM command to actually run D UI but let's trigger it on the event from the envm DAP plugin Now new dap triggers two events the before event and after event event and you can find more information about these in their documentation but I'm going to add a listener to these events so let's go ahead and do EnV and let's open up the debugging file and I'm going to add my event listeners here because they're related to the debugging DB fires events before and after trigger dap UI when we see them that should be clear right so to do this we can do we specify the plugin and we access the listeners and then the name of the event in this case it's going to be after and then the event initialized and it's going to be D UI config so whenever this happens we're going to execute this function and what we want to do is we want to open d U and we have already imported D UI here so we can access D UI by simply doing D UI do open and then we want to end the function and this will make it so that the DAP UI opens up whenever the DAP plugin has the event initialized event triggered I'm going to go ahead and do the same thing for the before and instead of event initialized I'm going to do event terminated terminated because we want to close the UI whenever envm dap plug-in is shut down so let's go ahead and do an end and at this place we want to do wui do close so whenever the event that the dab is terminated we want to close the UI and one one more thing is event exited if it finishes we also want to close it so let's go ahead and add that and hopefully you see here how easy it is to Shan these things together and making the editor really go ahead and become uh the way we want it so we have added the event listeners I'm just going to go ahead save the file exit it go inside EnV set the break point press F5 open the configuration and this time you will see it ran the DAP UI now it did not remove the new V tree because we didn't tell it to but if you want to you can go ahead and add that as an exercise you can also try pressing n because remember that those we still have the shortcuts we can still these are just new tabs that opens and we can manage and control them the same way as everything else so go ahead and try adding so the new Vim tree doesn't open up for you H whenever the DAP is Ran So let's be honest what we have done so far is powerful and flexible as hell we can make it look and do whatever we want but it still looks like crap so to make new look a little bit better we can have color schemes which modifies how neim looks changing the color scheme will basically it's a lot of colors you can change and you can modify that however you want um I'm not much for styling I'm I have a really crappy eye I'm color blind so it's doesn't really help uh but one cool theme that's really popular is the Dracula theme and you can actually make neim look really good by just importing that plug-in uh which will modify the color scheme for you so I'm just going to go ahead and show you how to and it's the same as always it's the three-step rocket update plugger add a configuration file Rec require it in the init.lua and you're good to go so let's go ahead we're going to add and it's mul SL Dracula envm so once we've added that save the file reload the Lua file and then oop forgot to close the string then save the file reload the Lua file and then Packer sync which will download Dracula for us and then we're going to configure it I'm going to go to the tree add a new file called styling. Lua and I'm going to open styling that Lua up and we're going to apply the color scheme that is Dracula and the way to do this is we type vm. CMD and it doesn't matter if you download Dracula or any other color scheme this is the way you apply it you do vm. CMD color scheme and then the name of the down downloaded color scheme so if you have multiple ones you can switch them out by changing the Dracula here to the name of the theme that you have found so save the file and then the last step we need to require it so that new knows that it should apply the settings so let's require styling let's go ahead and uh save this and then close it and whenever we reload it's going to look a little bit different and it's just going to look a lot nicer and I like this styling a lot more uh Dracula looks great out of the box and hopefully hopefully you think so as well so that's how easy it is to apply a new color scheme there's a lot of them out there uh but I mean draa is nice enough for me we're going to apply some quick development tools to just make it a little bit uh nicer uh and there's a tool called tree seitter which is used to make more advanced code highlighting and better code highlighting basically and at this point you should really know what's going on when we add stuff um so I'm just going to speed up a little bit and add and showcase some of the really cool plugins that are available so I'm going to go ahead and make a new requirement here or or a use here and we will download and use something called envm tree sitter which I really recommend it's a really nice plug-in tree sitter we're actually when this plugin runs we're actually going to have a custume function and we're going to end it and this is from their um this is from the plugins GitHub they do recommend you to do this uh I really don't know to be honest why there was something some kind of bug that could be uh could be happening if you don't do it this way so we're going to do local TS update require the plugin and do update and we're going to pass in uh a object and it's going to have the field with sync set to equals true and then we're going to call and execute that function which we just created we are requiring the plugin and V treit there and let's go ahead let's save this file and let's reload the Lua file and something is wrong oh so the thing that was wrong is I forgot a colon so let's go ahead and addit save the file L reload and then Packer sync to install it so it installed treer for us I'm going to go ahead and close that I'm going to jump to my configurations file create a new file which will be syntax highlight highlight. Lua I'm going to open it up and we're going to configure the highlighter so I'm going to require the tritor configs and I'm going to execute setup we have to specify the parsers to use and I want to use treesitter uh whenever I am handling go files or Lua files or rust files for instance and we want to Sy installation false and I will Auto install any tools needed so and we want to enable enable highlighting of the code so enable equals true and before we save the file uh we need to add these colons here so we don't have any syntax errors otherwise NE will complain once we added the commas we also need to go up to the top and replace it should be envm treer do configs that we set up so save the file go into init Lua import the file and by now you should you should really know the steps always the same three steps so syntax highlights do and let's go ahead save the file let's open up main. go and you will see that it starts downloading the tree Seer for go because we set it to autoinstall and I'm getting some errors probably because I have them installed since before and the tree seater for rust has been installed one has failed I'm just going to go ahead and restart it and as you can see the syntax highlighting now actually highlights the function names and everything looks a lot better so treer is really amazing for that advanced syntax highlighting and I do recommend it so we have a nice looking it's starting to look really good actually so I'm going to go ahead and go into plugins again I'm going to go to the bottom and I'm actually going to add a new plugin and the same thing here I'm going to add a configuration and we're going to add telescope telescope is really amazing and it allows you to search for files using GP for file names or even inside files so so I'm going to go ahead and require the plenary as a requirement uh and you can find the configuration for um how to install it in the GitHub all the plugins will have a link in the description uh but we need these two so let's go ahead let's save it let's reload the Lua file let's do a packer sync it should install the plugins and once that done again we need to add a configuration for them I'm going to add a file called filefinder Lua I'm actually quickly going to jump to the custom keys and inside the custom keys at the top I'm actually going to add a comment change leader key now the leader key is a key that you can use to start commands and in my case I'm going to assign the leader key to uh to comma so I'm going to do Vim dog map leader and I'm going to set it to comma so whenever I press comma it is known as the leader so I'm going to save that now I'm going to go back to the file finder and in here we will add key mappings that executes the file uh the telescope plugin and there's a few things that you need to know about the telescope one of them is so you do need rip grip installed to proper Ed telescope it's really simple to install basically there's an installation instructions on GitHub pause the video install it uh I'm on auntu for example it's simple as up to get install rip grip rip grip is really amazing you should install it once you have rip grip it's time to start key mapping the telescope we're going to add a the ability to search for files and one thing about telescope is that it actually respects your git ignore and I'm inside a git repository right now I have my DOT files here I'm going to go ahead and do key. map key map set is a function this is another way of setting your key maps previously we imported the function but we can also call it right away so we're going to use the newly assigned leader plus FF which will bring up telescope so we can search now to do that we're going to call Lua require telescope. builtin there is other ways to execute this you could require buil-in as a variable and call it call the function from there they do so on G the reason why I'm not doing it is because actually configuring becomes a lot more code uh simply calling the function like this will allow us to configure the command straight in the Lura here so it's a little bit easier so I'm going to call the F files which will bring up the f file prompt I'm going to pass in some settings such as no ignore which will make it not follow and respect G ignore I don't want to follow G ignore in this case sometimes you do sometimes you don't if you have times when you want to search unhidden files for instance only and maybe not get ignored files you can change this command have it on another key mapping for instance it's all to how you want to have it and we're going to execute the command we're not passing any options so it's just going to be like that we're also going to add live grip then we're also going to add a key mapping for live grip I'm just going to go ahead copy this because it's all lot to write and I'm going to change it so it's going to be leader FG G for grip we're going to change the function called to live grip and actually live grip doesn't accept these configurations I think it accepts hidden but it does not accept the no ignore so we're just going to call the function and execute it like this now at here in the top we also need to close the command like that so we have two new functions and before I save this file I need to change this to close the function so let's save the file and let's let's add it to init Lua let's go inside init Lua and let's require the file finder script let's save this and let's quit once we've done that we can open new him again I'm going to press my leader key which is comma comma FF and it will open up the find file search as you can see I can see my files here now it's super fast to search for stuff and as you can see it's really just kind of nice to have when you're searching for stuff now if I open up rip grip it's not going to show anything and that's because in my case I have G ignored all the files inside of my home folder. config and I kind of get add the ones I want to save in my repository I know it's strange that I have a git repository here sorry about the confusion but we can I can show you how fast rip grip is by going up a few steps I'm not in my git repository anymore I'm going to execute NE vim and I'm going to open the rip grip and rip grip uses fussy searching and whatever you search for it's just going to be super fast so let's see if I search for go for instance you're going to see it finds a million files but it's still super fast so it's RI grip is really recommended so before we end things I just want to show you one final plugin so I'm going to go back to to my config newm I'm going to clear my screen and I'm going to open up newm again I'm going to go inside my plugins folder and I'm going to go page down to yump to the bottom and I'm going to go ahead and add a status bar which is kind of nice to have when you code sometimes which shows you the GitHub status of the repository what branch you are in and a little bit more so I'm going to call use something called envm Lu line and LU line envm it will also have a dependency to the dev icons and if you didn't download them before I really recommend you to do so because uh they make it look a lot better and I'm going to set it that as an optional so once we have added the Lu line let's go ahead let's save the file let's reload Lua file and let's add a comma I always forget the commas so let's go ahead save the file reload Lua and then let's go ahead and execute Packer sync to download the luine plugin and once that is downloaded oh a lot of updates so once that is downloaded uh I'm going to go ahead create a new file I'm going to call it status bar. Lua I'm going to open it and for this tutorial we're simply going to use the defaults so I'm just going to require it and call the setup function so that is executed I'm going to save that file I'm going to go inside init Lua and I'm going to add the requirement now how you structure your files is up to you you don't have to have as many files as me I like making a file per plugin basically or kind of area like the debugging file it contains all the plugins related to debugging it depends and it's up to you how you want to structure that uh some people have like one giant file and like that I like having many small files I find it easier for me to understand what is going on so once we' require that I'm just going to go ahead and quit all and open newm again and you will see that we now have this nice looking kind of bar which shows us some information about I'm on the master Branch I have a few changes and a little bit of information about the file and that's really nice by now I think you understand how you configure and use newm there's a ton of things to learn but we could go on installing plugins together forever but I think it's time to kind of let you go and have you learn and practice some by yourself there is a bunch of plugins that I can recommend so I went ahead and reset my newm to my regular configurations just to show you a few plugins that I can really recommend so the first one I want to recommend is something called AO Pairs and basically it's as simple as whenever you create a single bracket it will create the counterpart for you just kind of a nice to have youtil when you code because you will always probably want pairs so Auto pairs does that for you now I also have something called a buffer line and as you can see at the top here it shows me my current open buffers so I can navigate easily between them also I have something called indent backline which is basically just for showing me the indentations of the code it can be really nice to see uh how many indents there is uh on each row uh I can also really recommend float term which is this one which allows you to open up a terminal as a popup but more than that it allows you to open up a terminal with other programs running such as lazy git for instance if you want to have a git integration into the newm so if I go ahead and do leader G for example I open up a float term with lazy git running here I can see changes and control what's going on inside of my git repository on my machine and one other thing that I really recommend as you can see I'm getting a few errors here because I'm running a linter and linters are really important and I love them so I can really recommend a plugin called envm linter it allows you to set up as you can see here I have a linter for cargo and I can configure it I also have linters for goang and I can configure them and add many linters this way and it's really easy to just kind of have them uh uh running and what I have done here is that whenever I save a file it will run the linter for me I can really recommend envm lint there's also a plugin called trouble which I can recommend now trouble allows you to have a trouble tab such as this one I can see the current errors inside of my file and it's just really handy and trouble also allows you to navigate using it so if I open up trouble again it brings me to the trouble and if the were multiple troubles here we could jump between them and that's really nice and as you can see here I have a to-do which is highlighted and that is another thing that I really recommend to-do highlights you can add different tags it doesn't have to be a to-do it can be a bug or a hack or any other tag that is supported and one thing about that is that it is actually supported with telescope so not only can you add them to your code but you you can also search for them inside of telescope so what I've done is that whenever I press my leader key and ft for instance it brings up this to-do and I can search for to-dos here so it allows you to find to-dos using telescope as well remember that telescope respects get ignore files so I won't see mine because I have G ignored it also I can recommend tag bar tag bar is what we see here uh it's a code overview basically you can see the main function you can see all your functions because it tags the code so you can really outline the code in a nice way and it makes it easy to navigate in large files because you can jump to them using this tag bar and I really recommend it we have learned how to use new there is of course much more to learn about neovim but I think that if you start using it daily you will kind of get to a point where you learn how to use it efficiently so far we have covered the most needed Basics and the needed knowledge to kind of get started using newm you shouldn't have a problem using newm after this I think and you should be familiar with how to install plugins and I can really recommend you to go out there and search for plugins and hey even build your own plugins maybe so after this tutorial I think we should be familiar with navigating newm using normal mode and insert mode uh you should be familiar with how you execute commands in vim and you should be familiar with how to add plugins and how to configure them and really handling plugins using Packer should basically be easy now I really do recommend you to look up how to set up linters and formatters and a hint is Mason kind of has support for this so it's a good tip now it will come as a good practice for you to install a few plugins on your own to make it really stick try setting up a linter maybe for your favorite language or kind of start configuring it to work for your favorite language all of the plugins that we have covered are generic so they work for all the languages you just have to install the language server for instance there are often plugins in newm which can help you set up things as well so for instance for an awesome go experience in neovim you can look up a repository called x-ray go which installs a ton of stuff for you that are used just really nice to have when you develop using go in neovim the con of those packages though are that they often cont contain a lot of stuff and from my experience at least what I feel when I install them uh I have no idea what's going on I have no idea about the features to use the key mappings they add uh it's usually like kind of overwhelming and I like adding my own stuff uh as I as I need them and during my my and during while I work with it I kind of get these ideas like oh I need a key mapping to do this and I can add it as I go if you have trouble following this guide you can find my DOT files at my GitHub I will put a link to all the plugins that are used inside of uh the description here you can also find a written tutorial basically it's the same thing that we have done but in an written format on my blog as well if you like this video please feel free to like and subscribe my channel feel free to reach out to me if there's anything you're wondering about or if you want to say that you like my video or if you want to say that it sucked feel free uh please leave feedback so I can improve my channel in the future hopefully you feel comfortable with neim and what can I say go out build yourself a dream editor I'm constantly changing mine try joining a community uh I'm using the newm channel on Reddit a lot people are super helpful and you don't have to feel any worries about asking questions we we we've all been new I'm still kind of new to Nim and I'm just constantly learning learning and I hope you will as well take care and bye
Video description
This is a Repost of my Old NeoVim video, in this Edit, I have improved the Sound and increased the speed a little to improve the experience for my viewers. Sorry for the repost, but YouTube does not allow proper sound editing for uploaded videos. A Step By Step Tutorial On How to Set up And Use NeoVim, For Complete Beginners. This tutorial won't hand you a perfect IDE configuration for NeoVim, for that you can google after people's dotfiles. This tutorial aims to help you understand NeoVim and learn how to manage it, allowing you to build whatever you want after. I won't expect any previous knowledge in either Vi or NeoVim. The complete dot files after this video can be found at https://github.com/percybolmer/dotfil... if you need help debugging. If you Rather read you can find this video as an article on https://programmingpercy.tech/blog/le... If you want to support me, feel free to buy me a coffee https://www.buymeacoffee.com/percybolmer Plugins mentioned in the video Packer - https://github.com/wbthomason/packer.... Mason - https://github.com/williamboman/mason... Nvim-LSP - https://github.com/neovim/nvim-lspcon... X-ray Go - https://github.com/ray-x/go.nvim Hrsh7th - https://github.com/hrsh7th/ Nvim-cmp - https://github.com/hrsh7th/nvim-cmp/ cmp-nvim-lsp - https://github.com/hrsh7th/cmp-nvim-lsp cmp-nvim-lsp-signature-help - https://github.com/hrsh7th/cmp-nvim-l... cmp-nvim-lua - https://github.com/hrsh7th/cmp-nvim-lua cmp-path - https://github.com/hrsh7th/cmp-path cmp-buffer - https://github.com/hrsh7th/cmp-buffer vim-vsnip - https://github.com/hrsh7th/vim-vsnip nvim-tree - https://github.com/nvim-tree/nvim-tre... nvim-dap - https://github.com/mfussenegger/nvim-dap nvim-dap-ui - https://github.com/rcarriga/nvim-dap-ui dracula - https://github.com/Mofiqul/dracula.nvim nvim-treesitter - https://github.com/nvim-treesitter/nv... nvim-telescope - https://github.com/nvim-telescope/tel... nvim-lualine - https://github.com/nvim-lualine/luali... Links to Recommended Plugins autopairs - https://github.com/windwp/nvim-autopairs bufferline - https://github.com/akinsho/bufferline... lspSaga - https://github.com/glepnir/lspsaga.nvim IndentBlankline - https://github.com/lukas-reineke/inde... FloatTerm - https://github.com/voldikss/vim-float... Nvim-Lint - https://github.com/mfussenegger/nvim-... trouble - https://github.com/folke/trouble.nvim TodoComments - https://github.com/folke/todo-comment... Tagbar - https://github.com/preservim/tagbar Links to Nvim Docs Install Neovim - https://github.com/neovim/neovim/wiki... Nvim docs - https://neovim.io/doc/user/intro.html vim.opts - https://neovim.io/doc/user/options.html vim.opt.completeopt - https://neovim.io/doc/user/options.ht... NetRW - https://neovim.io/doc/user/pi_netrw.html Cmp Functions - https://github.com/hrsh7th/nvim-cmp/b... vim.api - https://neovim.io/doc/user/api.html#n... nvim-Dap-Servers - https://github.com/mfussenegger/nvim-... nvim-dap-REPL - https://github.com/mfussenegger/nvim-... Events - https://neovim.io/doc/user/api.html#a... DAP events - https://github.com/mfussenegger/nvim-... Other links Nerdfont - https://www.nerdfonts.com/ Font Manager - https://itsfoss.com/font-manager/ NvimTree Guide - https://docs.rockylinux.org/books/nvc... Delve - https://github.com/go-delve/delve RipGrep - https://github.com/BurntSushi/ripgrep 00:00 Introduction 02:43 How To Install NeoVim & Configuring 06:15 Plugin Manager Packer 09:30 Explore using NetRW 12:12 Installing Mason 14:18 Installing LSP support 17:30 Installing GoPLS 27:33 Adding Code Completion And Suggestions 37:40 Learning about Key Mappings and adding a few 46:00 Formatting the Code Suggestions and Styling them a little 51:00 Installing and configuring Nvim-Tree 01:03:00 Installing a DAP to support Debugging 01:21:00 Adding a UI to Debugging using dapui 01:28:00 Adding Dracula Theme to make it shine a little 01:32:12 Adding Treesitter for Folding and Better Syntax Highlighting 01:35:00 Adding Telescope for searching 01:42:00 Adding Lualine for a status bar 01:45:00 I recommend and showcase a few Plugins you can install on your own to train 01:48:30 Conclusion and Ending