We can't find the internet
Attempting to reconnect
Something went wrong!
Attempting to reconnect
Analysis Summary
Worth Noting
Positive elements
- This video provides a detailed, honest look at the limitations of prototype hardware, specifically identifying thermal issues that many 'influencer' reviews might ignore.
Be Aware
Cautionary elements
- The use of 'revelation framing' regarding corporate surveillance is a recurring motif used to build high trust and insider status with the audience.
Influence Dimensions
How are these scored?About this analysis
Knowing about these techniques makes them visible, not powerless. The ones that work best on you are the ones that match beliefs you already hold.
This analysis is a tool for your own thinking — what you do with it is up to you.
Related content covering similar topics.
Transcript
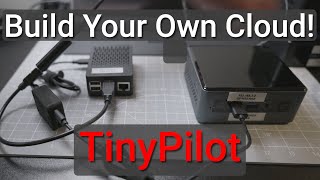
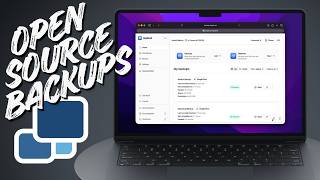
A couple years ago, I set up Frigot, an open- source network video recorder for my security cameras. I put a Raspberry Pi inside this 1U rack mount server, and I used a Google Coral TPU to help it detect people and cars outside the studio. My goal is to always run stuff like this 100% local. Unlike Ring, I don't want my security cameras to be part of a global surveillance network for like Palunteer. The OneU server's been running great, but today I'm testing this. This is an upgraded miniack version. Almost everything's better. Well, except for one thing. Since AI is driving up the price of hard drives, I'm actually putting in 4 TBTE drives here instead of the 8 TB drives in my old one. But this little box is built around this. This is the Xavis Cruiser, a board powered by a Raspberry Pi Compute Module 5. The board has SATA ports to plug in hard drives. It has eight power over Ethernet ports, so I can plug my cameras straight into this board without needing a separate PoE switch. It has an NVME slot where I can install an AI accelerator. Then it has a faster 2.5 gig network port and even a built-in ESP32 that gives it ZigGB for like smart home integration. This is a much more powerful board than the one in my oneU build. And Exevis, who used to be called Axis, sent it to me to test. It's enclosed inside this prototype 2U mini rack mount from DeskPie. Now, I mentioned it's a prototype because I've been talking to both Exeiz and DeskPie about this build for over a year. The final version of the rack mount will probably be a little better, but it's already functional with a nice quiet fan on top and two hot swap drive bays. Well, kind of hot swap because currently the cabling in the back is a little bit of a mess. They're working on that, but the whole thing uses around 20 to 24 watts of power with 8 TB of storage and a Halo 8 AI accelerator. Everything is running locally here, 247, and I can integrate it with Home Assistant or any software I want. I don't have to send my footage over the internet to Amazon or Google or anyone. And all in, this setup should cost around 500 bucks, depending on what hardware you pick. Now, before I get to building this, I should go back to when I installed my front security camera. I mentioned when I moved into the studio, the place already came with a 4 camera Hickvision setup, but the cameras were positioned for the previous business. I wanted to make sure I at least cover the two entrances, so I had to reroute the existing Ethernet cable they used for their old front camera. I got on my ladder and reran it through the ceiling tiles, making sure to pass it through some beam clamps. Then at the wall in my little lobby space since the top of it is metal, I used a step drill bit to make a hole. Then in the wall, I drilled out a hole for the POE cable to pass through, mounted the camera's wall plate, and position the camera while looking through the feed on my phone. And now I have two cameras permanently mounted here at the studio. I'll probably put one or two more inside so I can check on things when I'm away. But two 1080p cameras is a pretty basic setup for a lot of places. and that old server's been managing those fine for 2 years. So why upgrade? The Coral handles the two feeds and the Compute Module 4 doesn't have any major issues. The three main reasons I want to upgrade our space, using better supported hardware, and speed. The Compute Module 4 runs fine, but sometimes it can be a little sluggish. The Compute Module 5 is over twice as fast, and at least in my initial testing, even with three camera feeds, it's a lot more snappy. And regarding support, the interceptor and CM4 are fine, but Google's basically abandoned the Coral. Google hasn't really updated anything for like 5 years, and I don't like running abandonware on my network. So, for this build, I'm switching over to the Halo 8, which I got in a Raspberry Pi AI kit a couple years ago. The Halo isn't perfect, but it's faster, and it also has up-to-date software support. And finally, the 1U chassis for the Interceptor I was using is pretty big. Not everyone has space for a 19-in rack. And while I do right now, I'm also trying to downsize my gear. Now, there are plenty of alternatives for running Frigot. Like, if you have an Intel mini PC or a newer Rock Chip SPC, you can get object detection using built-in hardware with no Halo required. But there are two things I'm getting out of the Cruiser that I'm not getting there. A built-in managed PoE switch, which would normally cost around 50 to 80 bucks, and two SATA drive bays. If you want redundant storage and you can't afford big SSDs, other solutions result in kind of a cabling mess. That's not to say there aren't creative solutions like 3D printed hard drive trays, but this is nice because it's an all-in-one metal enclosure. There are also other all-in-one boxes like the Ubiquiti NVR for $299, but still you'd need a separate managed PoE switch with that and their software isn't open source. It's nice to have a self-contained box that I have total control of. Now, looking at the cruiser board, the architecture on here's a little different. Since the Pi is bandwidth constrained, it's actually using USB 3.0 for some of the heavy lifting. Like this JMS 561 chip is a USB 3.0 to dual SATA adapter. In my testing, it's been running fine, and they even have hardware RAID support if you want it. But I chose to run my 4 TB hard drives in a software RAID one array, so if one drive dies, I'll still have all my footage. For drive power, the board has a Molex power port with enough juice for two drives using this little adapter cable. Next, there's the upstream WAN port that's 2.5 GB. It's a RealTech RTL 8156BG chip that goes from USB 3 to 2.5 gig Ethernet, and it works fine, though there's a tiny bit of overhead loss through USB. The M.2 NVMe slot is connected directly to the Pi's PCI Express bus. And then there's these two network switch chips that connect through the Pi's built-in 1 GB Ethernet. POE cameras tend not to use much bandwidth. In fact, all my cameras are 100 megabits, so that's not going to be a bottleneck, at least until we have like 12 or 16K security cameras. The board also requires 48vt power input. And that's one thing that's a little bit of a downside. You basically need a flex ATX size power brick to get 280 watts, so you can power the Pi, two hard drives, and up to eight PoE Plus devices. Exovvis recommends this particular power supply, but a 48volt 6 amp power supply is in general going to run you at least like 50 bucks. The board also has an ESP32 built-in with wireless capabilities, so you could use it for a Ziggby connection in Home Assistant or even for some Wi-Fi or Bluetooth features that you could program in yourself. There's also these two quick connectors for like IoT sensors. So, this thing isn't just made for frig. You could run this as a full Home Lab server or a NAS for home automation, too. There are a few other features I won't get into, but the first thing I did was assemble the Cruiser into this prototype 10-in rack mount case from DeskPie. The prototype version of the case has a fan integrated into the top and back section, and it's held on with some screws. One thing I noticed is there's a lot of vents around the case that lets the air come from all around the board, but it also means the hottest part of the board, where the pie is, might not get as much air flow as it needs. Later on, when I get to performance, we'll take a look at the thermals. That's one thing I think I'll give DeskP by some feedback about. But here's the board closer up, and you can see there's a front panel header where I plugged in the power switch. Then there are two SATA ports for the hard drives, and these face up. So, if you have these stiffer cables like I do, you'll have to bend them a little bit to fit them under the top cover. Otherwise, you could get some thinner, more flexible blue cables if you want. But those plugs in the Molex get power and data to the drives. The extra slack can kind of be tucked away in the back, which we'll see in a minute. There are also a few fan plugs for more case fans. Besides the four pin Pi5 style fan plug next to the CM5, I put a thin heat sink over the CM5, but I think the best option would be to use a fan heat sink combo like this one from EdTatech. I had to scrge around for a few M3 and M.2 screws for the prototype build, but DeskPie or Xavis will probably supply the right screws in the final version of these things. I installed the Halo in the M.2 slot, and then I put in the hard drives. Now, initially, I didn't have the sleds. I had to order a couple on eBay, which I'll get to soon. So, for now, I just kind of slid the hard drives right in the openings and plugged them in the back. When I was putting the top cover on, I plugged the fan into the board and then I tucked the cables in the back. Like I said, I've been giving DeskPie some suggestions, so I think the final version of this thing should look a little bit better. But yeah, there's the whole build. And then there's the power supply up top. There's no getting around the fact that this thing's huge. You'll have to find a place to tuck it, maybe underneath or strapped onto the rack somewhere. But all in all, it looks great put together. I think one more suggestion I'd have is like an IO shield. Maybe even a 3D printable face plate that I could stick in there to make the front look even more polished, but I'll wait to see the final version from DeskPie. And one last thing is that power button doesn't have an LED for power status. So, I suggested they switch to a power button that also has a power LED ring, so it's easier to see if it's powered on from the front. Now, the next day, I got in two drive sleds I ordered off eBay. And these are basically Dell R720 sleds with light pipes for status. But right now, there aren't any LEDs behind the drive, so those lights are just off. The drive sleds slot in a little tight in terms of getting the latch on both sides, but in the end, it looks pretty good, and the drives don't slide out unless you unlatch them. That also makes hot swap easier. And I confirmed with Xavis, the J Micron chip they're using supports hot swap, so you don't have to shut down if you want to replace a hard drive. And before I get to software and RAID setup, there is a little dip switch you can use to turn on hardware RAID, but I usually recommend software RAID either with MDmin or ZFS. Exiz actually has some benchmarks showing that you can use either mode. And the main advantage to hardware raid is really that it just uses a tiny bit less CPU when it's writing files. Anyway, with everything put together and PIOS installed on the Pi, I got to setting it up as a network video recorder. The first step was to get my storage going. I have a guide on my website for setting up software raid on Linux, so I won't get too deep. But the main thing is after you create the array, you have to make sure to save the settings or it won't get mounted automatically after a reboot. Once that was set up, I wanted to do some simple thermal tests. I ran S2E to stress out the system and let it go for a while. I pulled out my thermal camera and yeah, things are getting pretty toasty. The CM5 actually throttled under load and I think the main reason is that fan pulling in air from all over the place. it's not really directing enough of that over the Pi. There are a few ways we could fix that, like putting in a duct for the fan or using a fan heat sink on the Pi, but that's something I think Desk Pi can fix in their final design. But next up, I set up the Halo 8. I wrote up the full process on my blog, but basically Fri maintains a little setup script you run, and once that's done, you reboot and make sure the Halo device is working on the Pi's PCI Express bus. Since mine was, I went ahead and ran my PIN NVR Ansible playbook that automatically configures everything for Frigot, like Docker, MQTT, and all the configuration files. That playbook's actually pretty similar to how it was 2 years ago when I made my OneU server. So, if you're interested in automating your Frigot setup, go check it out. I'll put a link in the description. I did run into some errors with the Halo processor, but I got those fixed using the commands that I also put in that blog post. Now that Frigot was running, I could see the two existing camera feeds in my dashboard. And almost right away, it started detecting people around my studio. I quickly ran outside and tested that it would detect me. And what do you know, it did. To make sure the Halo was being used, I hopped over to the system metrics dashboard, and sure enough, it was using the Halo, and detections were on average around 10 to 11 milliseconds. The CPU load is pretty low, and that's the main thing with a Frig setup. You you really don't want to rely on CPU object detection unless you like burning up tons of power. Looking at my Home Assistant power monitor, the full system is using around 22 to 24 watts of power, which is honestly not bad at all. That's with two spinning hard drives writing two camera feeds. What if I add another one? And what if it's a 4K camera instead of 1080p like my other two? Up to this point, I was using my cameras plugged into my network with a PoE switch in the rack room. I wanted to see if I could use the built-in PoE switch on here to plug in a camera and get it straight into Frigot. I plugged in this Anki 4K camera and it powered up right away. An Exovvis actually maintains a little gooey for their switch and after you open it, you can monitor port status and power usage. It looks like my camera was using about 2.5 watts of PoE power. After the camera booted up, I ran NAPAP on the cruiser to scan the internal network for new devices. It found the camera at 10100.187. So, I added a configuration for the Anki to Frigot and restarted it. Now, I have three cameras on the dashboard. And to test it, I walked over to the camera and waved. After a few seconds, back at the computer, I saw the Halo detected a person waving, and I could just click on that and watch back that footage. The last thing I tested was resetting one of the PoE ports on the cruiser using their little PoE tool. I just selected the port, clicked reset, and after a few seconds, it ran through a power cycle and rebooted the camera. Hopefully, they can brush up the UI a little bit more, but it's functional, and being able to remotely reset PoE port power is probably the main reason I love using managed switches for powered devices. At some point, I'll probably connect this Frigot install to Home Assistant. That way, I could automate like sending a picture when someone walks up to my door. But the Cruiser goes a step further. Ex has built an integration for Home Assistant that puts PoE controls directly inside your dashboard. That's pretty cool and something I'd love to see more of from other network vendors. On the whole, I'm impressed with everything you get, especially the quality of the documentation XV already has pre-launch. I think if DeskPie can iron out a few of the enclosure quirks I mentioned, this is going to be a killer setup for network video recording or even a generic storage server for mini racks. The cruiser board will go on sale for between 99 and 149 bucks and you can find everything I mentioned linked below. Until next time, I'm Jeff Gearling.
Video description
I more than doubled the performance of my NVR with a new CM5 board. And it has PoE+ built in! Some of the resources I referenced in this video (some links are affiliate links): - Exaviz Cruiser: https://exa-pedia.com/docs/cruiser/ - Frigate: https://frigate.video - Seagate IronWolf NAS 4TB HDD: https://amzn.to/46vIPyx - Hard Drive sleds (Dell R720-compatible): https://www.ebay.com/itm/404293056771 - DeskPi 2U mini rack mount: https://deskpi.com/products/deskpi-2u-mini-rack-mount-case-pre-order-for-the-exaviz-cruiser-carrier-board - My 1U Interceptor NVR build from 2024: https://www.youtube.com/watch?v=7wkVGcdI2vk - Blog post configuring Hailo and Frigate on Pi CM5: https://www.jeffgeerling.com/blog/2026/frigate-with-hailo-for-object-detection-on-a-raspberry-pi/ Exaviz sent me a prototype version of the Cruiser for testing, and DeskPi sent an early prototype of their mini rack case for the Cruiser. Neither company paid for this video or had any input in its production, but I still mark my videos as 'sponsored' if any equipment was provided by vendors in the making of the video. See my sponsorship policies here: https://github.com/geerlingguy/youtube#sponsorships Support me on Patreon: https://www.patreon.com/geerlingguy Sponsor me on GitHub: https://github.com/sponsors/geerlingguy Merch: https://www.redshirtjeff.com 2nd Channel: https://www.youtube.com/@GeerlingEngineering 3rd Channel: https://www.youtube.com/@Level2Jeff Contents: 00:00 - Upgrading from the Interceptor 00:38 - Exaviz Cruiser CM5 board 01:57 - Adding another camera 02:46 - Google abandoned the Coral TPU 04:27 - Cruiser's USB-heavy architecture 06:08 - Building the mini-rack server 07:43 - Tada! And some hot-swap drive sleds 09:02 - Setting up RAID, Hailo, and Frigate 10:53 - Power consumption, PoE, and a 4K camera 12:17 - Future Home Assistant plans