We can't find the internet
Attempting to reconnect
Something went wrong!
Attempting to reconnect
Analysis Summary
Worth Noting
Positive elements
- This video provides a classic, high-speed overview of the Ruby on Rails philosophy and the specific technical improvements introduced in version 5.0.
Be Aware
Cautionary elements
- The 'scaffolding' demo can create a false sense of simplicity regarding the long-term maintenance and architectural challenges of a large-scale application.
Influence Dimensions
How are these scored?About this analysis
Knowing about these techniques makes them visible, not powerless. The ones that work best on you are the ones that match beliefs you already hold.
This analysis is a tool for your own thinking — what you do with it is up to you.
Related content covering similar topics.

Create a URL shortner with Clojure and MySQL
Daniel Amber

Santa Claus on delivering 99% Uptime
Kai Lentit
Alpha preview: Action Text for Rails 6
David Heinemeier Hansson
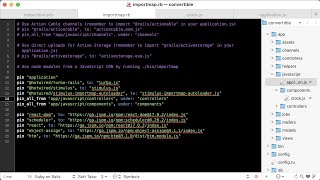
Alpha preview: Using React with importmaps on Rails 7
David Heinemeier Hansson
Alpha preview: Converting a import-mapped React app to use esbuild with JSX in Rails 7
David Heinemeier Hansson
Transcript
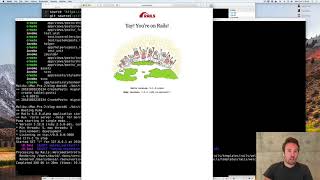
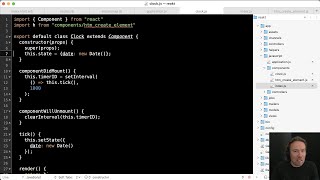
welcome to rubyan rails my name is David hmer Hansen and I'm going to give you a tasting tour of the framework this is not a tutorial this is not going to make you an expert in rubyan rails there are a bunch of much longer tutorials and guides and books to do that but uh before you dive into that it's always great to just get a general introduction and perhaps a motivation to dig deeper so what we're going to do together here is build a Blog um this has been the prototypical example for re rails for the past 13 years so we continue in that tradition and we do so by starting to run the uh rails new command the rails new command creates a basic skeleton a bunch of directories and essentially empty files for you to fill in with the guts of your real application so your real application um has to consist of models and controllers and Views and all that good stuff um and to get started on that we have another sub command the generate command that can generate a whole scaffold for um one such resource in your application we'll start by generating the post resource um it's going to have a string it's going to have a body and when we generate that um we will be generating um migration which sets up the database table for our model it's backed by the database it's going to have the controller the post controller where all the actions hit and routes where things goes and a bunch of views to set up your basic Crow operations well let me start by showing you just the migration here um so you can see what's in it which is not a whole lot it's just creating the table for that um posts model the title and the body and let's run that migration just to get that out of the way when we run rails migrate it'll run all the migrations that haven't been run yet and create them in the database and encode that database schema into uh DB schema as you can see here okay all good and well now we have a basic scaffold um let's have a look at what that looks like so we start the rail server and go to the browser and yay you're on Rails congratulations rails uh 50 rc1 release candidate one which is what I'm using to record this with but that wasn't really what we were going for we were going to see our brand new scaffold so let's have a look at that that doesn't look like much does it now by intent uh this scaffold is ugly because it is not intended to be used in new form of production this is just here for you to learn the framework and how things fit together so let's do that hello World um one two 3 so first you saw the index now you saw the new now we create the post now you're showing the post and now we can edit the post um and if we go back here we can even destroy the post so that is a complete crud setup well what do the code for that looks like let's take a look we'll leave that running and go in here and voila there are a bunch of directors here as you can see which is can be a little bit intimidating especially if you come from sort of a simpler nonf stack framework that doesn't try to take care of everything well realse does realse does try to take care of everything so let's look at some of all those everything that post controller we just created here um as I that has the whole crud setup uh and let's go through that flow we just saw first we hit the index command that lows all the post it then automatically renders a view that fits with the name so we go into the views here post index okay that's nice and simple um then we go to the show um the show relies on the fact that we have a before action that sets up a post as an instance variable you can see that down here then it loads up the show template gives you the edit and so forth um and from there we have new we have edit we have all the other things blah blah blah all good and well well one thing actually I just wanted to show you was we also have a different um view here for the index command for example at Json view um we generate this by default as you can see um if we do J get post Json then we actually get the Json content on that page let me show you that just real quick voila that's pretty neat and you get that sort of for free um everything in rails is designed around the notion of um multiformat so that you can use a single controller and output things both to Json or HTML or whatever else have you okay anyway let's make some changes to our brand new scaffold here we can start by um requiring some things of the view for example um oh sorry of the model um and the first thing we're going to require here is that we will validate uh the presence of title that the post will simply not be valid unless we have that well let's test that real quick um make a new post create that post whoops there's an error title can't be blank where does that come from I have another look here okay it comes from the post validating this because when we try to create it if post saved then all is good and well but safe will return false if there are validation errors and then it will render the um new template which includes this uh form partial and the form partial shows all the errors right here so that's basically just what you're seeing by default we have all these errors encoded um with just some Standard English you can internationalize that if you want all good and well um let's try to actually break this template though uh when you're typing this out sometimes you just make mistakes like a typo on the title let's see what that actually looks like if we um go back here and try to uh edit this thing we already have oh title X obviously we meant something else we actually meant title as you can see here it extracts the source so you can see where the air comes from it even gives you a back trace and down here there's even a console so you can inspect things um try to figure out what went wrong pretty neat um another neat way of sort of having a look inside of your application and help debug things sometimes so just set up some some data if you need it it's the rails console so the rails console gives you access to your entire domain model for example we can load that first post that we created by hand we could also load all the posts that will give you a whole collection of them right now we only have one or you could even um call a query on one them let's say we only wanted uh the post that were created between uh yesterday and tomorrow even see what that SQL looks like uh before we run the query like that or we can just uh run it we can of course also create a whole new post here um hello from the console and body that's good see that even runs the transaction and then sets the post you can see everything that's going on as you interact with your the main model which is is uh pretty handy well a Blog is not much of a Blog if all it has its posts so let's add some comments to this structure as well we're going to run the um scaffold command again actually we're not going to run the scaffold command we're going to run the resource command because we don't need a full controller with views and everything else for um for this comment so we just need a resource that will create an empty uh controller and no views but still the model um for that resource so we're going to make a new comment and that comment is going to reference um the post and it's going to have its own body great so that creates another migration as you can see up here um looks pretty similar it'll make a reference foreign key to that post and um let's micrite the schema to get us there now the databas is set up for that as well okay so now there's a um comments controller but we have to sort of tie that in with the with the post controller somehow and the the first step for us to do that is um setting up the proper routes when you generate these things the rout are already being made for you but kind of in a naive form comments of course they rely on the fact that they um are children of posts so we will just Nest this which will create a bunch of routes for us uh we can see all the routes by doing this okay and all the routes so of you see we have post comments it requires that you pass in that uh that post that this belongs to okay all good and well um oh one last thing let's look at that uh model we just uh generated for the comments so as you see here that's being set up as belonging to the post that's creating that link based off the foreign key between the two but we didn't actually change the uh post as well to say that that has many comments now there is a bidirectional link so we can go from one to the other and back again um we could quickly just experiment with this in the console we can say post first that gives us a post does that have any comments no it doesn't let's create a comment that has a body of say something funny voila as you can see all the um connections are being set up here if we now load these comments again that has a comment that's great but but we don't really have a way of showing these things yet so let's take a look at getting that um let's go to the um show post and then um we're going to add a section below the post that I have precooked right here that'll show the comments as you can see um it just has a differ where the comments are going to go um and these things uh we're calling them with render and then a collection this collection will then introspect it as this thing shows by looking up the partial that fits with that model and loading the entire collection for it well let's create those um partials in here um so we're going to have the common partial a partial is basically piece of a sub template and we're also going to have the uh new template here now I kind of pre-baked those as well because um the comments are basically super simple they just output the body and when something was created and then the new field is a little more interesting um we're going to have a form for a new comment that is scoped by post that'll set up the correct route and it'll also uh yield a form object that we can then interrogate here with the text area and body and submit and all that stuff okay let's see if we made any errors and check if that's actually set up correctly um let's go to just the first post here oh look at that say something funny it is um the comment we created in the controller or in the console is already there but if we want to add another comment well we have the form we have everything set up what we don't have set up yet is a way for um the form to communicate with a controller so let's go back and make that controller for the comments since we um created this through the um generator for resource it already has a stop controller but there's nothing in it so let me just remove that and put in my my pre here um we're going to create a Commons controller that just has a a create um method on it uh create action where it looks up the post that we're trying to add comments to it creates that as you can see here it using something called comment params this is what we call strong parameters where everything is Whit listed such that nothing just gets added automatically to the database you are in control of what gets added so you also have to remember obviously to change this if you add any additional U resources and then after that it just redirects back to post uh by redirecting back to post we do the same lookup as we did with the uh render where it looks up that the route for the Post uh matches the model name and so on so forth this is this whole convention over configuration theme we have going in all of rubyan rails where we can assume a lot of things by following set of basic conventions okay let's see if that actually worked um hello from the form voila excellent so that can now add comment so now we have basically sort of a basic outline for a Blog a very primitive blog but a Blog nonetheless now let's um use a few of the other elements that uh rails gives us for example uh mailers so if you want to uh send email for M and rails that is super duper simple as well we can set up another generator here um for a mailer and it's going to be a comments mailer and it's just going to have one action for now called submitted which is the action we will call when a new comment has been created and we send that to the author of The Blog okay as you can see here creates a comments mailer and a couple of views for it including some tests too um let's have a look at the comments mailer um as you see comment mail is already set up for internationalization as well I won't cover that in this um quick um run through of rubyan rails but you can dig into that later well we're going to extend this a little bit such that it can take a comment um and we assign that to an instance variable which means that that instance variable will automatically be available to the view we're going to send this uh mail to the block owner it's going to have the subject of uh new comment hooray and that'll basically render now the templates we have set up for this comments mailer um and send it to this uh Blog owner so let's have a look at the mailer templates um there are two versions of this there's an HTML version and there is a text version um if we start by the HTML version first let's remove this and I will add a pre-bake in here um you got a new comment and we can actually render the very same templates as we were using for the controller in here in the HTML version of the mailer um but in the text version we're going to want to have something a little simpler that doesn't render anything with uh with text in there and HTML in there um okay so now we have a mailer set up and what we can actually do here is we can see what that looks like um we have this neat feature called mail previews um that will allow us to add a UR uh in development mode look at what these emails look like so let's do that real quick you got a new comment on hello world say something funny uh that's the HTML version and then we got the plain text version pretty neat it's a great way to iterate on the design of these templates um before you actually try to hook them up but let's try to hook them up so we go back to the uh comments controller and now after we created a comment uh let's save that to a local VAR and we're going to call the comments mailer it's going to call submitt it with that comment and then it's going to deliver later deliver later means that we don't want to tie up the response to this uh action uh by sending the email in line we use deliver later which will trigger the uh job framework of rubyan rails to send this email asynchronously even the rendering of the email will happen asynchronously outside of the main uh request response flow which is pretty pretty neat let's see if that actually worked so um go back to the terminal and get us ready to create another um comment here uh hello again uh when we submit that comment and go back and look at what happened um you can see here in the um log that we're processing uh common scroll uh create with all these parameters that incuded delivery job from action mail that was the deliver later we set up and then as we were processing our response it was sort of a chronus to doing that in development mode of course it's not thata asynchron it's just all running with threads on the single process um but nonetheless it renders the comments mailer and all the templates for it and then it sends it to the Blog owner um it sends uh two M time versions of it one HTML and one with the regular uh setup that is pretty cool so uh now our blog is already um pretty functional but let's add something even more interesting in rails 5 we introduced a brand new feature for Real Time updates to Pages based on websockets U we're calling this action cable and in action cable you create channels so let's create a channel for comments such that um new comments are added on the page they're automatically sent to anyone watching that page at that time we can use another generator for this generate Channel and we're going to call this channel just comments Channel just like we had with uh the mailer creates a couple of steps here um let's have a look at the uh first one it's the Ruby side the server side version of the of the channel um it has two callbacks set up by default uh subscribed and unsubscribed um and we're going to add one more thing in here um let's see yep a broadcast method um this broadcast method allows us from somewhere else in the app to say hey send some stuff to this Channel and everyone that subscribes to it by default it's going to broadcast to a specific uh channel here and we're naming this channel after the post that comments belong to not going to set it up fully because that's a little beyond the scope before I'm going to show you right here but we will set it up in sort of a naive way that all this streaming just happens off the last post in real application you would figure out from the URL or an embedded tag which post you were on and just subscribe people to that post but um for now this will do what this also shows is that we can use the common controller rendering setup outside of the context of the common controller itself so we can render these partials that we have set up uh independently of that flow which is really helpful for channels that often want to send rendered HTML to a recipient okay that is the server side um of this new comment controller we also need a client side um so that not that that was the other stuff that we just automatically created for the uh controller here is the stuff that we created for the channel and we're not really going to do anything on connected disconnected um what we're just going to do is we're going to receive some data and when we receive uh data which is the template uh render template of the comments that we just set up in that um broadcast method we're going to uh basically just add that to um that uh ID comments diff that we had set up earlier we're just going to pin that and the data comes in form of a comment um you can see that on the comments um broadcast uh it sends data dot whatever you want to send to it here and the comment comes in the form of HTML fragment okay so that looks pretty simple um let's then see if this stuff works um we're going to go uh back to our setup here um and we're going to introduce a uh actually let's go back and make sure we have the latest remember we used post last so we need to post number two here to uh to do broadcasting from and then we're going to use a second uh browser here as well um this browser is going to say um something interesting oh what happened nothing happened because we had actually not tied it up such that when we submitted the new comment that um that it was also going to send be uh broadcasted out so we're going to take our common Channel go back to our common controller and add another um call here um oops not submitted we're going to broadcast uh this comment when a new comments comes in okay let's see if that then Works um uh reload make sure we're on the connection with both of these um is this thing on great whoa yes it was on wonderful so now we've been broadcasting to to both channels as one this is of course a pretty naive uh setup um but nonetheless shows you the strength and the ease of being able to use an integrated framework where you can reuse all the templates and reuse all the mod models whether you're talking over web sockets or you're sending emails or you're doing responses um in line and of course as with all of this um we also have tests line up so if you want to run rails uh test you can run test on something specific like just on the controller uh let's run on the post controller um or you can run it on the model or you can run all your tests together um of course in this case we still had that error we had embedded in the um uh form so we GNA have to go back and fix that let's fix that um let's see where do we have the form here it was fix it go back let's rerun our test voila there you have it that is Ruby un rails version five with a bunch of the goodies I hope you enjoy the show