We can't find the internet
Attempting to reconnect
Something went wrong!
Attempting to reconnect
Analysis Summary
Association
Pairing a new idea, product, or person with something you already feel positively or negatively about. The goal is to transfer your existing emotional response without any logical connection. It works below conscious awareness.
Evaluative conditioning (Pavlov); IPA 'Transfer' technique (1937)
Worth Noting
Positive elements
- This video provides a very practical, hands-on demonstration of idempotent shell scripting and the use of GNU Stow for configuration management.
Be Aware
Cautionary elements
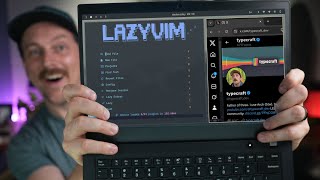
- The seamless integration of the Framework laptop as a 'fresh install' demo unit serves as an effective, non-disclosed endorsement within an educational context.
Influence Dimensions
How are these scored?About this analysis
Knowing about these techniques makes them visible, not powerless. The ones that work best on you are the ones that match beliefs you already hold.
This analysis is a tool for your own thinking — what you do with it is up to you.
Related content covering similar topics.

Why I Won't Be Using Omarchy
The Linux Cast

The Ultimate Hyprland Setup: ML4W OS 2.11.1 on CachyOS (Single Command!)
My Linux For Work

Omarchy Preview
David Heinemeier Hansson

Omarchy - The Best Tiling Window Setup Ever?
Chris Titus Tech
You NEED to try this Linux Setup! (Omarchy for Newbs)
typecraft
Transcript
Let's say you've taken the plunge. You've heard all about Omari. You've seen the posts on social media. And you thought to yourself, gee, you know what? I have some free time. Why don't I learn to install Hyperland and Arch Linux? So, you download an ISO, you flash a thumb drive, and here you are with Omari. Now, Omari is the most beautiful, complete, and straightforward Linux configurations I've ever used. But what if I told you Omari isn't perfect out of the gate? What if you have some preferences for programs that you like? Let's say you don't want to use Chromium as your main browser. Maybe you have your own Neo Vim config or oh god, maybe you use Emacs. If this is the case, you'll want to configure things after you install Omari. But how do you do that? In this video, we're going to cover installing programs item potently, installing DAW files, and then finally customizing Omari's defaults to my liking. And the best part, this is going to be super easy to bring to any other Linux installation you use in the future. And I'm going to show you how easy that is by installing it on Oh, let's get it right here. This brand new framework laptop I have right here. This thing is amazing. And in this video, I'm going to show you not only how amazing that framework laptop is, but how we can bring our updates to Omar onto this laptop on a fresh install. Super easy. Let's get right into it. So, first off, Omari comes with a terminal called Elacrity pre-installed. Now, elacrity is a really great terminal, but let's just say it's missing some of the features that you like and you want to install something like Ghosty, by the way. So, if you want to install Ghosty, you can use Yay, which is a Pac-Man helper that again comes pre-installed with Omari. You type yay- s and then you type ghosty and then you hit yes and okay ghosty is now installed. But how do we do this automatically? Well the simple solution is to build a shell script. So let's open up neovim and create a new file called install ghosty. This is a shell script. So we type shebang/binsh. This tells your operating system to run this as a shell script. And sh is a pzix compatible shell. But usually it's similar to something like bash on your machine or shell probably comes pre-installed. Either way, this is how you start off every shell script with what's called a shebang. Now in this shell script, we write essentially what we wrote in our shell earlier. We type yay- s, but then we add a couple of flags. No, confirm and needed. And then we type ghosty, which is the package that we want to install. We can save that. And then to make it executable, we type chimod plus x install ghosty. There we go. So now we can run install ghosty. And hey, ghost is already installed. It ran the installation script and we're good to go. Now let's install another program. Stow is an excellent program that enables us to manage our dot files really easily. So let's install gnu stow. Instead of running it in our shell first, let's just create a new script called install stow.sh. SH. Again, we start off with a shebang, which tells our operating system to run this as a shell script. And we type ya- s- no confirm- needed stow. Now, we can make that file executable. And if we run install stow, there we go. Stow is installed. Well, it was already installed on my system, but you get the idea. Now, having all of these installation scripts is great and all, but here's the thing. You're not going to want to just run installation script after installation script on your new Linux installation. You're going to want a more automated way of doing this. So, let's create a new master installation script to run all of these scripts that we just created. We can create master installation.sh. Again, we type shebang bin sh. That tells our operating system to run this as a shell script. And we can just source the files that we created. We created install ghosty.sh sh and install Stow. If we save this file and also make this executable and then we run it, we can see that we just ran all of our installation scripts by running just one script. Now, this might seem a little over the top because we only have two programs we're trying to install and they're pretty simple, but if you have a lot of programs that you're trying to install whenever you bring up a new Linux installation, a lot of these programs might have different prerequisites. They might have different configurations that you need to install with those programs. It's nice to have these things in their own contained scripts because inside of each script, you can keep any of the different prerequisites or whatever else is needed when you install each one of these programs. and it's super easy to maintain. Also, quick side note, this is how Omari installs all of its programs when you install Omari. It's just a series of shell scripts. Don't believe me? I'll show you. Let's go to the GitHub for Omari. And we can see under bin, we can see that we have all of these installation scripts. All these things do is just install stuff very similar to what we just did in this video. We are essentially recreating how Omari sets itself up so that we can have a nice cohesive way of installing everything on top of Omari whenever we have new installs. As you can see, it's pretty similar to how we do things. Now, of course, you're going to have more programs you're going to want to install. Let's say you don't want Chromium as your main browser. You want to install Firefox, anything else. All you do is create a new shell script, add it to your master shell script, and you're off to the races. But there's one main thing I want to do here. And installing Stow is a little bit of a hint. I want to install my dot files. So let's go ahead and do that now. Now Stow is an amazing program that enables us to amongst other things easily create sim links from a repository to files on our system here. Let's show it off really quick. Now I already have a doiles repository that conforms to what you would want to see in a Stow repository. If you're not super aware of Stowe, I actually have another video on my channel that explains Stow, how it works, and how we built this repository that you're going to see right here. So, let's go over an example. If I want to install DoFiles for Ghosty, I can look at my Ghosty configuration, go to config, and see that I have dot files right here. So, all I have to do is download my dot files repository locally, which I have right here. I see that I have all my dot files right here. I can cd into one of my directories and check out that I have a config folder which has my ghosty configuration in it. So if I go to the top level of my doiles directory and run stow ghosty that has now created a sim link from this repository to my system. I can check this out by going to my local config ghosty directory and checking that yep, there's a sim link right here between my config and my ghosty dot files. Really good. Now, this might seem like overkill for our situation, but if you have a lot of dot files, if you have a lot of configurations, Stow is a really great way to pragmatically store them and also use them as sim links on your system automatically. So now let's go into our directory where we are actually storing all of our installation scripts and let's create, you guessed it, another shell script. So we can create our install.files script. And I'm actually going to just paste a script because I don't think it's all that interesting to see me type all this out by hand and I don't want to bore you all. But let's just go over it really quick. We see right here we store our directory in our shell script so that we can reference it later. We have our repo URL which is the repository that I just showed you. And we have the repository name just as a variable so that we can easily reference it later in our shell script. Down here we have a couple of helper functions to check if Stow is actually installed. If Stow isn't installed, it will prompt us to install it first and it will exit. Otherwise, it will continue. Next, we will clone our repository because we're trying to do this item potently. If we spin up a new Linux installation, we want to do this as easily as possible. So, we want to clone our repository in this script. Once again, this is why we're storing everything as its own contained shell script because a lot of these things need to be in the shell script. And if it's all one big script and it's super messy, but one script per thing makes this way easier to manage. Then if our clone was successful, we will remove some of our old configurations like Neoim because Omari comes with lazy Vim installed by default and it's pretty great, but I like having my own NeoVim configuration. And we can then just run our Stow commands right here, which is exactly what I just did for you in our shell previously. So if we write that file and then chimad it to actually be executable and then we run our install.files files script. It will install all of our dot files. Now, it didn't seem like it did much, but let me just open up Neoim really quick. We can see that, yep, Neoim is actually brand new. It removed all the old configs, added our new configs, and now Mason is running, installing all the things that I want installed in Neoim. This is Stow working for us, and it's fantastic. And this is pretty great. So, now we have another piece of the puzzle solved. All of our dot files can be managed by Stow really easily. And we created another shell script to download our repository and then run Stow on all of the DAW files that we want on our new system. Pretty cool stuff. Okay, so now we have our programs installed and our DAW files are in place. What happens if we want to actually tweak the configurations that Omari gives us by default? Like I don't know, let's say this 200% scaling by default's a bit much for me. How do I change that? Well, for starters, Omari has an amazing way to edit your configs out of the box. Here's actually an excerpt from the Omari handbook. Almost everything can be edited through setup, configs, process, which is super, alt, and space. And then you go to our setup and configs. So now for me, let's just say I want my monitor to be a little bit less zoomed in. So in our configuration that we get to, we can actually add a line to change our monitors scaling. So we can type monitor equals preferred auto and instead of 200%, let's do 1.6. We can write that file and we can see that it automatically changes our configuration. So what's the problem with this? Well, if you have a new installation of Omari or if you're trying to install Omari on a bunch of different computers, it's going to be hard to copy and paste all of your configurations that you want on top of Omari every time you install it. So, how do we solve that problem? Well, the answer, of course, is more shell scripts. Here, let me show you how it works. We can go back to our shell scripts directory and create a new file called, I don't know, omari overrides.com. This is a configuration file for Omari. Now let's say in this configuration file we want that same configuration we had before. So monitor preferred auto and uh we want 1.6 for our scaling. Okay. Now that's great and all but how do we actually add this to our configuration in Omari? Well that's actually pretty simple. You see we can uh create a new split here. We can open up our config hyper hyperland configuration file. And at the bottom here we can actually just source another file. So you see Omari itself is already very modular. We can just add another source line down here. We could source in this new directory we created which is supplement the Omari overrides.com file. And this file could hold all of our configurations that we want to override for our default Omari install. And you can see already I just wrote that file and we have our new configurations already set. That's pretty cool. But once again, we're not going to want to type source every time we create a new Omari installation. Let's say we have a bunch of computers. Like I said before, that would be really annoying. So, let's create a new shell script to actually implement these overrides that we've created. Simple enough. Let's create another shell script called install overrides.sh. And once again, to spare you the thought of me typing everything out by hand, I already have a script ready that I'm going to just look over right now. You see, we reference a whole bunch of configurations at the top of this script. And essentially, all we're trying to do is automatically add that source line to the bottom of the hyperlink configuration file just like we did before, but we're doing it automatically with shell scripts. And we can see here we just have a few checks to see if our overrides config is actually available and if the hyperlink config is available. And we have one more check here where we GP for the source line at the bottom of that file. And if that exists then it already exists in the hyperlan config. We don't have to resource it. This is making our code item potent. It means we can run it as many times as we want without actually having any problems because if it sees that source line at the bottom of the file, it won't do anything, which is good. That's what we want. But if it doesn't find that source line at the bottom, it will just echo the hyperland configuration line into that hyperl configuration and [music] we're off to the races. Simple as that. So I can actually make this jamod plus x install overrides. I can then make that shell script executable. Now when I run that install overrides shell script, it will actually add that source line to the end of the file and since it wrote the file, it is now changed and we have our smaller screen. Pretty awesome. Okay, so now we have our whole entire system set up. We're installing the programs we want when we set up a new Linux installation. We're installing our dot files using Stow and we're also implementing the overrides we want for Omari. And we're doing this all item potently with shell scripts. This is an amazing setup and it's actually super easy to implement because of the way we built it on any Omari install that we may have. And to show this off, let's install it on our brand new Framework 13 laptop. But first, we got to build it. So, let's build our Framework laptop. It actually comes packaged really, really nicely. There's all these little boxes that have all the components that go into this computer and they're all labeled really well. It's a pretty straightforward process to build everything. It comes with these hot swappable expansion cards for USBC and they're pretty awesome. Now, the best part about this is that you can scan this QR code that comes on the box and actually comes with amazing instructions full of videos and steps to complete this build. So, let's go ahead and get right into it. When you open up the computer, you see it's all laid out for you. It looks pretty intimidating, but it's actually fairly straightforward. Now, I'm unboxing my USBC ports here, and I actually got a couple different kinds. I got two USBC's. I got an expansion card. It's 1 TB. And I got HDMI as well as USBA just in case. I also unbox my RAM. It comes with two 16 gigabyte sticks, uh, 32 gigs total, pretty good. And also, I got the one TBTE hard drive. And you see in this box, it also comes with a screwdriver that's really easy to use. Now, you can see in the instructions, I have a video here for installing the RAM, and I'm going to go ahead and do that right now. Installing the RAM is a pretty straightforward process. You lift up a sheath of some sort, and you install the RAM into its seat, and it all kind of clicks in nice and easy. Then, when I install my hard drive, it's just one screw that holds it down. And that's pretty easy to install as well. Next up is the keyboard and trackpad. This also looks pretty intimidating, but really it's just one ribbon cable that you attach and then you can kind of flip the keyboard over and push it on to the machine itself. Next up is the bezel. The bezel is pretty cool. This one's actually a translucent purple bezel. It's held on by magnets, so it kind of just snaps into place and you're kind of all set to go. Now, there's capacitive screws on the back to sort of tighten up the keyboard. You screw those in, you're good to go. I pop in all of my USBC expansion cards. I have HDMI, couple USBC ports as I said before. Then when you power this bad boy on, you can see that it comes up with a screen with a QR code, and that means you're pretty much done and ready to go. So now we're here with our Omari install. It's a fresh install on this beautiful Framework 13 laptop here. As you can see here, I've opened up my terminal and I have my repository, which I have all of the scripts that we worked on in this video and a couple others that I like to use. But I'm just going to go ahead and copy this URL from this GitHub repository. I'm then going to clone this repo onto my system. And that's all it takes. I can cd into Omar G supplement, which is the name of the repository that I use. I'm just going to make my font a little bit bigger here. The default font's a little small for my liking. And all we have to do is run our install all.sh shell script. And this will install all of the programs that I want and override the configurations with the configurations that we made here in this video with a couple others that I like. So let's run this now. I just enter my password and away we go. Wow. And that's all it takes. You see right now we have installed Stow, we installed T-Mox and we installed Ghosty. And if you see right here, our prompt looks a little bit different. And that's because in my DOA files I have a special starship prompt. Now, Omari uses Starship now by default. So, all it did was just change my prompt and it looks amazing. Now, if I open up Neoim, we can see that, yep, this is my Neoim configuration. Everything got overridden nicely. And we can see that everything actually works out of the box because we made some nice small contained item potent shell scripts. Omari is amazing and customizing Omari is super simple. I hope you learned a thing or two about shell scripting, Linux, and how awesome these framework laptops are. So subscribe for more Linux, Vim, and Bash tips and tricks. And hey, thanks nerds.
Video description
LEARN: https://learn.typecraft.dev/ X: https://x.com/typecraft_dev Lets say you’ve taken the plunge! You’ve heard all about omarchy, you’ve seen the posts on social media. And you thought to yourself “Gee I have some free time why don’t I learn hyprland and arch linux?”. So you download an iso, flash a thumb drive and HERE YOU ARE WITH OMARCHY. I consider omarchy to be the most beautiful, complete, and most straightforward linux configurations I’ve ever used. But what if I told you omarchy isn’t perfect out of the gate? Let’s say you already have preferences for programs you like. Maybe you don’t want to use chromium as a browser, maybe you have your own neovim config or maybe, oh god… you use EMACS? If this is the case you’ll want to configure omarchy after you install it. But how? well, In this video, I’ll show you the three different steps I take to customize omarchy to my liking.