We can't find the internet
Attempting to reconnect
Something went wrong!
Attempting to reconnect
Analysis Summary
Worth Noting
Positive elements
- This video provides a practical, step-by-step walkthrough of setting up multi-environment Docker management, which is highly useful for home lab enthusiasts.
Be Aware
Cautionary elements
- The use of 'NEED' in the title creates artificial urgency for a tool that is ultimately an optional convenience for most users.
Influence Dimensions
How are these scored?About this analysis
Knowing about these techniques makes them visible, not powerless. The ones that work best on you are the ones that match beliefs you already hold.
This analysis is a tool for your own thinking — what you do with it is up to you.
Related content covering similar topics.
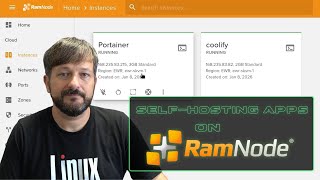
How to Deploy Self-Hosted Apps on a RamNode VPS
Learn Linux TV
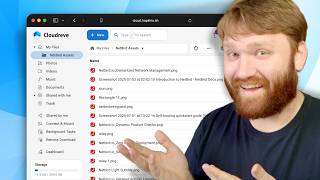
This Nextcloud Alternative Caught Me Off Guard
TechHut
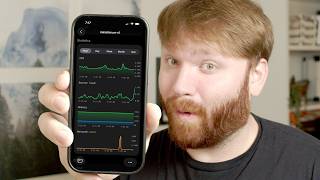
MUST HAVE Home Server Companion Apps (mobile)
TechHut
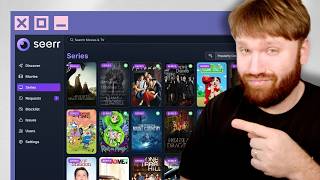
You need to DITCH Overseerr and Migrate to Seerr
TechHut
What can you DO with 1TB of RAM?
Dave's Garage
Transcript
Hello everybody. This is Tekk. In this one, what we're going to be doing is checking out a tool called Dockhand. What this is is a powerful intuitive Docker platform free for home labs ready for enterprise. So they do have enterprise license options. From a surface level perspective, what this basically is is an alternative to something like Port Tainer, which is a tool that I love, but I haven't really seen myself using that much anymore. I usually just manage all my Docker Compose stacks and directories with the terminal. Works good for me. But the problem the problem with that is there are updates and things slipping through my fingers. I don't really have a good way to monitor manage all of these different Docker Compost decks that I have on a variety of different systems. And hopefully this tool right here is something that could go ahead and help me out. So what we're going to do in this video is set this up on a desktop computer that I'm currently using as kind of my LLM server. has a lot of Docker stuff running on it. So, this is a great place to start. I will add a different environment from a different different machine so I can maybe manage a bunch of different stuff from the one instance. We'll go over some of the features. We'll change some settings. We'll have some fun. And we'll do all that right after I give a big thank you to the sponsor of today's video, gamma.app. If you're somebody who's into AI, which I understand if you're not, Gamma might be a awesome tool for you if you're looking to generate presentations, socials, websites, and more. Just to give you a quick demo here, let's go ahead and create new. And I'm going to generate something. Let's generate a presentation. And we're talking about Docker. Let's generate something for that. So, I wrote out this little prompt here just asking it to create something on anything that you'd want to know with Docker. I'm going to generate the outline there. And it's going to work pretty quick. They've recently added Nano Banana within their platform, which is the Google Gemini model. You can use it in their platform for free. It's incredibly quick. Everything is interactive. So, you could go through, make sure all the content is actually decent, edit, move things around, change everything how you want it to be. I could pick the general theming. I could pick the actual image generation type. And I can just click on generate, which you could see here. And then you could go edit it, manipulate it, do whatever you want. use it to build actual content or generate ideas for what you want to do. One thing, the layouts are really nice. And it is generating these images on the fly, which is cool. And of course, they have a bunch of fantastic internal tools to go ahead and edit this. But real cool, if we go over here, click on share, you can export it in a variety of popular formats, which is helpful. So, if you're interested in trying it out, go ahead and check out my link down below. Generate a deck, refine it, export it. That's the workflow. So, big thank you to Gamut. Now, we are going to go and get this set up. Over here in this terminal, I've already sshed into the server that I do plan on installing this on. It's Fedora. It has Docker. It's got a 3090 in it. It's a pretty beefy machine. So, under home lab, we're just going to hit get started for free. We have a few options. So, you can see we can do a Docker run command. We have a simple Docker Compose right here, or we have a Docker Compose stack if you want to use Postgress instead of SQLite for your database. If I go over here, I'm just going to show you kind of how I got this set up. Right now, I have two docker compose stacks. One for zero byte, one for automation. So, if I ls automation for example, you can see I got the compose, got nadna, open web ui postgress in there. For this, I'm going to go ahead and just make a new directory. Call it dochand cd into this new directory. And then we'll make a new compose file right here. For this, I don't really see a need to run postgress. I'm not going to be storing a whole lot of data. So, let's go ahead and copy this and then drop it on into our compose YAML. Now, here I'm really not going to change too much. I don't have any services running on the port 3000. We have the image here. We have the var docker sock. So, you are going to be exposing the docker sock obviously because it's going to be managing everything for you. Now, one thing I might not want to manage this in a docker volume. So, I'll go ahead and get rid of that. that's probably recommended to, but that's not really how I do things. Here, we're going to put this in our current working directory. So, in that home Brandon uh Docan directory, we have Docan data, and I am actually going to allow it to see one more directory. And you'll see this in action in just a little bit. And that is going to be my home directory. So, I want home Brandon to expose home Brandon within the container. And that is where I have a lot of my current Docker stuff. And that's how I'm going to easily import it. Again, you will see that shortly. So, let's just go ahead and run it, shall we? Docker compose up dash d. We don't really need to see it cuz we could easily just jump over here and see if it's working. So, let's go 183,000. And here we are. We are in dockhand. Now, I am going to configure my first environment, which is going to be my local environment. So to do that, we're going to go to settings and here under environments, we're going to add a new environment. This is going to be my let's just call it something like Fedora local. And if I go ahead and click on this, you get some more information. So the socket is going to be that Docker sock that we allowed it access to. Additionally, you do direct connection with the engine API. And this I think it's hoser. This is how we're going to connect uh off-site machines. They're not really offsite machines that aren't the machine that this is running on. Machines in my local network. So all that looks good. We have our public IP here. I'm going to do my local IP. So it will work if I click on something. So this can be 180. And we could just add that. And just like that, it's added. So if I head over to my dashboard, you can see my environments right here. And I have that Fedora local environment with those containers running. If I go ahead and open this up, you can see I have nadn postgress a llama web UI and zero byte as well as docand just right here. When it comes to the individual container management has everything you'd kind of expect if you're familiar with port tainer bunch of the same things including simple stuff start, pause, restart. We have view details. You can browse the files which is pretty cool. So in like zero byte for example, if I clicked on browse files, it'll actually open up a whole file browser which is nice. And you have the ability to create files, upload files, refresh, and so forth. Additionally, you could jump into the logs, jump into the into the actual CLI for the container, and delete the containers. There's also quick options here to prune, refresh, and a big one is checking for updates. So, if I click on check for updates, we can see I do have a few different things to update in the settings. And you'll see you can automatically have it check for updates at certain times of the day. You can even have it automatically update things, which I would not recommend. But let's say I want to update a llama. I just click on that update and then it's going to go ahead and pull download the image and restart the container with that new image. So, it will be all up to date. And there we go. It's done. So now that container is up to date and you can see that little update notification there is gone. Now then of course over here we have access to all the different logs. Really easy way to go ahead and jump through and actually see the logs for everything that we're running. We have multi here. You could change how it's displayed. Group logs. You can view it as singles if you'd like to and view it this way. It just has multiple viewing options. And then of course you have options to download the logs, copy them, change the font, autoscroll, bunch of really cool stuff. Then over here shell kind of the same principle philosophy. So if we go to a running container such as O Lama you could see connecting to a llama shell you could change this if you want to. So you could go sh in which there I'm now actually connected to Lama. And now over here under stacks this is where I like to have some fun. Now earlier I added this right here Brandon home and that's because these are unttracked. These were created externally. So I want to link it up to their actual docker compose yaml file. So what I could do so let's say dohand for example if I go ahead and click on this unttracked right here. It's an unttracked stack. This stack is running in docker but dohand doesn't know where its compos file is. And since I gave it access to my home directory I should be able to just go to home brandon dochand and then the compose yaml is right here. Select that. There we go. And now I could just hit save or save and redeploy. I'll just go save. if I don't want to crash the whole stack. And then I would just do the same thing with something like a zero byte here. So home Brandon zero byte compose select and then this one I could save and redeploy. There we go. And just to make sure I don't think it's going to mess with permissions, but if I get out of here and let's go ll. Okay, so good. The compose is still managed by me. If I go into zero byte, I believe it's going to be the same situation, which it is. That is good. Now, quickly while I'm here, I'm going to do this, but I'm not going to show you because I got some uh passwords. And there we go. And it's really one thing that's really nice about these stacks is I've opened up automation here. I just kind of linked the source. And we could see all the individual containers. So, we got four of them in this stack. We could see the specific memory, the IP address or the Docker internal IP address for the specific stack to see where that is running. Just overall a lot of information and quick access to a whole bunch of the other things that we saw such as the logs, files, and so forth. Now over here, we can see all of our images. This 8 gig image, not sure what it is. It says it's unused though, so let's go ahead and save some space by getting rid of that. Real easy there. If I drop down, we could see more information about the images. And then the same with volumes. We don't have any volumes cuz I opted not to use that. We could view all of our Docker networks. Here we have our registry. So you have Dockerhub by the default and then you could use this to search things such as Ubuntu. It' bring up the latest official Ubuntu image. You could see all the tags and easily just pull or run them directly from here. And then from there we have activity. So we can see things that I'm doing, see what's happening. Then we have schedules in which you can run various which these are all system schedules that are already here. And I'm pretty sure if I added the uh checking for updates and stuff through the settings, it would show up there as well. So, if I go into settings here, we have basic stuff, time format, date format, UI stuff. But one thing I want to change, let's go environments, and edit this environment. I I could have went to all this stuff when I first added it. But here we have updates. So, right now, enable schedule update check. That's off. Let's go ahead and turn that on. And 4:00 a.m. daily. That sounds fine by me. Automatically update containers. Not going to do that at the moment. And then we have automatic image pruning. So, we go ahead and save some space and enable that. So, if an image isn't being used, it will automatically get rid of it. And let's go ahead and change my time zone. Mine as well. So, all that looks good. And I could save that. And actually, let's go back. Under activity, you can pick what you actually want it to monitor. Under security, you can enable scanning for vulnerabilities. And then for notifications, I don't have this set up right now, but for a wide variety of different things that happen within Docker, you can get notified of those things happening. Now, if I go back to schedules here, we can see we have the update environment Fedora local that is there ready to go. There's no runs and we also have the prune images right there. So, it will automatically kind of save me some space on those unused images. Now, if I jump back to settings here, we have our environments. We have our registries. We have git here. So, if you want to actually deploy your package or your stacks through git, you can set that up at a repository. I don't have a specific use case for that, so I'm going to just kind skim over that. If you do, you know what's going on. We have config sets, and this is basically just a template that you can reuse for multiple uh different containers or deployments. So, if I have a config set, you can see the name, the description, bridge network, you can set the environmental variables, port mapping, so on so forth. And then right here we have notifications. Now, if I added a channel, you could either use SMTP or apprise for web hooks. So then you could use uh Telegram, Slack and so forth to get various notifications. And then here if I go to global system events. So this is where you would set that up, but I am going to skip that for now. And then last but not least, at least last but not least that we care about is authentication. If you didn't notice when I connected to this, it did not have me sign in at all. Probably not the best thing to have as a default, but we're going to easily fix that by first adding a user. So there we go. Filled it out. A fair password is better than no password, that's for sure. So there we go. The user has been created. So now I should be able to enable authentication. Going to test signing in real fast. And we're back in. So that worked. And then right here we have single sign on. So you can add single sign on providers just using client IDs and secrets. We have the callback URI. So if you're using something like authentic pocket ID, you can enable that here. And that is something I definitely will do once I get all that set up. Personally, I'm going to be leaning towards Pocket ID for all my uh single sign on local stuff. You can see there are some features hiding behind the u advanced enterprise feature, which I mean some of it makes sense. So, we have like user roles and things like that. For a home lab, those probably aren't going to be features that you're necessarily going to need or want to play around with. Finally, under about we have the runtime, bunch of information. We're using MySQL light, the license version that we have, and of course the release notes all right within here. Now, what I actually want to do now and kind of the main point of setting this up is managing this one environment is really no trouble. But it does become a trouble when I have to manage multiple different environments and I have the Docker stacks or Docker Compose stacks and VMs. I have an Unrade machine all over the place. HSER agent. This is what we want right here. So, we have a quick install script which will install on any Linux system. So, I think I'm just going to go ahead and do that. We do have a uh Docker container that we could run which I mean probably would make sense to run it with a Docker container. All right, we're going to try that. Let's give that a copy. And I am going to sign into another server here. So, let's open up a new tab. And this is my NexCloud server. So, it's running NextCloud all in one. If I run a docker ps, you could see that right here. Bunch of NextCloud stuff. That That's really it. Just nextcloud. So, I am just going to see if it's as easy as it seems. And paste this on in. We're going to change your secret token to something super secret such as um your secret token. I'll change this later. Let's just hit enter. Let's spin her up. So, now it's theoretically running. So if I go to doc hand once again, let's click this little plus button. Try to add a new environment. This is going to be next cloud. Next cloud VM is fine. We're going to do the hoser agent. And this is going to be the server that I just connected to. So 30. And our token is that. And let's test the connection. And it looks like it worked. 14 containers. My golly. Uh let's go over here to updates. We're going to want to enable the checking and everything else is pretty good. So, let's go ahead and just add that for now. And there he is. We have our next cloud VM. So, if I go back to our dashboard here, there it is. Nice. Easy peasy. So, if I open up this environment, we can see we got some containers going. And it is true. I'm not running these containers anymore. So, all that is fine. Looks like this one says it's unhealthy, which is great. If I look at the logs, I mean, it looks fine. Nice. I I'll I'll just take that take that as a W for now. Yeah, I'll I'll go and investigate that a little bit later. And I tried to find they don't have the hoser client already in unrade. So, I'm going to have to figure out something else for that. But, if I do recall, I have another one that I'd like to manage. This one, I do believe, yep, this is my image my image server. It's just another VM that I have Docker on. A lot of people ask kind of why I do that. For things that are really important like image, I have that in its own separate virtual machine that I run backups on. So then that entire VM has the ability to be rolled back in addition to all the actual library files being backed up to various cloud services and other devices. So just like last time, I'm going to run this. I will change that sock a little bit later. Not the sock, the token. So there we go. Let's grab my token. And it should be as simple as just clicking this plus button here. This is going to be my image VM. Probably going to do direct connection with Unrade, but we're going to go with this agent. There we go. Drop in our token. Go to updates. We're going to enable this. Need to change my time zone on the other one, too, but it's fine for now. Test that connection. Good to go. Add that environment. And now we have multiples. Sweet deal. So, I can make this a bit bigger. Here we go. That is image or image server. So now this is probably incredibly out of date. If I checked for updates, you can see we got image server and learning available. Nice. And I will note for these ones when I go back and change those uh the tokens. I will need to uh add this so I can actually add those compos files and be able to edit them through here. So do note that. So yeah, just some really cool stuff. Getting that agent on Unrade. I'm going to have to play around with that for a little bit to get that to work. But overall, I'm really excited about this. I'm really excited to use it. It's going to be really easy to manage all the various services that I have now. And of course, if you want to go and try it out for yourself, I will leave a link down below to their website, the documentation, and all of that fun stuff. Seems like a cool project. I like it. It's It's again a newer project compared to something like Portainer. If you're looking for something a lot more mature, that is always a great option to go with. But this seems cool. As you can tell, I'm going to try it out in my actual home lab environment for at least a couple months and see if I stick with it. So, with all that, please subscribe, like this video, all that fun stuff. And goodbye.
Video description
️⚡Checkout our Sponsor and get started with Gamma API - https://gam.link/techhut Dockhand is a modern, powerful Docker management platform that's free for home labs and ready for enterprise. From a surface level, it's an alternative to something like Portainer, which is a tool I love, but I haven't really found myself using it much anymore. Dockhand caught my eye though, and after spending some time with it, I'm genuinely impressed. So let's dive into how I got it set up, connected multiple environments, and why I think it's worth checking out. Learn More: https://www.techhut.tv/dockhand-docker-manager 🏆 FOLLOW TECHHUT X (Twitter): https://bit.ly/twitter-techhut MASTODON: https://bit.ly/mastodon-techhut BlueSky: https://bsky.app/profile/techhut.bsky.social INSTAGRAM: https://bit.ly/personal-insta 👏 SUPPORT TECHHUT (all links below this line will earn us commission) BUY A COFFEE: https://buymeacoffee.com/techhut YOUTUBE MEMBER: https://bit.ly/members-techhut —PAID/AFFILIATE LINKS BELOW— 🛎 RECOMMENDED SERVICES VPN I USE: https://airvpn.org/?referred_by=673908 📷 MY GEAR HARD DRIVES: https://serverpartdeals.com/techhut MinisForum Tablet: https://amzn.to/3SeMmds Beelink N200: https://amzn.to/3xZjeQs Raspberry Pi 5: https://amzn.to/4f3yUCN Q1 HE QMK Custom Keyboard: https://www.keychron.com/products/keychron-q1-he-qmk-wireless-custom-keyboar?ref=techhut ASUS ProArt Display: https://amzn.to/4i4cAKz 00:00 - Start 01:13 - Gamma (Sponsor) 02:41 - Setup Dockhand 04:50 - Local Environment 05:50 - Settings and Tour 13:40 - External Environment