We can't find the internet
Attempting to reconnect
Something went wrong!
Attempting to reconnect
Nate Herk | AI Automation · 57.8K views · 1.5K likes
Analysis Summary
Ask yourself: “Did I notice what this video wanted from me, and did I decide freely to say yes?”
Performed authenticity
The deliberate construction of "realness" — confessional tone, casual filming, strategic vulnerability — designed to lower your guard. When someone appears unpolished and honest, you evaluate their claims less critically. The spontaneity is rehearsed.
Goffman's dramaturgy (1959); Audrezet et al. (2020) on performed authenticity
Worth Noting
Positive elements
- This video provides a practical, hands-on guide to using .md files for context management in LLM workflows, which is a legitimate and useful developer pattern.
Be Aware
Cautionary elements
- The use of 'revelation framing'—presenting a standard software configuration as a 'secret blueprint'—is designed to convert viewers into paid community members.
Influence Dimensions
How are these scored?About this analysis
Knowing about these techniques makes them visible, not powerless. The ones that work best on you are the ones that match beliefs you already hold.
This analysis is a tool for your own thinking — what you do with it is up to you.
Related content covering similar topics.

See your entire year in HEY Calendar
37signals
Emacs: easily set timers with TMR
Protesilaos Stavrou

Emacs Goodies - #7 Proced Mode
Goparism
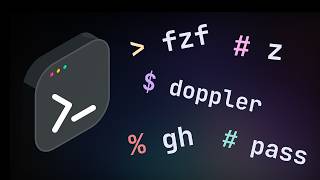
10 CLI apps that have actually improved the way I work in the terminal
Dreams of Code
AI Revisited - part 2 – REWORK
37signals
Transcript
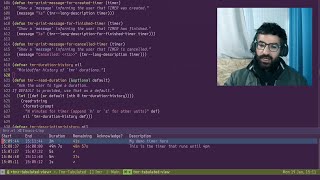
This right here is my Claude Code executive assistant. Let me show you a few things that it can do. Okay, so I'm going to start off by saying pretend that it's morning because it's not right now and use the morning coffee skill to help me plan my day. So, I'm going to shoot that off. Now, while that's going, I'm going to open up a new tab and I'm going to shoot off this message that says, "Spin up a sub agent to do research on the new Cloud Code voice feature and then create both a LinkedIn post and a Twitter style carousel for me." It's created a to-do list and it's getting going on that. I'm opening up another window and I'm saying do a pulse check on the team to see if we're on track for the week and for the quarter. And finally, one more just for fun. Create me a visualization for a YouTube video where I want to explain why having Claude as an executive assistant is awesome. And now it's using a visualization skill. So what you're watching right now are four different agents. 1 2 3 4. All doing things for me in parallel. And not just for a cool demo, but these are actually things that I do every single day or every single other day. So the first agent's done, which is our morning coffee. And we can see this is what is on the calendar for today. That's crazy that it said March 5th. It's actually the 4th, but still this is all correct. So, it looked through my calendar. It looked through my project management and our quarterly goals. And it pulled in urgent action items. It also pulled in my video pipeline. So, it sees what I'm scripting and what's in the backlog. And it uses all of this context as well as everything on this lefth hand side, which are, you know, current priorities, me, OTAAS, my team work. We've got projects, we've got decisions, we've got all this stuff in here that it's able to look through. So, we've basically given it access to everything going on in my business and now it's able to just plan out my entire day and I can go ahead and say yes and it will just block off my whole calendar. And I really love doing this because if I don't have to have that decision fatigue of what should I do with my next 15 minutes, my next hour and it's just done for me, I'm way more productive. The second one is done. So, we had a sub agent doing research. We've got a LinkedIn post and we've got our carousel. So, right here is the LinkedIn post which is in my tone of voice as you can see. And then if I go over here to our projects and I go to carousels and I go to March 4th, we can see that we have seven slides. We've got slide one, which is you can now talk to your code editor. Slide two, cla code voice mode is live. Slide three. Slide four. I think you guys get the point. And then here's slide seven which is the CTA. Now we've got the pulse check, which is an even deeper dive than that morning coffee skill. It's looking at all of the initiatives that we currently have in progress. And I can see each task and the current status. And based on all that information and based on our goals, it gives me follow-ups. So I'm really easily able to check in on the team and make sure that everything is actually progressing. And the last one is our actual visualization for an executive assistant. So I would just need to go to projects. I would go to visualizations and we should see March 4th we have Claude executive assistant PNG. So here's what we got. We've got you on the lefth hand side where you're buried in work and on the right hand side we've got with Claude executive assistant and I'm actually going to use this in the video. So that was a quick demo. You guys got a little bit of a taste of what this executive assistant can do for me. Now don't be overwhelmed by all these files over here. I've built this up by using it every day, but I'm going to show you guys exactly how you can follow this framework to have basically your own herk 2, which is what I have right here, but it would be for you. And so, all four of these things that just happened probably took me a minute or two. And if I was to do each of those manually, it would have taken me at least 25 minutes. So, if you want to know how you can build this for yourself, let's get into it. So, today you are going to be building your own executive assistant with Cloud Code. But I wanted to start off real quick by just talking about what most people do and why that's not really the same thing. So, with something like Claude or Chatbt, we've been way more productive because we've been able to save memories. We've been able to save, you know, maybe custom skills or custom prompts, there's still so many times where you've probably thought to yourself, man, I wish this thing just knew everything about what's going on. So, in that old way, you kind of feel like you're repeating yourself a lot or you're giving it extra context or it's just helping you get maybe like 50% of the way there instead of 90% of the way there. But with an AI assistant, it knows your name, your business, your priorities, your team, your current things. that knows the decisions you've made. And it can also do things for you like check in with the team. It can create stuff. It can research. It can plan your day. And this is the visual that we just generated together. And I actually like this more because it's showing that I'm able to create more YouTube videos because of this assistant. So the benefits are pretty clear here. You can save a lot of time. You never have to really repeat yourself. You scale your team and you can potentially sell this skill because now you understand how to set up these frameworks with context management and, you know, memory. And in this process of building your own assistant, you're going to get so much better at cloud code, which is a really good skill to have. So, like I said, today I'm going to be showing you guys exactly how I built this thing. And there's four main phases. So, phase one is we need to give it a home. So, that's kind of like the structure of our project, which I think is the most difficult or kind of like the most confusing thing up front because as you guys saw in my project, there's a lot of folders and in each of these folders, there's a lot of subfolders. So, there's a lot going on. So, it's really important to be able to make sure that you know where stuff is, but that Claude also knows where everything is because as you scale, more and more files will be created, more and more skills, more and more processes. After we've given it a home, we need to give it some life. So, we need to give it some rules. We need to give it some context about you. It needs to learn everything about you and what you're currently up to. After that, we need to give it hands. So, we're going to build a first skill together. And then, we're going to see how we can build more and more skills and sub agents and stuff like that so that it actually gets more useful at doing things for you rather than just like helping you think. And then finally talking about how we actually let this thing grow. How do we improve it? How do we really scale it? And how do we make sure that this assistant actually gets smarter over time and really is leverage for us. All right, so phase one, let's give this thing a home. So if you guys have watched any videos on my channel with cloud code, then you've noticed I'm using Visual Studio Code, which is just an IDE, an integrated development environment. It's completely free to download for Windows or Mac. So go ahead and grab that. And then once you're in there, this is what it should look like when you open it up. Now, what you have to do is come over to the lefth hand side, click on extensions, and you'll type in Claude Code, and it will look like this. And all you have to do is go ahead and install this. When you do that, it'll prompt you to sign in with your Enthropic subscription, which you do need to be on a paid plan for Claude Code. You could use your API key, but it's better to just have a fixed cost rather than worrying about how many tokens you are racking up. All right, so once Cloud Code has been installed, you'll notice in the top right there's a little orange button. If you click on that, this is where you have the cloud code actual agent that you can go ahead and start talking to. But before we start talking to it, we still haven't really given it a home. So, we need to set up a folder, which means you need to open up your file explorer or your finder or whatever it's called and create a new folder. So, for this, I'm just going to be in my desktop. I'm creating a new folder, and I'm just going to call this EA demo. EA for executive assistant. And now, what I have to do is open up that folder in Visual Studio Code. So, I'm going to go on the lefth hand side and click on the explorer. And it says you have not yet opened a folder. This will basically be your project. And I'm going to go ahead and click open folder and open that one up that I just made. So, here is my EA demo. Select folder. And now we are actually in our project. This is the home for our cloud code agent because what I can do is open up this little button. Close out of everything else. And now we have our folder on the lefth hand side. There's no files in there yet. And then we have our cloud code agent right here in the middle that we can talk to. So now the second piece of giving this a home is understanding how cloud. MD works and creating our cloud. MD file. So if you've built an agent in Naden or you've built a custom GBT with chat GBT, you understand that when you do something like that, you have to give it a system prompt. You have to give it instructions. So that's exactly what we need to do here. And we do that with a claw.md file. So the way that this works is you send something to cloud code and before it actually reads your message, it's going to load in the claw.md file and read the entire thing and it's going to do that every single time. So the claw.md file should have only the most important rules about this is what the project does. this is where you need to look for your rules. This is where you look for context, that kind of stuff. Because if you fill it super super full of random information, then you're going to go through your tokens and your context window faster. So, what's ultimately going to happen by the end of this video is you will have not only a cloudmd file, but you'll have acloud file, you'll have projects, you'll have context, you'll have decisions, you'll have a bunch of different folders in here. But the brain cloud.mmd tells cloud code where does everything actually live. So, that's how we stay really organized. So all we're going to do in here to start is we are going to come over to the lefth hand side. I'm going to click on new file. And I'm just going to call it in all caps claude and then MD. And MD just stands for markdown. And so what happens is the cloud.MD file pops up right here. And you can see that there's not currently anything in there. So I'm just going to say to Claude, hey Claude Code, this folder is for you to be my executive assistant. So just throw a quick blur about that in the cloud.MD file. I shoot that off. It's basically going to look through the project, see what's in here, and then it's going to edit that file so that we have a little blurb in there. And unless you're on bypass permissions mode, it's going to ask you for permission here. So now it says done. CloudMD has a quick description of your folder as an executive assistant workspace. If I click into the cloudMD, you can see this is what we've got. This folder is cloud code's workspace for acting as an executive assistant. Use it to help the user with scheduling, task management, research, drafting, communications, and any other EA related work they need. So this is going to evolve throughout the video. You guys will see that once we start to give it some more life, which as you guys know is phase two. So, like I said, cloud.md is the brain and it's going to tell cloud code where to look for information about us, which is going to be in a MI file, information about your business, which will be in work, information about your team, which will be in team, and then information about what you're currently focusing on right now, which will be in priorities. And it will also understand all of your rules, like the way you like to speak, um your style, formatting, stuff like that. Okay, so I'm going to paste in this prompt, which you guys will be able to access for free in my free school community. I'll have a post in there associated with this video, and then you just need to basically grab that markdown file, copy it, and paste it into here. You can see that this prompt is pretty beefy, and it's going to basically walk you through and have Claude Code extract all the information out of you that it needs to get this project started. So, I'm going to shoot this off, and we're going to see that it's going to start to ask us some questions about us. So phase one is creating the folder structure and it's initializing a git repo. And now you can see that all of these folders and files have popped up on the lefth hand side which is very similar to how my Herk 2 project was set up. We've got templates, references, projects, decisions, context, archives, and the claude. So all of this stuff is going to start to get filled up a little bit. And trust me, as you start to use this, it will make much more sense. So now we are on phase two, which is the interview section. So first part, what is your name? What's your role? What's your time zone? Blah blah blah. So I'm just going to give it some dummy information here. Okay, so I shot off my initial answers and now it's asking us more about our business and our work. So obviously I am just kind of giving it some dummy information to show you guys how it's going to set up these folders. But this is where you should really take some time here and let it get to know you and give it as much detail as you want because ultimately you're going to want it to know all of the stuff either way. So take your time here, really give it information. If it asks you something and you don't know the answer to it, maybe just say that you don't know and see if it can help you brainstorm some stuff. But also you could just say skip, you know, I'll set this up later. And you can see that it might not move on to the next section until it feels like it has enough information. So right here it asks if I had anyone key. I said yes. I have one other person and I didn't say the name. So it's asking what is the name. And now it's moving on to priorities, goals, and projects. Remember that you'll be able to plug it in real time into ClickUp or you know aauna or notion or whatever you use for your project management and your goals because a big part of this is making sure that everything it's looking at is actually current. This is just kind of the initial onboarding to get it familiar with your business. Section five asks about communication preferences. So, how do you actually like to interact with something? Because this can be really flavored to you. And remember, none of this stuff is permanent. You can always change it later. And the last section is what do you want help with? So, like what are the recurring tasks that eat up your time? What would you hand off to an assistant first if you could? Are there any specific workflows that you want to automate or templatize? Now, if you don't know right now, that's fine. Just say skip because what's going to happen is I'm going to challenge you to use this as much as you can. Don't use your custom GBTs. Don't use your projects. try to migrate everything into here and just use this and over time you'll realize what is recurring and what are processes that you can actually use in cloud code. So I just told it let's skip that for now and let's just keep on moving through the setup. So now that it has all of our information, it's going to build out the files based on our answers and we're going to be able to see that right now it's writing the MI file and now it's writing the work file and now it's writing the team file and the current priorities and all of this is going to get looped back together. All right, so all of this is set up. We have our tree view of our folder structure. So we can really dig into this if we want to see what's in thecloud or what is in the archives, the context, all this kind of stuff. We get a summary of how everything works. So if you're confused about any of this stuff, you will get a summary and you can also ask, hey, like what does this context file do or what does the archives folder do? And it will be able to explain it for you. But you can see it's populated this stuff with information about me. The skills that we need to build are on the backlog. Otherwise, if you listed some, it would say, "Okay, cool. Let's just start building those skills right now." And as far as keeping the assistant sharp, weekly, nothing required right now. We have automemory for daily learnings. Monthly, we'll update this stuff. Quarterly, we'll update this stuff. And as needed, we will log decisions in the decision log. And pro tip, if you want your assistant to remember something permanently, just tell it remember that I always prefer X. And it will save that across all future conversations. And then the last thing it's going to do is an initial git commit. And this is just local. It's not going to do a actual GitHub repository out on the cloud. So, this will just kind of locally store these files so that you can have some version control. But if you want to, you could just say, "Hey, instead of doing this here, let's actually just do it on GitHub." And then you would just give it your email. It would be able to help you sign in. And then it can actually just make the repo for you. And it can handle all of those future commits and pushes. So the benefits of that is that in GitHub, it basically stores all these folders, all these files, which means from any device, you could basically pull in that repo into Cloud Code and you could always have your executive assistant ready. You've got cloud backups, you've got rollbacks, you've got collaboration, and you've got branching. So it's just best practice to put your codebased projects into GitHub. So let's just real quick take a look at what actually happened. So the first thing I want to look at is the cloud. You can see in here right now we have rules with communication style. So if I open up this, we can see that it threw in some information about the way that we like to talk. So bullet points, everything concise, no m dashes, internal speak casual, external speak even more casual. If we go to the skills, we can see there's nothing currently in there. There's nothing in the archives folder. In the context folder, we have current priorities. This is everything that I just talked about during our setup. It also says when this was last updated, which is nice. We've got our goals and milestones, which it says update this file at the start of each quarter. So, that's good. We've got 2026 annual goal, Q1 2026, Q2 2026, informal milestones. We've got the MI file, which is going to evolve a lot over time. You can even give it information about your background, where you grew up, all this kind of stuff. And it can use all of that to tailor it even more. We've got the team markdown, so anything that you needed to know about some of the key people in your organization. And then we've got the work MD, which has some business and company information. In the decisions folder, we have a log. So, anything major that happens, it will be logged here with the date, the decision, the reasoning, and the context. We've got our projects, which it created a folder for each of them. So, we've got chocolate pistachio flavor, we've got website launch, we've got West Coast expansion, we've got winter events. And each of these have a readme file which basically is just a quick description of what this project actually means and you know the status or any other information about it. We've got a references folder where we'll be able to drop examples and SOPs. There's nothing in there yet. And then for templates, we also have you know we're able to drop in some stuff that it can reference and this is just an example session summary. Nothing is in there for this session yet. And then the last thing to look at here would be the claw.mmd file. So earlier it was just like a few lines and it was very basic but now it's tailored towards us. So you are Jack's executive assistant. Be direct, concise, and casual. Here is Jack's top priority. Here is what's very urgent. This needs to happen ASAP. And so this is getting read every time so that it can basically keep checking in. Hey, is this done? Is this done? Now, here's something really cool where the clawmd file can point to the right files. So remember how I said that this got loaded in every single time you talk to cloud code? That means if we threw all of our business information, all of the information about you, your priorities, that would be a lot of tokens. So remember that all claw.mmd has to do is tell cloud code, hey, if you need some information about the current focuses, go read this file. So that's exactly what you're seeing right here. It says, hey, if you want to understand who Jack is, go read this. If you want to understand, you know, the business details, go read this. And so on and so forth. So that's how we're able to save tokens here, but still give Cloud Code all the information that it needs. It will also tell Cloud Code what tools it has access to and how to use them. Right now, we haven't really set anything up. And similar concept over here with our projects. It says, "Hey, if you want to look at this project, go here. This project, go here." You'll notice right now we're at about 87 lines, which is pretty good. I always try to keep them, you know, under about 150, maybe 200 max. That's just best practice. Over time, they're going to get larger and larger, so you should regularly be kind of compacting them down and pointing out to other files when possible. Now, this is a great place to start, but at some point, you're going to want to add some more files on your own. So, this is what you've got right now, but what you can see is in my Herk 2 version, I've got a few more. And one of the ones that I added that you'll probably want to add is a brand assets. So in here I've got fonts and I've also got some images, logos, brand guidelines, things like that. So all you do if you wanted to add a new folder or new files is you would just come in here, add a new folder, name it whatever you want, and then just start a conversation with cloud code and say, "Hey, I added a folder called brand-assets. Just update your skill documents or update the cloud.MD to know that it's there and what I'm going to drop in there are logos or head shot or things like that." So all of that can be obviously customized as long as claw.md understands that. So that's basically the way that our project is set up. It's now got a home. It's got some life. And let's move on to phase three, which is giving it hands. Actually letting it do something for us. Okay. So if I was you guys right now setting up this executive assistant, the first skill that I'd probably build is connecting it to ClickUp or Notion or wherever you have your actual like project management or task management. And I'm not going to walk through that right now because I use ClickUp and I don't want to go through that setup in front of you guys because it might not apply to you specifically if you don't use ClickUp. But basically, it's super easy. You explain in natural language exactly what you want to do. You have it do research on the endpoints or maybe even an MCP server. And then all you have to do is go grab an API key and put it in av file, which you'll notice right here. We don't currently yet have. So here's what you would do. I'm going to go to plan mode and I'm going to say, help me build a research skill. This skill is going to use perplexity. So I need to give you my API key in AENV file. So go ahead and create that file for me. And what I want the skill to do is help me do research. This is more than just a simple couple, you know, web searches and web fetches that you might be able to do already. This is research that's kind of deeper and it's also tailored towards me and my business because it understands the context of, you know, what's going on and our current projects and priorities. So I'm going to shoot that off in plan mode. Cloud code's going to think about it. It might do a little bit of research to help us build this plan and then it's going to come back with something. And what's pretty cool is you can see that first of all it explores the project to see how things work and it even spun up a sub agent to explore the structure of our project right here. And sub agents are really cool because they have their own context window and they might even be able to use their own model if you you know configure one to do so. So I'll touch on that a little bit more after we build the skill. So I may come back and ask you some questions which is a good thing. So here it says for perplexity what model do you want to use? And I'm just going to go with sonar for now and submit that off. And now it thinks it's good and it's come back with a plan. And we can see we have build research skill with perplexity. Jack wants a reusable research skill that goes beyond basic web search. It's going to create thev for our API key. Now the reason why it needs to do that is because if you do end up pushing this to a GitHub repo or putting that anywhere on the web, it's best practice to have aenv which is where you have all of your API keys and you don't give it to Claude in the conversation history right here. It's going to build the actual skill itself. So we'll see that once it's created. And the skill instructs Claude to understand the question, load context. So read through me, work, team, current priorities, goals, and anything else. Formulate queries, call perplexity API, synthesize, save report, and then present the summary. Another thing worth noting is that it's also going to update the claw.md so that it now knows about this skill and knows that it exists. So anyways, it looked at the API documentation. It gave us a research report format. I'm just going to go ahead and auto accept this plan, and it's going to start building it out for us. All right, so the agent just finished up. It said, here's what we created. We have the env, which you can go drop your API key in. We've created the research skill. So, if I go toclude, if I open up the skills, we can see we have a research folder. And in here, we have a skill.md for research. So, I'm not going to read this whole thing, but you can see now that we have this actual skill. And as you can see, this basically just says when do you use the skill and how do you actually run the process of, you know, calling the API and making the report for Jack. And it updated the cloud.MD MD to show Claude that this skill now exists. So, I'm going to go ahead and grab my API key from Perplexity and paste it into the ENV. As you can see, I'm just going to drop it in right here and then save it. Okay, I put the API key in there and we're going to test it out. I said research ice cream events in Portland using the new research skill. And what we're looking for here is seeing if it's actually able to call the skill. So, it says, okay, let me load the relevant project context and then I'll run the research. The content has been loaded. Now, I'm going to break this up and I'm going to call Perplexity. So, here you can see it did three different searches. It searched for Portland ice cream dessert events and then it searched for Portland vendor application process and finally it searched for Portland dessert scene and connections. So, it comes back with a very concise output which is exactly what we told it in the way that we like to communicate. We got this information, right? But then it also says that I saved the full report to this folder. So, if I go to research, which it created a new folder right here, we can see that we have March 3rd Portland ice cream events research. And this is a markdown file that has much more detail about what it actually found as far as these different events and these different, you know, vendor things that we might be interested in. And it includes all of the links to all the sources that it actually pulled here. And what's great about this and why you guys can probably now see that the folder management is so important because every time you do research, every time you generate content, every time you make updates to projects, all of that still lives in this project. Which is why it gets smarter and smarter about what you're doing the more you use it because I could basically clear out this context and I could pick up right where I left off because it's able to go read this file, this research report. So that was a quick preview of a skill. Now, there are going to be some times where you might actually want to use a sub agent instead of a skill. Now, as you guys just saw in the demo, when you're talking to the agent and you call a skill, it basically just uses the skill right here in this context window with this model with that, you know, conversation awareness. But a sub agent basically gets called on by this main worker here and it has fresh memory, fresh context. And you can even use a different model. So sometimes if you want to do research, but you want it to be cheaper, you could just tell it to delegate that to a sub agent and that researcher sub agent could maybe use haiku instead of opus 4.6. So that's kind of the benefit of a sub aent. So, let me just show you guys real quick how that would actually work. I'm going to go back into plan mode and I'm going to say I need to create that research skill. So, basically everything you just did with the research skill, but I want to create that as a sub agent and I want this to be using haiku instead of opus just in case I need to do some cheaper research. So, create that sub aent for me. Put that within the claude folder in a folder called agents. So, we now have the plan to create that research sub agent. And you can see that it's going to use model equals highQ. And I'm just going to go ahead and accept these changes. So, what it did is it created the agent. MD, which we'll go ahead and take a look at. And I believe that it also updated the research skill so that if I say that I want it to be like cheaper or to use a sub agent, that the research skill will actually invoke the sub agent, which is pretty cool. And then it also added an update to the cloud.MD file, which now should have an agent section. You can see there's been a new folder created. We have agents under our cloud. And in here we have a research agent. So if I open this up, you will see that we have you are a research agent for ice cream Fridays. You receive a research query. Call the perplexity API and save a structured report. So I'm trying to keep this as simple as possible. But there is something that I want you guys to notice about both the agent and the skill that was just created here. So these were created as complete markdown files, which is fine. But actually the way that we need to set up both of these is using a YAML front matter because that's where we can actually have the configuration. So, I'm not going to dive super deep right now into exactly why this is, but at a high level, it makes Cloud Code better at understanding what that skiller agent does, when to use it, and it's going to save you tokens as well. So, for now, I'm going to manually build this YAML front matter by literally just going like this, going back into our VS Code, and then for the skill, I'm just going to paste that up here, and then change the name and change the description myself. And I'm going to do the exact same thing then with the agent. But what I would actually recommend you do is in your project give cloud code this document. You know give it the example. Give it even the URL and say hey look up on this page what is the best practice for creating sub aent files or creating skill files so that every time you build me a new sub aent or you build me a new skill it does it in the best practice. So really the reason I showed you guys this and the point I'm trying to make here is cloud code is smart but it's way smarter if you let it do its own research and then save that research so that in the future everything gets better and better. So now you can see I've updated both the agent and the skill with the YAML front matter and now it's going to work a lot better. It would still work the other way but trust me this is just going to save you tokens and you're probably going to get more consistent results. All right so now let's go ahead and test that out. I'm going to go ahead and clear this conversation and I'm going to say I need you to do some really quick research for me. I want to keep this one cheap, so just use the research agent and find out, you know, how ice cream events are going in Los Angeles. All right, so this is pretty cool. It read through the research skill. It read through the research agent. And then it also read through my plans. So it said, "Hey, Jack wants quick, cheap research about LA. This ties directly into the West Coast expansion priority." So now it has all that context. It calls the research agent with the model Haiku. And now it's going to go ahead and do that research for us. All right, awesome. That research is done. If I open up the research folder, you can see that right here we've got our LA report about some ice cream stuff. So, just keep in mind the research report is still really good. It still has lots of sources. It still has lots of detail. It wasn't the research that was worse. It was just when all of that raw data got passed back to Claude Code. It was using Haiku to summarize it and to write this MD file rather than having Opus do that. Okay, so we've set up our executive assistant. We have given it information about us and our business. We have connected it with a skill and an agent. And now phase four is basically just about letting it grow. Now I could walk through some more step-by-step examples with you guys. But really this is about customizing it for your tech stack, your, you know, project management system, your team, and the way that you work. So with my cloud code assistant here, because I have all these different agents now and these different rules and these different skills, it's just because I use this every day instead of using like Claude or ChateBT on the web. It gets smarter and smarter over time. So right now you're at day one and if you use this every day, a month from now, this thing is going to look crazy different. there's going to be way more docs, way more decisions, way more skills, and it's just going to be smarter and smarter, and you're going to be like living in that thing. So, really, what I would challenge you to do from here is to only use this. Just like for the next week, try only using this. Take all of your cloud projects, take all of your custom GBTs or, you know, your gems, whatever it is. Take those instructions, put them into this project, and say, "Hey, turn this into a skill for me." Use that skill, use new skills, and every time that you're using the skill, say, "Hey, this is what I didn't like. This is what I did like. Update it. you know, let's let's just keep making it better and better. And that same exact theory applies to the entire system, the cloud files, the reference files, the project files, everything. And then, like we talked about earlier, put this thing on GitHub, have version control, and make sure that if you switch to a different laptop for some reason, you can still use your executive assistant. But anyways, that's all I got for this one. Now, I'm sure you guys are all excited to keep building on top of this executive assistant. So, what's next is really just to go master skills. I already made a full video breaking all of that down and how you can build better and better skills. So, go ahead and watch this video right here and keep using your executive assistant.
Video description
Full courses + unlimited support: https://www.skool.com/ai-automation-society-plus/about All my FREE resources: https://www.skool.com/ai-automation-society/about Apply for my YT podcast: https://podcast.nateherk.com/apply Work with me: https://uppitai.com/ My Tools💻 14 day FREE n8n trial: https://n8n.partnerlinks.io/22crlu8afq5r Code NATEHERK to Self-Host n8n for 10% off (annual plan): http://hostinger.com/nateherk Voice to text: https://ref.wisprflow.ai/nateherk In this video, I walk you through exactly how I built my own AI executive assistant using Claude Code, and how you can do the same. We go through four phases: setting up the project, adding context and rules, building out your first skills and sub-agents, and how to let it grow over time by layering in more skills, memory, and context as your needs evolve. By the end, you'll have a clear blueprint for setting up a personal AI assistant that actually works the way you work, not just a generic chatbot, but something that knows your business, follows your systems, and gets smarter the more you use it. Sponsorship Inquiries: 📧 sponsorships@nateherk.com Timestamps 00:00 Demo 03:00 What We're Building 05:02 Phase 1 08:35 Phase 2 16:50 Phase 3 25:35 Phase