We can't find the internet
Attempting to reconnect
Something went wrong!
Attempting to reconnect
Analysis Summary
Ask yourself: “Did I notice what this video wanted from me, and did I decide freely to say yes?”
Performed authenticity
The deliberate construction of "realness" — confessional tone, casual filming, strategic vulnerability — designed to lower your guard. When someone appears unpolished and honest, you evaluate their claims less critically. The spontaneity is rehearsed.
Goffman's dramaturgy (1959); Audrezet et al. (2020) on performed authenticity
Worth Noting
Positive elements
- This video provides practical demonstrations of metal fabrication, TIG welding, and custom PC mounting techniques within a non-standard chassis.
Be Aware
Cautionary elements
- The use of a 'failed' project premise to seamlessly transition into a highly monetizable hardware showcase with extensive affiliate links.
Influence Dimensions
How are these scored?About this analysis
Knowing about these techniques makes them visible, not powerless. The ones that work best on you are the ones that match beliefs you already hold.
This analysis is a tool for your own thinking — what you do with it is up to you.
Related content covering similar topics.

How Much Ram is in Your Gaming PC?
Toasty Bros
I built a Titanium PC. It crushes everything.
jakkuh
Don't Buy Gigabyte B850I AORUS Pro | Honest Review | Problems
Verified Reviews
Transcript
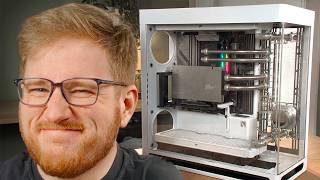
Behind me, I have a Windows 95 gaming PC that Matt and I spent probably 2 hours making a YouTube video on where I wanted to buy this Windows 95 PC and test a bunch of old Windows 95 games on it. It sounds pretty simple, right? Well, the PC ended up getting damaged pretty badly in shipping to the point that we were able to play a couple of games on it, albeit not very well because apparently the specs were way worse than I thought they were. On top of that, it didn't launch most of the games and eventually it just stopped working altogether and literally was artifacting across the whole entire screen. And long story short, the seller gave me a really really good partial refund. I honestly kind of feel bad for them, but I do appreciate them a ton. And so now I am going to gut this PC. And before you freak out, I'm just going to straight up give it away to someone local. We're not going to do some type of giveaway because honestly, it's not really worth much. I'm always looking for ways to optimize my routine, especially with how busy my days get. Today's sponsor, Suriri, is an easy way to upgrade my daily routine. There's no messy charging cables, no clutter, and it gives a better clean than a normal toothbrush. Suri comes with an array of medium soft bristles, ideal for optimal cleaning, and even the plant-based heads are recyclable. My favorite part, though, is the travel case. It's compact and comes with a built-in UVC LED light to break down 99.9% of bacteria found on your toothbrush. Besides looking sleek with this minimalistic aluminum body, series motor provides a dentist approved gentle yet powerful clean. Plus, it has a pressure sensor to help you build healthy habits and a one-mon battery life. Pair that with the Pebble charger and wall mount combo, and Suri would have all angles covered whether you're traveling or trying to save sink space at home. There's no apps or gimmicks, just features to make brushing and your life better. If you're interested in learning more, make sure to check the link in the description down below and also use our code Toasty Bros 15 to save 15% off of Siri today. Try it for yourself and you'll see why we love it so much. Big thanks to Siri for sponsoring today's video. Now, let's get back to it. All right, so before I start doing this part, I just want to show you guys like how broken it really is. So, the front panel has multiple pieces broken off of it. And now it has more p No, I'm just kidding. The these uh these are supposed to pop out. I did not mean to do that. And then check this out. I don't I don't know if you can hear how many things are rolling inside of here, but we were surprised that this thing turned on when it came in. Oh, yeah. It opens like this, too. It's kind of funny. There's modern cases that are now doing this one piece design with glass. Okay, so the inside is It's pretty weird, let's be honest. Uh you can see here the board is like long. So, the bottom of the board is here, the top is here. We do not have a traditional IO layout like at all. There's not like a punch out for an IO shields. Now, luckily, it looks like the power supply that looks like standard ATX. Hopefully, all the mounting holes line up, but I don't think that's going to be a big deal. The drives in the front are obviously pretty standard. This is a 5 and a quarter, which is our disc drive. That'll probably get swapped out. Or maybe I'll keep this here and then I'll get like um one of those USB hubs for the front to make it kind of fancy and modern. This is a what is it? A 3 and 12 in. I think it'd be a floppy disc drive. One of our games is probably in here. Speaking of the games, I bought all these games that I'm also just going to kind of donate along with the the leftover hardware here. The motherboard does have like everything it needs to work. It has RAM. I think it's like it's a few megabytes of RAM. It does have a Pentium underneath there. It's a single core Pentium that does not have a lot of power. Uh it's 200 MHz. There is a 2 GBTE hard drive in there. Yeah, 2 GB, not two terabytes, 2 GB ID ribbon cable. And you can see here like this weird expansion riser um that's actually screwed into this metal bracket here that also is screwed in. So that can come out luckily. Yeah, this thing's going to need some some mod. I'm thinking um micro ATX board. And then obviously there's going to need to be a lot of work done back here to make any of this work. Um but yeah, it's it's a very old case. It's actually wonder if there's is there a date on here? November 18th. Oh, you can almost read that actually. That looks like 1990 something. Let me know down below what you guys think. What date is that? This was a NEC Powermate P2200M. Uh, definitely before my time. I was born in 1998. Like I said, I hope I don't really offend anyone too bad by doing this. Um, I I know I'm kind of messing with a piece of history here, but I think that this hardware going to the right person will make sense. Like I said, I'm going to give them all the electronics in the inside. And then I really just want it for the case. We got a really good partial refund, so we really only have about $118 total um into this entire build. That does not include I bought the keyboard and mouse separate and I bought this stuff separate. Like I said, I'll just bundle all that stuff to one person or or a company, whoever can actually make this stuff work again. And then I just want the case to make something cool and modern that somebody will get to game on in those modern titles. All right, so the tear down really was not too bad, but I just want you guys to bit appreciate this old technology here. Uh, old but gold, you know. We got our very OG RAM sticks are actually Kingston brand. We can see some of our old Intel branding and whatnot. Underneath here, like I said, uh, unless I'm being stupid, this should be the CPU underneath here. Uh, just a simple heat sink. It's LGA socket 7. I guess it's not LGA necessarily. It's just socket 7. I'm not sure if this is LAN grid grid array PGA soldered. I don't really know. We have some type Oh, that's our graphics card. I think 1996 ATI technology. So, I think this was our ATI um graphics card if I'm not mistaken. So, just like an integrated graphics basically, but it looks like you can upgrade it. It's it's a very weirdly shaped board. Like I said, our IO is right here, which is obviously not standard modern. ATI 3D Rage 2. This is where we were kind of being held back in our Windows 95 video. We only did get a few games, like a couple to work, and yeah, they were not running good on this thing. Even at the lowest graphics, every game pretty much was unplayable besides kind of Frogger. All right, so I got all my parts here, uh, for the most part that I'm going to need for actually building the PC portion of things, and then it's going to get really fun and messy with mods. Um, I'm not going to go in depth for any of this stuff because it's all stuff we've used before. We end up going with the Ryzen 5 9600X. We got a nice ASRock B650M to complement that. Of course, we're just going with that 4060 that we got a really good deal on trading at PC Bros. Um, we're going to be using that Gen 4 Okinos riser cable that seemed to be free. I'm assuming it's Gen 4. I don't even know that for a fact. Uh, we are going to be throwing in a 5 and a/4 in floppy disc adapter bay. Basically, it's going to give us some USB ports in the front and we will paint that to hopefully match the case as good as we can. I'm trying to go all out for this mod. And then we have our nice Corsair RAM over there. That stuff's pretty freaking fancy for this build, but it's a good upgrade path. I mean, at the end of the day, this would be a really solid mid-range build. We got the Roswell BMG 750, which I really like this power supply because it's rated pretty well. It's got plenty of headroom. It's modular, so we can get rid of any extra cables we don't need. And I like how the sides are perforated along with the fan, so that hopefully it'll help get a little bit of extra cooling for our build because it's going to need some help. We got this tiny thermalite fan to put in the front. And lastly, we got this 1 TBTE Samsung 990 Pro, which is a pretty high-end Gen 4 SSD. And I think that's it. Altogether, we're we're basically at a little under 1,100 bucks, including the case and all these parts. All right, we're at everyone's favorite store and I got two pieces that broke off of the case. We got one that kind of represents the yellowed front and then one that represents the metallic case pretty well cuz I got a feeling with this mod, we're going to need some paint. All right, I feel about I'm going to say 85% positive that I got some colors here that'll actually match. So, h we'll see what we can do. And then we got a piece of metal. I should have plenty of like scrap metal at the house, but I always like to have some new stuff just in case I don't have enough. All right, so first thing I want to do because paint takes a while to dry. I got this paint here, which is a almond from Rustoleum. And I think I can just take this plastic plate off. Um, but check out the ports on this. It's definitely pretty nifty. I think this will be uh really nice to kind of modernize the PC while keeping it old. But I want to paint this whole front so it blends in with the rest of the PC. So, let's unscrew this and see if that works. All right. This is definitely going to take a few coats. So, we'll go and get our first coat on now. Let's go and do a little test spray. All right. This can's pretty fancy. It has like multiple settings on it. So, the good news is I don't think that the factory standoffs are welded in because like I said, they're like not the right height. None of them are in the right spot. They're definitely they were kind of made for a different times, but I think some form of fashion here. I don't know if I need There's more screws holding this on. Oh, okay. Yeah, they're literally just like there's like nothing there. But that's good though. That means I can actually weld to this without having to worry about basically melting through the paint on that back panel. So, uh, just one more thing to make things a little bit easier. I'm assuming I can just take like a pair of channel locks now and pull these out. All right, so we got those old standoffs cut out. It almost felt like they were aluminum. They're like really easy to cut, but um, I bought these on Amazon. So, these are stainless steel, um, spacers. They're kind of meant for I think like drones or something was their main purpose. They're kind of long. So, what I'm going to do is I'm going to cut these down to size and then just TIG weld them into the case. So, you can see I have those standoffs in my vise here. I'm just taking my Makita wireless cutff wheel and I'm cutting these down to about half the original size because we're going to be welding them in. They are stainless steel. So, welding these with just some mild steel TIG rod should be a piece of cake. Now, once I get those cut to size, I'm marking four of the motherboard holes. This is basically like your standard ITX or microATX pattern in most cases. So, I'm taking a auto punch tool. You basically put a lot of pressure and there's a spring inside of there that slips once you have enough pressure on it and it creates kind of like a hammering force that adds a nice punch where you need to either drill or in my case just using it as a good mark for my standoff. This is actually just a kind of expensive Harbor Freight TIG welder, believe it or not, just running straight argon gas. And I'm just using some mild steel uh rod or rod filler. And you can see that I'm gonna have a little bit of trouble welding this because I really wasn't even thinking about the fact that this is painted. I'm honestly surprised I was able to uh weld all this as good as I was able to. Typically, when you have painted surface, you really don't want to weld that, if you even can weld at all. So, you're going to notice like a little bit of extra smoke. You're going to notice that there's some burn marks and stuff that'll get covered up later with paint. And that could easily be avoided if I just take the time to actually scrape a lot of the paint in those areas that I'm welding off. And for anyone wondering what exactly is TIG welding, well, it's basically kind of like a form of brazing almost um like with solder. I'm basically using a tungsten filament that adds a ton of energy to the point that you get like that red hot plasma essentially. And with that, you're melting either the two metals together, which is like fusion welding, or in my case, you're adding some filler rods. So, you're getting some fusion welding, but also adding in some extra material so you get an extra strong weld. Check it out. Board screwed in. And yes, it's sturdy. It ain't going nowhere. I don't know what's rolling around in there, but that doesn't matter because look at the IO shield. All right. So, I mean, once again, tell me that this is not absolutely just beautiful. Just the idea of this. My thought is basically mounting it just like this. But I want this to be a sort of mechanism where if this card ever goes bad or someone wants to replace it, it could be done. I need to somehow mount this bracket probably using that piece of metal I got. Maybe running a bar like welding it across and then drilling out these holes here. Um you can kind of see my camera here and here. And those will be basically my mounting points for this bracket. And then we will need to figure out a way to actually support the GPU as well because obviously we don't want it just dangling from a PCIe riser card. That would probably not be very good for it. So you can see once again we have the vice set up. This is such a amazing tool for any type of metal or woodworking. Gently cutting through this because we don't want to send any disc flying. And what I'm going to be doing next is kind of test fitting where exactly this is going to go, which in this case, it's going to be what actually holds our vertical riser cable in place. Yeah, you can see I'm pretty happy with the overall size of this piece. So, I'm going to take my Sharpie and just do some kind of crude marking where I'm going to take it over to my drill press and drill some holes. Now, once again, Harbor Freight Special. I'm just using a drill press. It's a tabletop drill press that I built its own table for. I've had this drill press for probably eight years and it is amazing. I probably paid like $50 or less for it. Um, it's a multi-speed. I've used it to do some serious projects. And in this I'm just using a simple drill bit and um kind of oversized drilling these holes slightly. I've always found that unless precision is needed, it's better just to drill your holes slightly larger. So if they're slightly off, you don't have to worry um about your screws lining up perfectly. The bracket is now, well, I guess it now has a bracket. The vertical mount has a bracket on it. And then we're going to take, you know, basically two pieces of metal and run them to the bottom of the case and just weld them straight to it. Uh, cuz this will be like our our permanent, you know, GPU mount. But this will still come off and so will the graphics card. That's that's the good part. So, now that we have the bracket actually fitted on with the piece of metal, I'm basically just going to be making two extra pieces of metal that are all going to get TIG welded together. So, rather than doing like a bar straight across like I originally said, this will be a lot less intrusive and I can just weld this straight to the back panel um where we welded the standoff. So, most of the welding in this case is going to be done on that same panel, which will make things blend in a little better and there will be less warpage with the metal with all that heat. Now, for these pieces, I'm definitely turning the TIG welder up a little bit because now we're just straight up welding angle iron um or flat stock in this case. And so now I'm I'm turning up the welder at about 60 amps um running this. We're still just using mild steel filler rod because there's no reason to use stainless or anything like that because everything else is going to rust anyways. Definitely not going super precise with any of these welds. Not trying to make them amazing. Not that I'm uh fully capable of that anyways. I'm definitely more of a um amateur MIG intake welder. Now, this is a totally unnecessary step, but man, I think this sounds and looks so cool. So, we're kind of like um quenching or squaltching um the really hot metal just to show you how hot this actually gets, too. And this is after it cooled down for about 5 minutes. Honestly, it may even make the material more brittle for all I know, but this is a nonstructural application. All right, I'm thinking that's kind of how I do most of my work, by the way. I'm not a uh super accurate pen and paper kind of person. And I'm more of like a, you know, measure four times, cut four times kind of guy. Like screw it up a few times till you get it right kind of guy. But I feel pretty good about just being somewhere in this vicinity. I don't think this part really needs to be perfect. Just want it as close as I can get it. I think I should be able to figure out those marks pretty well what they mean or I might forget 2 seconds from now. So you can see here I've already tack welded my part together. And in tack welding is basically just a way of getting your part kind of positioned so you can test fit. And then once you know that it's perfectly form fitted and everything, then you go back and add your main welds. And that is exactly what I'm doing here. We're adding a little bit more structural welds to it. Those sparks that you see once again are due to the fact that I am welding pretty much through paint, which you really shouldn't do. Not the prettiest, but very, very sturdy. So, let's see how that mounts up. It's got a little bit of springiness to it. So, bear with me here. The nice part is these have a lot of wiggle room on them. Like you can really line them up however you need. Yeah, that's uh that is not going anywhere. Look, this is why I tell you all to bear with me. I mean, come on. This is pretty freaking cool looking. So, here's kind of the back setup right now. Uh like ever so slightly crooked, but all that's holding it in is literally like I'm actually kind of living on the edge here. This is all that's holding it in is that uh that tiny little plastic tab. So, I'm being pretty careful not to touch it too much. But, I'm almost thinking um most higherend GPUs will have this. This is basically so that you can add a support bracket. And I'm kind of tempted to do the same thing basically that I did here. Um, and basically just take some flat bar and weld it to the case. And don't worry, I'm going to be painting all of this. So, we'll make it this is all going to blend in with the case for anyone that's been wondering. I'm going to I'm going to make it look nice. Don't worry. I'm just debating on if I only do back here, will that be enough to, you know, cover all of like this area? Okay, cuz I'm worried that this will still be kind of loose and wiggly, but also to be able to still get this card out. I I'm just worried about how much I can add here. I might almost need to add something that I can take off and on, like maybe a piece of flat bar um that can bolt onto the case rather than welding it on the outside. Now, adding this back bracket I was going to make kind of complicated, but I realized, man, I can make this so much more simple by just once again cutting a piece of flat stock. And then I'm just going to drill some holes and TIG weld it in. It's that simple. So, I'm taking my Makita grinder. We're going to cut straight through with the cut off wheel once again. And then obviously it's a lot easier to drill your holes when it's out of the case rather than welded in. So we're taking the drill press again. We are drilling those two holes. And that's how we're going to hold the back of the GPU. And a fun fact, it just uses some simple fine thread motherboard style screws, which all those stainless steel Allen head bolts that you see me using, it's just from a cheap Amazon assortment kit, and they're just M3 screws. Now, once again, we're taking that TIG welder, and the first thing we're going to do is actually tack weld that piece on. And once we're happy with where it is placed, that's when we're going to go ahead and add the rest of our weld. This is not a super structural part. So, we're just going to kind of go a little bit beyond tack welding, but not much more than that. So, now I'm ready to fab up my last bracket, and that is the main IO shield bracket, the part that would normally hold in your graphics card in any case. So, same kind of deal applies. I want to make this whole piece removable because honestly, getting this GPU in and out is already kind of a pain. You have to kind of bend it a little bit and it's a little uncomfortable. So, what I'm doing here is I'm going to make a piece that's going to bolt not only to the graphics card, but also to the inside of the case so that if we need to remove the graphics card to replace it with something else, it's pretty easy to do. All right, one more round of cutting. So, we got it over in the bench grinder. We are cutting our flat stock once again. We got everything measured out so we can cut in one run, which is pretty nice. I always I always like to be able to cut things not multiple times because I miscalculated things. So, this was a successful cut and weld run. And we're drilling our last holes here. Uh if you have noticed that stuff I've been spraying on the whole time, that is actually Zep cutting oil. So cutting oil is really good for whenever you're um drilling, cutting, really anything where it's metal on metal. Creates a lot of friction. This stuff basically just lubricates the job that you're doing, and it helps your bits last longer. It also helps you be able to cut through the material easier and quieter as well without generating as much heat. And I got to say, as far as TIG welding goes, TIG welding pieces of angle iron or flat stock together is definitely the most fun in my mind along with like tubing. It's just so much fun because it's nice and clean. You can actually get uh good-looking welds, especially when you're just using something simple like mild steel. And yeah, this is actually pretty much the last major weld that we're going to be doing. You can see the holes are already cut. And then it'll just hold four of those same M3 bolts with the nuts on the other side. And that's how we're going to keep our graphics card super sturdy. And you can see here just how sturdy we're really getting this. So, we're going to put two through the case. We just had to drill two additional holes. Nothing too crazy or cumbersome. That's the nice part about this is I didn't have to drill or modify the GPU at all. So, in theory, this GPU should be easy to upgrade or swap because yes, 9600X, this definitely could handle a better graphics card in the future. I'll tell you what, this my here right here might be the most overengineered GPU I ever done seen. So, we got and I could if if I wanted to, I could just pick the whole computer up by the graphics card. So, I'd say that's pretty good. All right, we got the PC back at the office because I needed to do a couple things here. So, specifically, we ordered that cooler, and I will say this thing is a lot smaller than I would like it to be, but I really don't have time to order another one. Um, that may change. I may have to order another one if this one doesn't work. But luckily to get to this cooler area, I only have to take the power supply off. So, I'm really not too worried about having to replace it again. Um, I did take this off. So, if you remember, this was basically sitting in the front here. This fan is a kind of an odd size. I think it's like an 85 or an 82 mm. You can see here, this fan's too big. What I think I'm going to do is I've already marked, you can kind of faintly see right there. Right there. I'm going to drill new holes to where this fan will go in here like this. I don't even know if I'm going to bother hooking up the RGB or not because I'm trying to keep this thing pretty sle. I guess I could hook it up and then you can just turn it off. It's not a big deal. We'll do that. We got new feet. These are 3D printed uh on the Bamboo Labs printer. And um they're to replace the original. We only had two of like these rubber feet. Luckily, with these being plastic, too, they really shouldn't scratch surfaces too much. And then the last thing, this was like my first mockup. I just 3D printed this. You can see it's not perfect, but I got to where it's like pretty wedged in there, but I don't want it to fall out. So, I made this version, which as long as I didn't do it upside down. Yes. So, that's going to go in there like this. And then I should be able to take like selftapping screws. Nothing too crazy. Just some really small screws and that'll um hold in place. And then, like I said, I need to paint match a lot of this stuff to the case. I'd like to not have to repaint the whole case, but I guess if it comes down to it, it's not the end of the world because almost all of the case is just basically bare primerred metal. So, I just have to take everything out, which isn't a huge deal, and paint it. So, it wouldn't be too bad if I had to do that. But either way, uh we got to make one more trip to Lowe's. Oh, and before I forget, one more update before I start working on the PC some more is I actually posted on a Facebook group that's basically like vintage PC parts. It has like 50,000 members almost. And um I posted the parts and said, "Hey, anyone in the Louisville area that could be interested in this stuff, I didn't say it was free. I didn't give a whole lot of details. Guy named Neil um actually DM'd me and I looked at his Facebook and he kind of does this stuff for fun, it looks like." So, he takes apart like old consoles, old PCs. He said he has a big collection. And he DM'd me and said, "Hey, I'll pay for shipping. I really just mainly want like the board and stuff probably cuz he didn't want to pay a whole lot." And I was like, "All right, buddy. It's your lucky day. Um, you're going to get everything here, the keyboard, the mouse, all of the games, and every single component that was in the old PC." And I sent him pictures of the sleeper, kind of explained who we were. Uh, he seemed pretty hyped. So, um, he actually even sent me some old sleeper cases that are empty that he was like, "Hey, would you be interested in these?" I'm like, maybe, but I need to slow down on sleepers cuz I do them all the time. So, we'll see. It's a cool case, though. But anyways, I'm going to get that stuff shipped to him and let's go ahead and work back on the PC now. So, for our 3D printed feet, we're going to go JB Weld. I could screw them in or find some other ways, but I don't know why. This just feels right. I got to do something goofy with this PC. All right. Now, I know some of you may love JB Weld. Some of you may absolutely hate it. I'm kind of in that middle part where I really prefer welding or screwing things together rather than using JB Weld because I think it's kind of like a uh poor man's way of doing it or like if you're just kind of uneducated on how to do certain things. Um, and in my case, I could have drilled the feet in. I could have found a way to make a more permanent solution, but honestly, JB Weld is pretty darn permanent. If you've ever used JB Weld or like an epoxy, you know that if you do it properly, it can be just as strong as a weld or a screw sometimes. So, in this case, with these feet already being printed, I didn't want to have to go back in and add some type of flush offset so that we could screw them in properly. The J-B Weld actually seems to hold up pretty well for the feet on this PC case. So, right here, we're going through the holes that we had already marked earlier, and I'm just using that same punch tool where I have to use ungodly amounts of force it feels like to get those actually punched in. But now, we're actually using it for really its intended purpose. Um, we're doing these so that the screw bit does not do what we call walking where the drill bit um, essentially tries to go out of where you're trying to drill. So, you'll notice once I actually use the drill bit, it'll stay right in place exactly where I punched that hole. And now, once we got those drilled, you will notice I definitely drill this thing a little bit off. And, uh, you know what happens when you are like me and you're not very precise. So, I found that just doing two screws um, holds this fan in really well and it's mostly not crooked. So, we're going to let that slide and uh we'll see how the airflow actually is once we get to gaming here in a minute. Now, once again, we are using that punch and we're going to go to these four tabs that I 3D printed onto this. It almost looks like a power supply cover, but really it's just covering that extra space between the graphics card and where there used to be almost like motherboard. Um, and it's a really simple 3D print. I am going to paint it along with the case here in a minute. And we're just going to use wood screws to hold this in after I drill these. And yeah, I could just use sheet metal screws, but in all honesty, just using some simple wood screws actually turned out to look pretty good. All right, so we're on pretty close to the home stretch. Um, what I'm doing right now is I'm going to try to remove anything that I don't want to paint. All right, so we got the case emptied out pretty much completely. All of the electronics, everything gone. And the only thing I want to cover up is this stuff here. Um, I haven't really read a lot of it, but I feel like it's kind of cool for home office use. Kind of gives you some of like the history of it, I guess you could say. And then here is all of the insides uh laid out here. Um we did get the new cooler in. I totally forgot to bring it home with me. So that'll probably be a uh I'll go to the office later tonight and grab it. And hopefully um as the paint dries, we'll be ready to put this thing back together uh in the morning. So now I'm doing my least favorite part of painting and that is the prep work. But also that's the most important part of painting anything. So, you can see I'm taking masking tape and I'm covering any labels that I would really like to preserve because if I just start painting, you're never going to see those labels again. And honestly, it kind of just looks like poor worksmanship. So, I'm going to put a little bit of masking tape over any of the labels that I don't want painted. I'm going to put some masking tape over the bottom of the feet so we kind of get like a two-tone for the black plastic feet that I printed. Now, when it comes to painting, once again, I am not great at painting. I'm kind of lazy. I'm just going to kind of lightly coat the case. You let it dry a little bit and you go to another coat. But in my case, I'm not sanding. I'm not waiting super long. I'm literally just going to get a few coats on this thing. And then I'm going to let it dry for probably a day or two because I think that's a really important part um for keeping your paint on. And then we are just about ready to start putting our parts back into the case. All right, I finally got the cooler in. This is the ID Cooling I-S67 XT. And this one I'm confident will keep our 9600X cool. That other one I do not think was going to cut it. I don't know why I bought it. And the case looks pretty darn good. This is that primer gray. You can definitely tell that it's not like the original color if you look closely, but I think realistically it just really helps like these welds and whatnot really blend in. So now hopefully when I put this thing back together, it'll actually look like it's still pretty old. I really hope this came with thermal paste cuz I don't feel like I have any here at the house. Oh yeah, throw a little bit of that in there. Some ID cooling. I'm not even going to clean the old stuff off since it hasn't even been ran. And I've never really been one to worry about thermal paste brands mixing. Pretty cool little low profile fan. Saves you some pretty good clearance. And then uh yeah, here's the cooler. So, the heat die itself is still pretty small, but I feel pretty good about it. It's got a lot of heat pipes and everything. It's definitely thicker than the other one was. Oh, yeah. This is going to look really good. And I think this is going to keep our VRMs and our CPU nice and cool. I think our power supply fan is actually going to be pulling out. I might this might make more sense this way. So, after a day of this case drying, we're going through and reinstalling our old parts and our new parts. Starting off with that fan. So, this is a 92 mm fan, which is a little bit smaller than your standard 120 mil, but hey, they still move a decent amount of air. And uh I realized the motherboard doesn't even have an ARGB connector. Yeah, get that B650 with no RGB connector. I just need to connect the fan. I don't care about the lights because realistically I'm keeping this thing as sleeper as possible. These switches for the most part are pretty standard. I will say I'm going to have to make a little bit of modifications for them to fully work, but for the most part the LEDs and the reset/sleep switch can be configured to go straight into your modern-day motherboard to where you're still use them. And that's what you're going to notice me doing is we're going to use that top reset switch as our power button for now. And later on, I'll actually hot glue a power switch where the actual power button on the right side of the front of the case is. Now, this is such a fun part. We're feeding through all of these cables for this 5 and a/4 aftermarket bay. I'm so glad that companies are making and continue to make these. They're pretty inexpensive. You know, you're looking at like 20 to 30 bucks. Some of them even have like temperature readouts and and displays. Some of them are really simple and have like one or two USBs. I really like these ones that are like the combos where you basically get all the ports you could ever need and more in the front of the case. So, realistically, you can plug so much into the front of this and it's going to match the front beige of our original case front. All right, now for the moment of truth. Does everything fit and does it look good? Let's see. Little bit of finessing to get this on. I will say it was not easy. I definitely had those little five and a quarter blanks that kept popping out of me just like the intro. But hey, you get the idea. All right, now for the fun part of putting that motherboard back in. I've just been leaving that riser cable in there. Hey, it's just me being lazy, but I don't really think it's going to hurt anything. Now, we're putting in that graphics card, which is definitely like I think the chef's kiss of what makes this build um go from like kind of like a boring sleeper to like a serious sleeper. We have an upside down vertically mounted GPU that honestly, even though it's only a 4060, it looks pretty baller. And I think when you guys see the actual performance of this PC, you'll be pretty impressed with it. But I think adding this just makes it look a little more professional. It blends in a little more and it's removable. So if we need to add or take away anything, we can just unscrew that. Now lastly, we haven't talked about this a lot, but the power supply is just standard ATX. And luckily, this build actually had that standard threading from the factory. So I don't have to do any modifications. I was able to put all four coarse thread screws in and have the power supply ready to go. Ladies and gentlemen, I present to you a true sleeper gaming PC. Ladies and gentlemen, we are starting things off on a sleeper gaming PC with arc raiders and we're currently running borderless full screen 1080p DLSS on balance with the transform model and we're running uh ray tracing at medium and medium settings. All right. >> Yeah, we're doing this map for the first time cuz uh trying to get some more action. >> Oh gosh. >> OH my goodness. >> Oh god. >> Whoa. Maybe I shouldn't have had you shoot at that. >> Oh my gosh. Kill a friendly. >> Oh, this is not going to end well. I'm gonna use my last two shots. >> Oh, you got Are you out of ammo, too, bro? >> I don't even know how to heal. >> Go. Come down to my level, Bozo. >> Oh, get him. That guy's Yeah. >> Oh my gosh. He's not dead yet. >> Oh, he's dead. >> Let's go. >> All right. You know what? That's That's enough. >> We got to We got to evac. >> That is enough. >> Here it Oh. Oh. >> Oh god. >> Oh god. If that killed you, that would just crushed me though. That would be insane. Pretty slick. All right, so um 140ish average only 1% low of only like 92. That's pretty impressive. Let's go to the next game. All right, guys. Next up is Marvel Rivals and we're running some slightly higher settings. Uh we're on DLSS set to quality on the high preset. Really running some rate tracing here. And uh no FPS cap, 1080p. We're getting 100 FPS. Whoa, I'm falling. in. We have not benchmarked this game in a while. I'll be honest. But we are benchmarking now, so that's all that matters here. I don't want to see that. Oh no. Hello. Or they they are they are on me. Okay. Okay, team. I don't know what happened there, but it worked. I don't even need to waste my just yet, guys. Just play this with like dead silence for like 5 minutes. >> Yeah, make every other benchmark one minute long, but this just 5 minutes. >> Five minutes of me just >> pushing cart. >> Pushing guard over here. Oh, watch that. WATCH THOSE SQUIRRELS. WATCH THOSE SQUIRRELS. OH, HE JUST GOT SQUIRRELED. >> I got squirreled. That thing does damage. Oh, heed you back. >> Eight bullets. >> ONE. >> OH GOD, NO ONE'S HERE. >> THE SQUIRREL'S MAD. >> No one's here. >> Oh, he's going t WW. Hey, 124 average, 1% low of 72. Should we watch another game? >> All right, I had to honor Windows 95 a little bit. We got the original Quake. Uh, this came out in like 1995 or six, I think. I'm apparently not good. U, we are running the max settings though. So, uh, we're running 4K, by the way, just with everything as high as it could go. >> This has to have a little bit of remastering done cuz this looks way too >> You think so? >> It could just be the 4K. >> It could be just 4K cuz it actually looks pretty dang good. >> But maybe maybe there's some remastering. Maybe the game looks better than we thought it was. You know, >> it's peak. >> Oh my goodness. I'm going till I die. >> This game's not built for the zoomers and we're we're only using uh 2 and 12 gigs of VRAM. >> Yeah, that is We don't have much left, Matt. >> We don't have much left. We're not going to be Oh, I got to shoot that. Such a puzzle game. This is the OG Tomb Raider. >> Dude, they can't even kill me if they wanted to. Dude, we're we're putting these guys to rest on God. >> You're in the goo with the with the undead. >> Freaking come at me, bro. Hey, Quake Gran. Pretty good. Uh, we got we have two >> Oblivion and what was the other one you want to replay? >> Uh, Hell Divers. >> Hell Divers. >> All right, let's go on to the next game. >> All right, guys. We are in Hell Divers 2 running the following settings. We go to display. We're doing some 1440p gaming here with some balanced upscaling. Medium, high, mainly medium, but some high settings. >> It's a Goober Goblin. >> Get a grenade IN THERE. OH. OH GOD. ORBITAL precision strike. GO. BOOM. OH MY GOD. >> YEAH, BUDDY. Oh goodness. >> That's one of those things. >> I'm running. >> I was like that. That's on your head, boy. >> Yo. >> Yeah. >> OH MY GOD. >> I GUESS IT WASN'T. UH, can I get uh a resupply? Right on my head. All right, last little wave here. I'm not really doing any of the object. I guess I just supposed to kill him, so I am kind of doing the objective. >> Mhm. >> Boom. Boom. Boom. VRAM. Not even close, right? 4.7 gigs of VRAM being used at 1440p here. >> Solid. >> Not too bad. This is working pretty good. Is this an anti-tank weapon? Oh, there's right there. >> BOOM. Hell divers looking good. I could do this forever fighting all these people. But we're going to move on to the last game, the return of the legend himself, Bench Marcus. All right, guys. Horrible news. Uh, this is not Benchmarkus. I I'm so sorry. I forgot this is my account. But we are in the bright side running 1440p medium settings uh with ray tracing on low, DLSS balance. We are using some frame gen uh because as you can see, very demanding Unreal Engine 5 game. And uh we got a this is a pretty demanding area. Kind of like a white run in Skyrim. Let's run around here. The old PC, we have to play some old games that are remastered. Oh, we're we're taking over this guy. >> Go get him, boy. Go go go get Go get him. Stop right there, civilian. I like how they talk to you. Resist arrest. >> Stupid skeleton. >> This guy looks like he's ancient, too. He's pretty. Oh, and you got someone shooting you with a bow in the background. >> They don't want me. They do not want me. How did I summon that dude? See? >> Get in there, boy. >> Jack skeleton. This guy's got no shields. You can bum rush him. You can get him. >> Okay. Apparently, I CAN'T BLOCK. >> OH MY GOD. HE ONE TAPPED MY SKELLINGTON. >> OH NO. OH, this guy's a go. This guy's a god. >> Oh no, here comes the shield. Oh, this might be it for you. >> You're going to PAY WITH YOUR BLOOD. >> I pay with my blood. Well, hey, 1440p, even though we're using almost all the VRAM, still played it at over 100 FPS with some frame gen. And >> that was it. That's the benchmark run. >> All right, let's run OCCT and uh see what type of attempts we get. All right, guys. So, the sleeper build definitely turned out pretty good. And uh overall, this one I think is actually a true sleeper. I know you guys have been like begging for that for a while. you're like, "Stop doing the resto mods. Make this one actually look old." And from the outside, you really can't tell that it's not a Windows 95 PC. >> It's a pretty cool way for us to take a PC that, well, was a bit of a disaster on its arrival and was an original concept of uh actually diving down the Windows 95 rabbit hole, but we're able to actually pass on those parts to somebody who's going to really use them for good and then also take the case and do what we know how to do well, a sleeper mod. Now, I told you guys I was going to run OCCT. So, you can see on screen here, I just ran two five minute tests. I think this thing got to operating temp pretty quick. For the CPU, the max we saw was about 84.8C. The GPU, the max was about 67 C. So, not too bad on the temp side of things. And for 30 mark time spy, we got a score of 10,839, which spending 1,78 bucks total on this build is a 10 cents per point score. So, hope you guys enjoyed this sleeper mod. Once again, price performance is not always going to be the best with these mods, especially with how much this case actually was when you originally bought it, but it still turned out really nice, and we always like doing these projects. So, if there's any other cases you want to see here on the channel, maybe something a little more modern or we could go even older, let us know in the comments down below. We would love to try to build a gaming PC inside it. But, as always, we hope you guys enjoyed today's video. If you did, make sure you check out our other two YouTube channels and also our twitch.tv/toastybros. And do not forget to like, comment, and subscribe. >> See you guys on the next one. Bye-bye. Now, believe it or not, this PC will be for sale at pcbros.te. Pretty much all the really cool builds that we do here at the YouTube channel go over to PC Bros. >> pcbros.te. You can also buy merch from us like this build mat which is really awesome for those who love to build gaming PCs. You can buy some t-shirts. You can buy a bunch of other cool stuff. If you love the Toasty Bros or you want a gaming PC like Jackson mentioned, PC Bros got you covered. You just go to Toast toasty Bros on checkout. You will save 3% of your next purchase. See you guys later. Bye-bye.
Video description
Thanks to SURI for partnering with me! Shop here https://suri.yt.link/PhjK64M and use my code to get extra 15% of SURI — you’ll see why I love it so much. Originally we bought a fully working Windows 95 Gaming PC….. and it showed up broken. We tried our best to get it working again so that we could test some old games but ultimately the seller gave us a really good partial refund! We’re going to open this PC up, recycle/repurpose the original parts, and then install our sneaky new parts! Time to make an old build with new parts. Originally the PC was $336.62 and now after refund we are $114.02 in. Original video concept - https://www.ebay.com/itm/297932482285 We’ve had a lot of people ask us to revisit good ol Windows 95 for Gaming… So today we are! We bought a NEC PowerMate P2200M desktop with some good upgrades inside for Optimal Windows 95 Gaming! We also got 10+ Windows 95 games to try out…. Let’s see if some 90’s and 2000’s kids can understand and game on Windows 95! NEC PC Intel Pentium 200Mhz, 65MB RAM, 2GB HDD, ATI 3D Rage ii GPU, Creative Labs 16 Sound Card, CD Drive, Windows 95B - $310.00 Microsoft IntelliMouse PS2 - $18.00 AST 5140M Gaming Clicky PS2 - $23.00 Frogger He’s Back, Quake, LOT Of Vintage Games - $56.00 $440 total before tax spent Windows 95 FULL build and setup guide for 2020’s - https://www.vogons.org/viewtopic.php?t=36770 AMD Ryzen 5 9600X 6 Core 12 Thread Amazon: https://amzn.to/3OYvrNg Newegg: https://newegg.io/ncf4c38d78 Asus Rog Strix RTX 4060 8GB GDDR6 3 Fan Amazon: https://amzn.to/4sJ7599 Newegg: https://newegg.io/nc76826658 eBay: https://ebay.us/EYtguR ASRock B650M-HDV Amazon: https://amzn.to/3N32wqH Newegg: https://newegg.io/ncbe85dc7d 1TB Samsung 990 Evo Plus Gen 4.0 Amazon: https://amzn.to/4rUxC36 Newegg: https://newegg.io/nc20ecd354 Corsair 32GB DDR5 (2X16GB) RGB 6000Mhz Amazon: https://amzn.to/46Bc9DU Newegg: https://newegg.io/nc50f51de1 Rosewill VMG 750W 80+ Gold Amazon: https://amzn.to/46ZsrXp Newegg: https://newegg.io/ncd0e99c9b ID-Cooling Low Profile Cooler Amazon: https://amzn.to/4cs3aZf Okinos Gen 4.0 Riser Cable Amazon: https://amzn.to/3N38AQa This channel contains affiliate links for which I may be compensated. Buy a PC from us! - https://pcbros.tech/ "ToastyBros" to save 3% Want to win a PC? Follow us on Twitch - https://www.twitch.tv/toastybros 👉 Follow us on X - https://x.com/ToastyBrosTech 👈 👉 Buy our Merch! - https://pcbros.tech/collections/pcbros-merch 👈 👉 Follow us on Instagram - https://www.instagram.com/toastybros👈 👉 Discord Community - https://discord.gg/toastybros 👈 👉 TikTok - https://www.tiktok.com/@toastybrosofficial 👈 The Toastybros is comprised of Matt and Jackson, two tech heads with a passion for creating content. They have been creating content for years on YouTube and the Toastybros has become their most successful channel. Please consider subscribing to see more content like this! ✌👊