We can't find the internet
Attempting to reconnect
Something went wrong!
Attempting to reconnect
Sleeved & Slabbed · 2.1K views · 63 likes
Analysis Summary
Ask yourself: “Is this structured to help me understand something, or to keep me watching?”
Curiosity gap
Creating a deliberate gap between what you know and what you want to know, triggering curiosity as an almost physical itch. Headlines like "You won't believe..." are engineered to exploit this. The content rarely delivers on the promise.
Loewenstein's Information Gap Theory (1994)
Worth Noting
Positive elements
- This video provides a clear, practical look at the physical tools and chemicals used in card cleaning and pressing, which is often kept secret by professional restorers.
Be Aware
Cautionary elements
- The video frames 'beating the grader' as a repeatable success, which may encourage novice collectors to accidentally devalue expensive cards through permanent alteration.
Influence Dimensions
How are these scored?About this analysis
Knowing about these techniques makes them visible, not powerless. The ones that work best on you are the ones that match beliefs you already hold.
This analysis is a tool for your own thinking — what you do with it is up to you.
Related content covering similar topics.

Day 211 of Collecting EVERY Pokemon Card Master Set! #pokemon #pokemontcg #pokemoncards
Danny Phantump

Day 209 of Collecting Every Pokemon Card Master Set! #pokemon #pokemoncards #pokemontcg
Danny Phantump
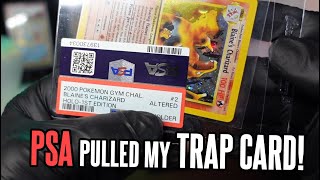
THIS happened when I graded REPAIRED Pokemon cards!
Slab Rehab
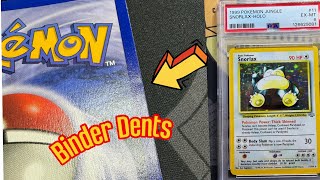
Pokémon repair - Dents and Scratches
Kurt’s Card Care
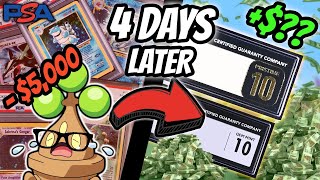
Regrading PSA to CGC Made Me THOUSANDS (IN 4 DAYS!)
Fredy Cards
Transcript
All right, guys. Today we are restoring my Lugia from Neo Genesis. Uh, one of my favorite cards of all time. I purchased this card a few weeks ago at a card shop uh because I thought it was a clean copy. There's not a whole lot of whitening on the back and there's no whitening on the front, which is awesome. Uh, but the hollow is scratched to and unfortunately there's a huge dent in this card. It's kind of hard to see if you don't have it under the right light, but uh there's a mean dent, and unfortunately that deems this card damaged. Um a dent like this is something we can hopefully work out of the card and make it less visible. Um but when it comes to grading, a dent like this really affects the grade. Uh we're talking like a few points, not just like a point or two. a dent like this uh pushes the card into that damaged threshold. So, that being said, we are going to grade the card. You're going to see the grade results at the end, and I'm I'm super thrilled. Um I'm super excited about it. So, we definitely had a great transformation on this card. That being said, let's start like we always do. Just give the card a quick clean with card spray. want to make sure there's no dirt or any other sort of residue that's sitting on top of the card. You know, as we start working into the hollow and and pressing the card, uh, anything that's sitting on top of the card is just going to cause more problems. So, always good to start with a clean slate front and back and then we'll move on to the hollow. So, what we're doing right here is we are trying to restore some of the shine in this hollow right now. We're not necessarily buffing scratches out. Uh just trying to make make the hollow pop again. And when you have scratching like the scratching we have on this card. Uh I call it sandpaper scratching because it literally looks like someone took 80 grit sandpaper and just uh went to town on the hollow. So, what we're trying to do is bring the shine back through those light scratches. We'll take a wipe wipe down with the microfiber cloth so we can kind of see where we're at. Again, the goal with this step is not to make a ton of progress, but just to get exactly what you're looking at. You can see the hollow is is shining again. It has that pop. It has that reflection. Um, so that's step one. And that's honestly really good progress so far. Step two, one of the most important steps is to actually use the polish to buff out some of these scratches. So you can see I'm doing just really small controlled circular motion. Um I'm not using a ton of pressure here. Just just trying to get good coverage across the card. And I'll skip through some of this because uh this process probably took 20 maybe 30 minutes. Um I did a couple passes with the polish. So you can see here this is you know round two. Just really want to make sure we're getting as much coverage as we can and wiping it down in between in between runs. So now I'm going reverse. Kind of the same strategy, but um going clockwise this time instead of counterclockwise. And then anytime I apply polish to the hollow, I apply it to the rest of the card as well. You don't want to have, you know, a look or feel or shine um in one part of the card and not on the rest. You want it to have a seamless look to it. And so we're going to make sure we cover the whole card. Let's give it a wipe down. Make sure we get as much of this product off the card as we can because like I've said in my other videos, the goal with the polish is not to have like a layer of polish on the card. You don't want like a a thin coat of polish. You want the polish to get into the card, into the cracks and the scratches, and then you want to get it back off. All right, let's take a look. And that looks a whole lot better. Wow. All right. Now that we've gotten the hollow taken care of, we are going to put the card between two damp foam pads. So, I used card spray on the backside pad. Just kind of wiped it in. don't want a ton, but you want the card uh to sort of sit in an environment with some moisture. Um, and we're going to press the card that way. This has a similar effect um to like a humidor. You know, I have a humidor. Um I don't use it a whole lot anymore because the problem with the humidor is you get the cards uh in the environment, you know, that damp moist environment and then they curl. And when they curl, it's just a little bit harder to, you know, get the card back to flat. It just adds extra steps. So, the idea here is to put it in that same sort of environment, but put it in that environment where it's clamped down, uh, it's pressed. Always make sure you wipe down your plates. Even if um you're using foam pads, you want to make sure those plates have nothing on them before you press into the card before you apply pressure. Again, with the foam pads, you have a little bit more forgiveness, but if there's something on that plate and you put it under all that pressure with, you know, all the different clamps, uh you're risking indenting something into the card. So, let's fly through this process. Let the card sit for about six hours in that environment and let's see where we're at. So, the goal with that was not actually to press the dent out. Uh that was more or less just to put the card in a flat environment and make it a little bit more workable. So, we're not expecting to have made a ton of improvements, even though we made a little bit. The goal here was just to get the card in a workable state so we can move on to the next step. So, what we're going to do now is put the card in a fresh penny sleeve so that we can get ready for the direct press. Always use a brand new penny sleeve when it's going under direct pressure. might seem a little obnoxious, but not taking chances. So, I already wiped these pads down. Like I said, just made sure there was nothing on them. I put the card to the right side of these plates so I can really get extra pressure in that corner where we have that dent. So, now we're hoping to have to have actually gotten somewhere. Not perfect, but you know, we just we want to slowly start chipping away. Seeing if we can't press this card back to flat. Now, a dent like that, you can't um you can't fix it perfectly. You cannot give the card more dimension where dimension has been taken out from some sort of pressure. But what we're trying to do is flatten the rest of the card around it when the card's damp so that when it expands back out, that dent is is not as much of a an eyesore. You can't see it as much because it's technically not as deep as it was. So next step, we are going to apply some moisture directly to sort of this dent the the the corner that it's in. The reason we're doing this is because we're going to put it back in the penny sleeve and try to work this dent with one of my tools here. So the goal here is not to literally press the dent out. We're actually just working the fibers around the dent so that the card becomes just a little bit more flexible, a little bit more malleable. So, this process right here is not one that you're going to see a ton of improvements, but it's really, really important to do this before our next press. Again, just working the fibers, trying to make the card a little bit more malleable. I probably spent 101 15 minutes doing this, so I'm going to skip through it. You guys kind of get the idea. And we're going to do another direct press. Now, if we were trying to flatten this card out because it was curved, I'd probably be using pads here. But what we're trying to do is work out this dent. So, we're going to apply extra pressure in the corner that needs it the most, and we'll let that sit for a few hours. All right, let's take a look. Now, we're starting to we're starting to get somewhere. So, I actually repeated this process just one more time, but I'm going to spare you guys for the video because you kind of get the gist here. But if you remember the before videos, I mean that dent when it hit the light, you could see it clear as day. It's really tough to see it in there. There you go. So now under the, you know, direct light in that exact spot, you can still see it, but it's a whole lot less visible. Again, guys, I paid $260 for this card in its damaged state. So the goal here would be so that it grades somewhere in the six range. I mean, that that is a huge improvement. So, we're really hoping that pays off. That six range puts me in uh a break even or profitable environment. So, I really really hope we can get a six. I think a five would be fair. I don't really know. I don't know how much the dent is going to affect it. So, let's find out. 6.5. We take that for sure. All right. So, there's not a ton of sales history on this card, but there was a new label, CGC 6.5, that just sold on eBay for 400 bucks. So, that's a huge W. We'll take that any day. Uh, that definitely makes this profitable for us. Look, if you guys like videos like this, I just restored and graded my Shadowless Charizard, so check that out. Hit the subscribe button. We got more coming.
Video description
In this video I attempt something that many collectors say you should never do… I restored a damaged vintage Lugia Pokémon card and then sent it to CGC for grading to see what would happen. Could the restoration actually improve the grade? Would CGC detect the work that was done to the card? Or did I completely ruin a vintage collectible? From cleaning the card to preparing it for submission, you’ll see the entire process — and finally the moment of truth when the CGC grade is revealed. This experiment raises a big question in the Pokémon card world: Can restoring a card actually increase its value… or is it always a mistake? Let me know in the comments what grade you think it deserved. Subscribe if you enjoy Pokémon card restorations, grading reveals, and vintage Pokémon content. #PokemonCards #PokemonCardRestoration #Lugia #CGCGrading #VintagePokemon